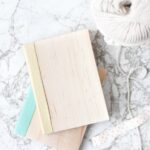
DIY Journal Covers
DIY journal covers and notebooks made of leather and wood! Super cute and make great gifts too.
After yesterday's confession, I'm feeling a little bit more on track for the new year. So, I made some DIY journal covers / notebooks to give us all (myself included) an extra push in the right direction.
If there's anything that can get me inspired to plan for the future, it's a shiny new notebook. Am I alone on this? Or do you know what I'm talking about here?
To make these little guys extra special, I thought I would cover them in maple wood veneer and leather. How's that for fancy notebook inspiration?!
Materials
- mini composition notebooks mine are from Amazon
- thin wood veneer mine is maple - from a local woodworking store
- scrap leather
- heavy duty craft glue
- scissors
- textile paint and paint brush if you plan to colorize your binding
- chip clips
Instructions
Cut leather and wrap it.
- Cut a piece of leather that is slightly larger than what you'll need to cover the binder edging of each notebook.
- To measure, just place the edge of the leather over the black binding of your notebook. Then, wrap it around the back side and mark with a pencil before cutting.
- You'll want to leave at least an extra 1/4 inch of overhang on each side of the length of the binding (as shown in the photo).
- *If you plan to paint the leather, do so before moving on to step 2.
Attach the leather binding.
- Next, attach the leather to the binding of the notebook with glue. I applied the glue to the leather and then attached it to the notebook, but you can apply the glue directly to the notebook instead, if you prefer.
- Attach a long chip clip to the leather after attaching (Not shown in the photo steps, but I did actually do this and it works great).
- This will act as a clamp while the glue is drying.
Cut the wood veneer.
- Once the glue has had time to dry (drying times vary based on the type of glue you use), cut two pieces of wood veneer that are slightly larger (about 1/4 inch excess all the way around is great) than what you'll need to cover the front and back of the notebook.
Attach the wood veneer and clamp.
- Attach the first piece of veneer to the front of the notebook, with glue. Be sure to butt the wood right up to the leather binding. Then, flip it over and attach the second piece of veneer the same way as the first.
- Clamp the wood with a chip clip and wait for the glue to dry. Once dry, remove the chip clip.
- Then trim all of the excess wood and leather from the edges with a sharp pair of scissors. And it's ready to use.
- I ended up painting some leather turquoise and hot pink before attaching it to the notebook. And left a few plain, to let the gold leather have a moment in the spotlight.