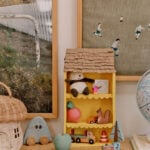
Cardboard Dollhouse from a Cereal Box
Cardboard dollhouse DIY - a fun easy project to work on with kids! Use it as an actual dollhouse or for toy storage.
Cost: $0
Equipment
- Scissors
- glue gun
- paint and paint brush
Materials
- cardboard cereal box
- thicker cardboard (from a shipping box is ideal)
Instructions
Cut the cereal box.
- Start with a cereal box and some thicker cardboard from a shipping box. Carefully cut the front panel from the cereal box, leaving all other sides intact.
Reinforce with more cardboard.
- Reinforce the inside of the box (back panel, sides, and bottom with thicker shipping box cardboard. Use a glue gun to attach.
Build and attach the shelves.
- Then start building the shelves. I just measured the inside of the box and cut cardboard pieces to fit. I doubled them up to make each one more sturdy and then added little support flaps underneath each shelf.
- Glue them into the inside of the box at varying heights.
Add decoration.
- Add a decorative edge to each shelf, like scallops, if desired, with more cardboard. Glue them on.
Make a roof.
- Roof time! I'm sure there are easier ways to make the roof, but here's what I did... I glued some cardboard flaps to the front and triangles to each side to create the roof angle. Once those were glued to the top of the cereal box, I glued a larger sheet of cardboard to the flaps and the triangles on the side. Then a back plate.
Paint.
- Time to paint. Paint the dollhouse base (everything but the roof) whatever color you decide. You'll likely need a few coats.
Make and attach roof shingles.
- Next, cut little rectangle shingles for your rooftop. It will save some time if you paint the cardboard first, before cutting all the shingles. Then glue the shingles onto the roof cardboard with hot glue. Start at the bottom and work your way up, one row at a time.