
If you don’t have much time to DIY holiday gifts this year, this project is for you! It’s a semi-handmade idea that will add a personal DIY touch to nearly anything you can think of…metal, glass, wood, paper, etc.
I’ve partnered with Testors, a company that has specializes in products for hobby, craft, and home decorating, to add a subtle winter white ombré finish to a whole bunch of fun little gifts and decor items that I bought at a handful of local stores.
I tried their airbrush kit on for size and basically painted anything and everything that wasn’t nailed down (this thing is really fun to use)… Copper candle containers, holiday bells, a perfume bottle, a vase, etc, etc.
And today I’m sharing how you can use an airbrush like mine to add a DIY touch to store-bought gifts for the holidays, while simultaneously airbrushing everything else your house too. 🙂 Click through to see all the holiday gift ideas that you can recreate in hurry!

In case you’re curious to know how easy or difficult airbrushing is, on a scale from 1 to 10 (10 being the most difficult), I’d say it’s a 3. As in, very easy! It seems intimidating at first but it’s actually really straightforward once you get it assembled. Yay!
Here’s what you’ll need to create a winter white ombre’ finish on store-bought gifts…

Materials
- Testors AZTEK airbrush
- Testors AZTEK propellant
- airbrushable acrylic paint (any color – but mine is pearl white)
Instructions
1. Attach color cup (where paint will be added) following the directions that came with your airbrush. It basically just clips on. Super simple. After you’ve added your color cup, you can hook up the airbrush cord to the propellant can.

2. Next, add paint into color cup. Just make sure it is airbrushable acrylic paint (it will be thinner than regular acrylic paint).

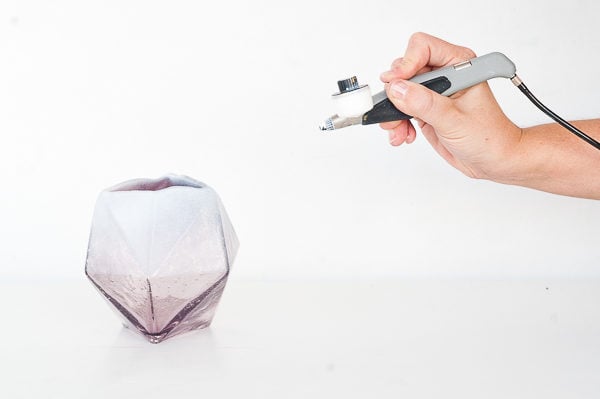
3. Hold airbrush similar to a pencil (see photo) and press on the trigger (button lever) to release paint. Test out on paper first to get the feel for it. It might take a few second for the paint to start coming out.
4. Once you have a feel for it, grab a giftable item (like my geo glass vase) and get to airbrushing! Move the airbrush back in forth in long strokes, as you have you finger on the trigger, pushing down and pulling back.
5. Apply multiple layers is desired. Let the paint dry completely before touching or using. And that’s it! Now you know how to airbrush pretty much anything you can think of!
Super simple, right? Here’s how a few of the pieces turned out…


Looking for more giftables to give a DIY airbrush look to? I really like these copper container candles for gifts and gold holiday bells for decor. You could also make your own candles and then airbrush the container or get more DIY gift ideas here.
So, what’s my verdict on airbrushing? I love it! But why not just use spray paint? Because I’m guessing you’re wondering what the answer to that question is. Don’t get me wrong, I’m not turning in my spray paint keys anytime soon, BUT, airbrushing is a little different than spray paint…in a really good way!
After playing around with the tools for this project, it seems like airbrushing has more control than spray paint and you can definitely achieve a more natural / subtle ombre look (along with a bunch of other techniques that I haven’t even tried yet). It also works really well for creating build-able layers, which would be especially cool with multiple colors, etc. More info here. Can you tell I’m into this thing? It’s my new little craft toy. 🙂


Photography Amelia Tatnall Lawrence
Styling Brittni Mehlhoff
Have you ever tried airbrushing before?! What do you think of the finished pieces.
—
This post is in partnership with Testors. Thank you for supporting the brands that help keep Paper & Stitch running.
5 comments | Click here to reply
[…] partnered with Testors, who you may remember from may last airbrushing project, to bring your some DIY ideas that are going to be shoe-win. And if you’re still willing to […]
Freshen up Old Shoes with this DIY Shoe Makeover (3 Ways) for SpringThanks Michelle. Much appreciated.
BrittniOh my, the things look amazing! So pretty!
Michellehttps://www.makeandmess.com/
It’s really fun, Jessica. You should give it a try sometime!
BrittniI’ve never tried airbrushing before but oh my god all the objects look amazing at the end! x
Jessica — NinetyCo
Jessica