Once you learn how to make soy candles, you’ll make them forever. I started in 2014 and am still making them to this day.

Over the years, I’ve made DIY soy candles many times – as gifts for friends, family, and myself. Great Mother’s Day gifts and Christmas ideas especially!
And one of the reasons I love it so much is bc the process of making soy candles is much easier than it seems. Like MUCH easier.
It’s one of those things that once you learn, you’ll always make them when you find yourself with some wax and a pretty container to use.
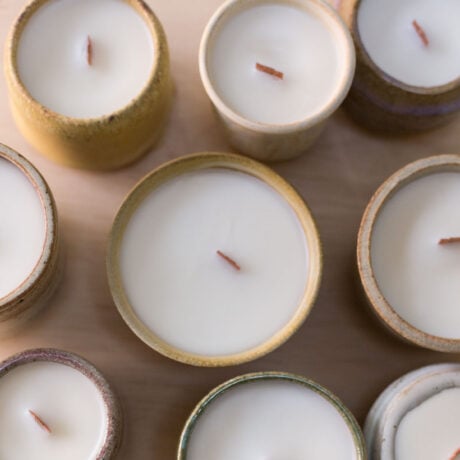
And because I recently stumbled on a ton of beautiful, tiny, pottery pieces that would be perfect for candle containers, I made a big batch for my son’s teachers and staff at his school.
They were a huge hit and I managed to snag a few photos before I gave them all away. So I figured this tutorial was ready for a long overdue update, with new candle making tips, new photos, and a pretty drastic side by side of the very first candles I made and what I make now.


Why do you love making soy candles so much?
Well, lots of reasons! But here’s a few…
- You only need a handful of supplies to complete a number of candles all at once, that you can gift to others or keep for yourself.
- You can make scented soy candles or ones with no scent at all.
- You can make candles without any color or super colorful ones.
- And you customize the container to suit your design style (my personal favorite).
For all of those reasons, I put together a more complete (and updated) guide for making soy candles that walks you through all the steps and gives you options for variations.
Like scented vs unscented, colored candles vs uncolored, AND how to get that perfectly smooth candle top you always see from professionals.
Here we go…
Materials List for DIY Soy Candles
- small decorative containers*
- soy wax flakes (1 lb bag for up to nine small votives)
- candle wicks with metal tabs OR natural candle wicks / wood wick
- fragrance oils or essential oils (if scenting your candles)
- wooden spoon for mixing
- candy thermometer / something to read wax temperature (optional)
- pouring pot or other heat safe container
- larger regular pot for boiling water
*I found some really cool handmade pottery locally and collected it for a while before I finally had enough to do a big batch of candles. Thrift stores, garage sales, and places like Etsy are great places to look for small vessels like the ones I found.
As another option, you can reuse old containers that were once used for candles, by removing the wax and wick. It’s a very simple process, which I outline here: easy planter hack. And for the containers you don’t end up using, you can turn them into planters.

How To Make Soy Candles
1. Prepare the pots and pour the wax flakes.
Add water to a large pot (just a few inches of water is fine). Then, turn on the stove to medium heat.
Next, pour soy wax flakes into the pouring pot and then place the pouring pot into the larger pot of water – double boiler style.
2. Melt the wax and stir.
As the wax starts melting, stir it with a wooden spoon. Stir every so often until all the flakes have melted completely and the melted wax is transparent.
*Once the wax is transparent, you can add color if desired. I almost never add color to mine because I love the natural color. But I did explain exactly how you can add color below in the ‘how to add color to soy candles’ section right below the steps.
3. Let the melted wax cool a little.
Remove from heat and let the wax cool for a few minutes. The ideal temperature is 130-140, if you have a candy thermometer available to check the temperature.
4. Add scent to your soy candle, if desired.
Now, if you want to make your candle scented, pour in the scent you’d like to use and stir. But again, make sure the wax has been removed from the heat before adding scent because otherwise, the scent may evaporate from the wax.
I used essential oils, but you can also use fragrance oils (which you will not need as much of to produce a noticeable scent).
Need a starting point? 15 drops of fragrance oil or 20 drops of essential oil is a good start to make one scented small to medium size candle. But a more precise rule of thumb for fragrance is one ounce for every pound of wax.
FYI – It will smell more potent in melted wax than it will in your completed ready-to-burn soy candle.
5. Add wick to each container.
While you are waiting for the wax to cool, add a wick and metal tab to each container. If necessary, assemble the two pieces, but the ones I have linked come pre-assembled to make it easy!
I like to dip a tiny bit of melted wax onto the metal tab and then place it in the center of the container. The melted wax hold it in place, so it will stand up on its own.
You can also use a dab of hot glue instead of the melted wax, if you prefer. Or as another option, some candle wick kits (like this one) come with little stickers for the tabs that you can use to attach them to the container.
6. Pour the wax into the containers.
Next, pour the wax into each container, avoiding the wick if possible. And wait for the wax to set up completely (12-24 hours) before moving or handling at all. I usually let my candles set up overnight.
As the wax starts to set, it will get less and less transparent, until it’s fully opaque.
7. Let the wax set and trim the wick.
Once fully hardened / set, it’s almost ready to use. First, you have to trim the wick down to 1/4 inch. Then, its ready to use.
Also wanted to mention, that you’ll want to continue to trim the wick length every time you light it for safety and even burning.


How to Get Perfectly Smooth Candle Tops
Ever wondered what the trick is for getting perfectly smooth candle tops every time?
Here’s what I learned after the first few times I made soy candles. Which is why one of my original batches in the white and blue containers have a few imperfections on top – I hadn’t learned this part yet…
Use a heat gun.
Specifically, I’d recommend an embossing heat gun! That’s bc it’s small and doesn’t blow the heat around as much as some of the others.
So, once your candle has set up for 24 hours, if there are any cracks or craters on the top surface, you can use the heat gun to fix it.
Turn on your embossing heat gun and use a circular motion around the entire candle, not just the spot with the imperfections.
Go around and around, while trying to avoid the wick as much as possible (so the wick doesn’t burn).
Once the entire top surface has melted, just let it set back up (maybe an hour or so). And then you’ll have a smooth candle top.
You can see how smooth the candles look with this trick in my most recent batch of candles vs the first ones I made back in 2014. Wooof! Quite a difference.

How to Add Color to Soy Candles
If you’d like to add color to your soy candles, you’ll want to purchase dye blocks or liquid dyes for candles.
Dye blocks generally produce more vibrant or darker colors and liquid dyed usually produce pastel / lighter shades for soy wax candles.
Either way, you’ll add in the color once the soy wax has completely melted, before you add any scent. Make sure to stir the color in thoroughly.
Can I use crayons to color soy wax?
No! Basically, crayons have stuff in them that doesn’t make it good for adding to candles. Essentially, they don’t burn well. So don’t add crayon wax for color.
Should I use a candle wick centering device?
You can, but you don’t have to. A wick centering device can definitely help keep your wick stay, well, in the center. It’s not required though. So, it’s kind of up to you.
I don’t use one, personally. But some candle wick kits actually come with one, like this, so if you have one, use it. If you don’t, don’t.
What should I do with leftover soy wax?
If you have any smaller, additional candles (or even tea-lights) that you’d like to make, they’re great for using up leftover soy wax that is still in it’s melted state.
You can also wait for it to harden back up and use a couple small chunks in a oil burner / wax warmer if you have one (assuming your wax has been scented).
Otherwise, I just leave the remaining wax in the same container I first melted it in and reuse it again next time I’m ready to make candles. So easy!


The Complete Guide to Making Soy Candles
Ingredients
- small decorative containers*
- soy wax flakes 1 lb bag for up to nine small votives
- candle wicks with metal tabs OR natural candle wicks
- fragrance oils or essential oils if scenting your candles
- wooden spoon for mixing
- candy thermometer / something to read wax temperature optional
- pouring pot or other heat safe container
- larger regular pot for boiling water
Instructions
- Add water to a large pot (just a few inches of water is fine). Then, turn on the stove to medium heat.
- Next, pour soy wax flakes into the pouring pot and then place the pouring pot into the larger pot of water - double boiler style.
- As the wax starts melting, stir it with a wooden spoon.
- Stir every so often until all the flakes have melted completely and the melted wax is transparent.*Once the wax is transparent, you can add color if desired. I didn't add color to mine, so I didn't include it in the steps. But I did explain exactly how you can add color below in the 'how to add color to soy candles' section right below the steps.
- Remove from heat and let the wax cool for 5-10 minutes. The ideal temperature is 130-140, if you have a candy thermometer available to check the temperature.
- Now, if you want to make your candle scented, pour in the scent you'd like to use and stir. But again, make sure the wax has been removed from the heat before adding scent because otherwise, the scent may evaporate form the wax.I used essential oils, but you can also use fragrance oils (which you will not need as much of to produce a noticeable scent).Need a starting point? 15 drops of fragrance oil or 20 drops of essential oil is a good start to make one scented small to medium size candle. But a more precise rule of thumb for fragrance is one ounce for every pound of wax.FYI - It will smell more potent in melted wax than it will in your completed burning candle.
- While you are waiting for the wax to cool, add a wick and metal tab to each container. If necessary, assemble the two pieces, but the ones I have linked come pre-assembled to make it easy!I like to dip a tiny bit of melted wax onto the metal tab and then place it in the center of the container. The melted wax hold it in place, so it will stand up on its own.You can also use a dab of hot glue instead of the melted wax, if you prefer. Or as another option, some candle wick kits (like this one) come with little stickers for the tabs that you can use to attach them to the container.
- Next, pour the wax into each container, avoiding the wick if possible. And wait for the wax to set up completely (12-24 hours) before moving or handling at all. I usually let my candles set up overnight.As the wax starts to set, it will get less and less transparent, until it's fully opaque.
- Once fully hardened / set, it's almost ready to use. First, you have to trim the wick down to 1/4 inch. You'll want to continue to trim it to this length every time you light it for safety and even burning.
Notes
How to Get Perfectly Smooth Candle Tops
Ever wondered what the trick is for getting perfectly smooth candle tops every time? Here's what I learned after the first few times I made soy candles (which is why one of my original batches in the white and blue containers have a few imperfections on top - I hadn't learned this part yet)... Use a heat gun, specifically, I'd recommend an embossing heat gun! That's bc its small and doesn't blow the heat around as much as some of the others. Once your candle has set up for 24 hours, if there are any cracks or craters on the top surface, turn on your embossing heat gun and in a circular motion around the entire candle, not just the spot with the imperfections. Go around and around, while trying to avoid the wick as much as possible, until the top surface has melted and then let it set back up. Should take less than an hour and then you'll have a smooth candle top. You can see how smooth the candles look with this trick, in the candle in the tan pottery vessel.How to Add Color to Soy Candles
If you'd like to add color to your soy candles, you'll want to purchase dye blocks or liquid dyes for candles. Dye blocks generally produce more vibrant or darker colors and liquid dyed usually produce pastel / lighter shades for soy wax candles. Either way, you'll add in the color once the soy wax has completely melted, before you add any scent. Make sure to stir the color in thoroughly.Can I use crayons to color soy wax?
No! Basically, crayons have stuff in them that doesn't make it good for adding to candles. Essentially, they don't burn well. So don't add crayon wax for color.Should I use a candle wick centering device?
You can, but you don't have to. A wick centering device can definitely help keep your wick stay, well, in the center. Haha. It's not required though. So, it's kind of up to you. I don't usually use one, personally. But some candle wick kits actually come with one, like this, so if you have one, use it. If you don't, don't.What should I do with leftover soy wax?
If you have any smaller, additional candles (or even tea-lights) that you'd like to make, they're great for using up leftover soy wax that is still in it's melted state. You can also wait for it to harden back up and use a couple small chunks in a oil burner / wax warmer if you have one (assuming your wax has been scented). Otherwise, I just leave the remaining wax in the same container I first melted it in and reuse it again next time I'm ready to make candles. So easy!Hope this soy candle tutorial was helpful for you, but as always, if you have any questions, please let me know. I often update posts with new info as questions come in.
And let me know what you think too! Have I convinced to make some soy candles yet?
56 comments | Click here to reply
What a fantastic guide to making soy candles! The step-by-step instructions and helpful tips make it seem so easy and fun to create these beautiful candles at home. I appreciate the emphasis on using natural materials and the versatility of soy wax. Can’t wait to try my hand at this craft. Thanks for sharing this wonderful DIY resource!
David CampbellI appreciated how this post explained that the procedure of making soy candles is very simple. My mother loves collecting scented candles. I suddenly got an idea to gift her a full moon-infused soy candle for her coming birthday.
Victoria AddingtonI tried making some myself, I want to open a store ideally with a style like this (https://crescentcandles.co.uk/) but I think they’re a bit too big to start with. Maybe wax melts instead would be better for me?! 😐
Dan PMy mom has been thinking about getting the right kind of soy candles for her home because it will allow them to work a lot better. She would really like to get some candles from a professional that she will really be able to enjoy that can be scented properly. It was interesting to learn about how they can use essential oils to make a scented candle like 15 drops for a small scented candle.
Adam GolightlyWhat size are these containers?
I need to make sure I buy similar size, since these are sold out. Will get more expensive if I use larger containers.
Karin OutenLove this! It’s almost exactly the same as to how I started making candles. It’s SO easy and SO fun! Mixing the scents and creating new profiles is one of my favorite things!
Alison G.[…] 32. DIY scented soy candles […]
63 Awesome DIY Gifts for Everyone on Your List + What's your Favorite Gift You've Ever Received?! - Paper and StitchTo get the candle to burn evenly, you must trim the wick to 1/4 inch, if its not trimmed it will burn a hole straight through the middle of the candle. And of course different size wicks for different size containers. But the wick must be trimmed.
lisaHow and when during the process would you add color and scents?
maryThis sounds easy. I love homemade gifts and would like to try.
Hello can you add color to the soy candles? What kind, how much do you use, and when during the process do you add the color and scent? Thank you I would love to make homemade candles.
Mary[…] Make your house glow with these lovely candles | Scented Soy Candles by Paper & […]
9 DIY Projects for a Rainy Day - Designs of Any Kind[…] Ladder || Ceramic Ring Holders || Scented Soy Candles || Leather File […]
Style Bee: April Shopping FastHi there does anyone know the exact quantity of scent to ml of wax or grams please. As my first attempt u can only smell when its not lit.
lisa[…] over to Paper & Stitch for the […]
Scented soy candles | scissors paper inkWhat options are there for fragrances? I’m not a fan of coconut but idk if it’s possible to get any essential oil to replace it?
MelanieThese looking amazing and seem really straight forward to make. I’m so going to get my DIY on this weekend and try to whip up a batch of candles.
Rigel[…] DIY no sew sunglasses pouch (Homey Oh My) 2. Sneakers with braided shoe laces (Martha Stewart) 3. How to make scented soy candles (Paper & Stitch) 4. Top 5 photography tips and tools (Design Eat Repeat) 5. DIY faux hammered […]
Szerdai ötletelés #3 | Heart[…] Scented Soy Candles – These are great for a gift, or just if you’re bored and love candles!! […]
Friday Favorites : July 4 | Mostly SewingBeen scared to make investment, but think homemade candles will be holiday gifts this year! Thanks so much for sharing!!
ArleneThanks for the tip, Judy. I had no idea. Will definitely try that scent ratio next time.
BrittniThere is a video on the website of www.candlescience.com. You do not have to use their products – but I have learned from my “scenting” mistakes. The main one being – you can actually use too much scented oil and the pool of wax can catch fire and a ring of flame appears. I experienced this thinking – oh – more scented oil =’s a stronger scented candle. I use 1 oz. of scent to 5 cups of soy flakes which is the equivalent to about 3 cups of liquid (melted) wax. The website above has is great tutorial. I also melt my soy wax flakes in the microwave. I’ve been making the candles for about 3 years now. Love shopping for containers!
I love using teacups and saucers as gifts!
Judy[…] 3. Indigo Dyed Embroidery by Lovely Indeed 4. DIY Pop Art Pet Portraits by A Beautiful Mess 5. Scented Soy Candles by Paper & […]
5 Must-Try Projects for the Holiday Weekend - The Crafted LifeHi Danielle. I wasn’t measuring precisely when I made these because I had so many containers to fill and they were’t being filled to the brim (because of the lids). That said, if you were measuring in a liquid measuring cup, the solid soy wax flakes will roughly melt down to half when it becomes a liquid. So, if you measured out 6 cups of soy wax flakes (in a liquid measuring cup) and then melted it, it would measure in at about 3 cups when melted. Hope that helps.
BrittniHow many ounces does one pound of wax chips make?
Danielle BThanks Megan! They’re so easy. You should definitely give it a try.
BrittniThis is awesome!!! I have always wanted to make my own candles. Serious…and those pots…so cool. Would be awesome to take old purchased candle jars and refill them this way 🙂
Megan Gilger[…] collar de cuero (1) Unas alpargatas chulisimas customizadas con abejitas (2) Pintar unas plumas (3) Velas perfumadas (4) Servilletas decoradas con acuarela […]
5 DIYs para intentar este fin de semana | Cosas Molonas | Blog de Inspiración & DIY |[…] things to make this week here and […]
This Weekend | Dejlige DaysThe scent I used can be found at craft stores, right next to all of the candle making supplies. I haven’t experimented enough to have a favorite brand just yet. But I’ll let you know if I come across one I would highly recommend.
Brittni[…] Create easy scented soy candles on Paper & […]
5 DIYs to Try This Weekend | Paper and StitchI love this project I’ve always wanted to try making my own candles. Thank you for showing how easy it is. Where did you get the coconut scent and is there a brand you prefer? Is there other scents you have tried?
Teresa Allen[…] Simple DIY candles […]
5 Awesome Things Today | thehow-toshopThanks Ana and Christina.
BrittniI just love the idea of scented soy candles!!!!!!
ChristinaLove the idea of how you used this anthropologie spice jars!
AnaHi Carolyn. Pour any extra wax into a paper cup while it’s still liquid and then wipe out the pouring pot with a cloth or paper towel. You can keep the paper cup filled with wax too and melt it down again for the next time you make candles (after you peel the wax from the paper cup of course).
BrittniHow do you clean the pouring pot after the wax has been poured into the containers?
Carolyn KeslerThanks Hope!
BrittniThese are so beautiful! Such a simple and yet personal gift to give. I’m so looking forward to making these myself. Thanks for sharing the tips!
HopeHmm…did you wait for the wax to cool down before pouring, Allison? That could be the problem.
BrittniI tried to make candles this winter and they cooled down weirdly and were really concave in the center by the wick – I just couldn’t give them away in that state
AllisonAllison from http://www.mercuteify.com
Thank you Kristin and Stacia! I’m kind of a candle fiend at the moment.
BrittniThe canisters are adorable! I just love candles!
StaciaLove this idea!
KristinThanks Katie. Definitely give them a try. They’re really fun to make.
BrittniLove love love!! Can’t wait to try:) These are adorable! xoxo Katie
Katie CookAwesome, Kel. Text me if you need help troubleshooting anything in the candle-making process. Although, you probably already know the drill for this stuff.
BrittniThese turned out SO great, Britt!!! I’m getting ready to do some candle making myself, so I’m glad to see your successful venture as motivation! 😉
Kelly @ Studio DIYInteresting Lauren. I hadn’t heard of that issue, but good to know that the fatter wick solves that problem. Happy to hear that this post inspired you.
BrittniLove those jars! I made a bunch of candles last winter, but I found when I lit them they burned a tunnel straight down rather then melting all the way across edge to edge. From much research, I learned I need a fatter wick for the jar size. And now this post inspired me to actually go get them and make some more 🙂
LaurenHaha. Sometimes a girl just has to wing it when it comes to how much essential oil to use. They smelled really good though. 🙂
BrittniI LOVE this idea! totally worth a cute DIY night with friends or for gifts or for my own house.
I love this line–“I wasn’t sure how much to use, so I poured in the whole bottle.” haha I think this is the best part of the whole post. I will definitely be trying this at home 🙂
ElizabethThese would make great birthday gifts, Caitlin. I’m planning to make a few more, when I find more containers that I like, so I have something for last minute thank you gifts. But I do know a few people with upcoming birthdays. Maybe I’ll make some for them too. Clearly, I’m addicted to candle making now.
BrittniSuper cute! I’ve only made candles from one of those kid crafts kits probably 20 years ago. I like that these are soy…now that I know more about cheap candles, it’s worth paying a little extra for your health! These would be perfect to make and keep on hand for birthday gifts.
Caitlin | teaspoonThat’s a good question, Rachel. Yes – I would definitely leave some wax in the pouring pot just in case there is a dip in the candle, cracks, etc. I was moving my wicks around a lot during the pictures (after the wax had been poured), so there was a little bit of unevenness. Pouring a little bit of wax over the top (be sure to cover the entire to make sure it spreads evenly) before you cut the wick down to size would fix any problem like that.
BrittniOooo how lovely! I might try some of these this weekend. I love candles and am completely out of household pretties! Did you get many bubbles or a dip in the middle as it cooled? Wondering if I need to leave some wax aside to top up after?
Rachel Ward