
We’ve been delving into the beauty realm recently with the help of our production assistant and beauty extraordinaire, Rachel. And she finally convinced me to do a nail tutorial.
We decided to combine the nude nail trend with other elements (like the dot nails I had for the DIY Dots artwork post and a cuticle crescent for fun) to create a design that totally speaks my language (and hopefully yours too). It’s modern, playful, and maybe even a little bit quirky.
To paint your own nude crescent nail art, you’ll need the following…

Materials:
– base coat (I like this one)
– nail polish in two contrasting colors (we used Butler Please from Essie and Feelin’ Hot Hot Hot from OPI)
– top coat (I like this one)
Instructions:
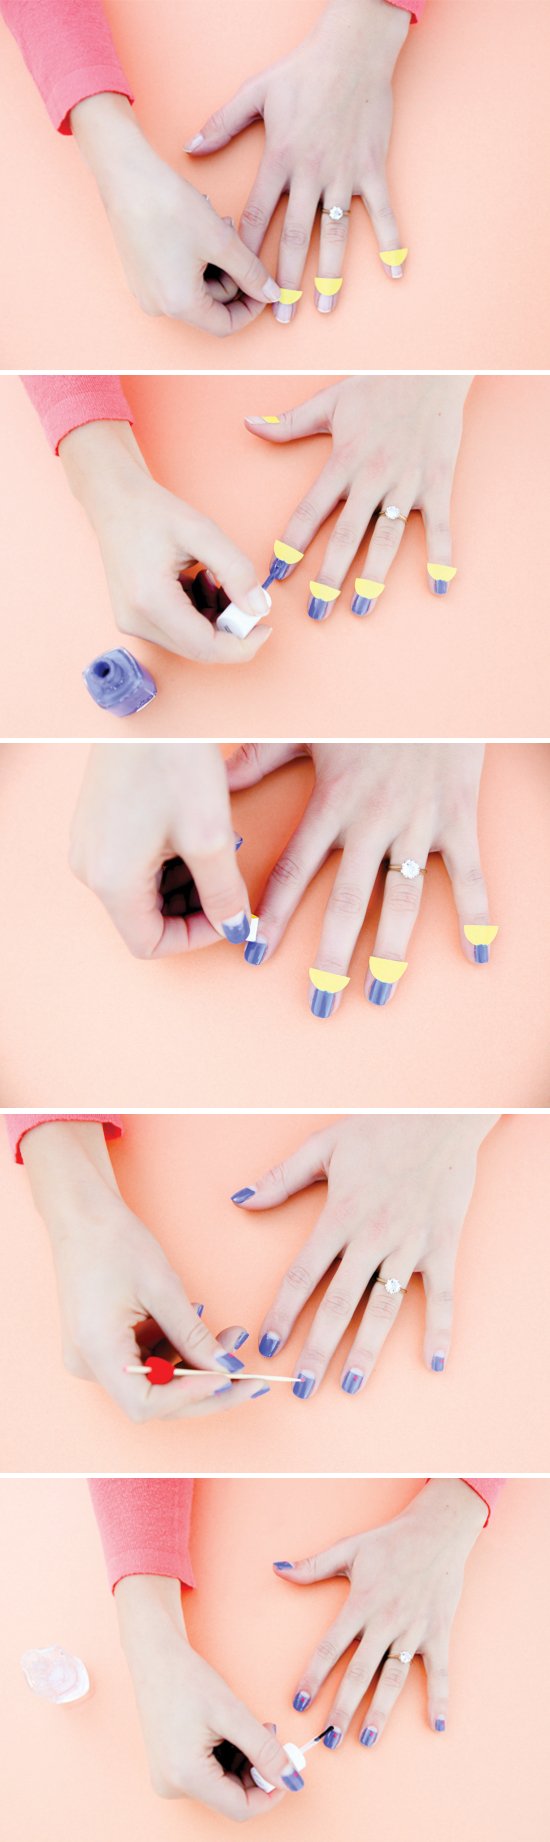
1. Prep your nails with your favorite base coat.
2. Grab a small pack of circle stickers you can find at an office supply store, cut them in half and place one over each nail where you want your negative space to be. This is the nude crescent shape you’ll be creating, near the cuticle. As shown in the photo. Make sure to press each sticker down firmly. *A cuticle pusher (like this one) worked great for us.
3. Paint each nail with your base color and once that coat is completely dry peel off your stickers. We gave ours a little extra time to fully dry to avoid rough edges when removing the stickers.
4. Add a colorful dot accent above the crescent shape. We used a toothpick but a dotting tool (like this one) works well too.
5. Finish off with your favorite top coat.
Note: If your stickers leave any rough edges, you can clean the edge of your polish up with a cotton swab and nail polish remover.
Once you’re nails are finished, you’re probably going to want to grab your nearest ice cream cone (you can take one from a small child, I’m sure they won’t mind) and show these puppies off. Kidding! But seriously though, that’s what we did.
I was secretly jealous that Amelia was the hand model for this project because I really wanted to paint my nails in this design too. BUT my nails are a little too stubby to be a hand model at this point. So I’ll leave that one to the pros and just try this design on my own time.
P.S. Let me know what you think of doing more nail tutorials like these. If you like ’em great! I’d love to do more and if you’re not a fan, I’m happy to hear that too. I won’t cry, I promise.


Nail art by Rachel Brewer
Modeling by Amelia Tatnall
Styling and photography by Brittni Mehlhoff
Think you’ll give this nail art DIY a try? What other color combos do you think would be good for this design?
12 comments | Click here to reply
I’m finally catching up! This is so beautiful!
Lexy | ProperYour nails are so cute! I love these!
Paige
Paigehttp://thehappyflammily.com
Thanks Annie. Stay tuned for more.
Brittnihttp://www.alvoresblog.com
Can’t wait for ur new posts.
AnnieThanks Marilyn.
BrittniLove the tutorial and the nails. Have to remember to use gloves when cleaning and doing dishes.
MarilynIsn’t Amelia’s engagement ring gorgeous, Kelsey? So lovely.
BrittniCute! And I love the ring.
www.kelseymarie.co
KelseyThanks Hannah. That sounds like a good color combo. 🙂
BrittniLove these! I’ve got so into nail art this winter. My favourite is electric blue and gold
HannahHannah x
Http://crafternooncabaretclub.com/blog
Thanks Michelle.
BrittniThose look so cool and clourful, I love them!
Michellehttp://www.makeandmess.com/