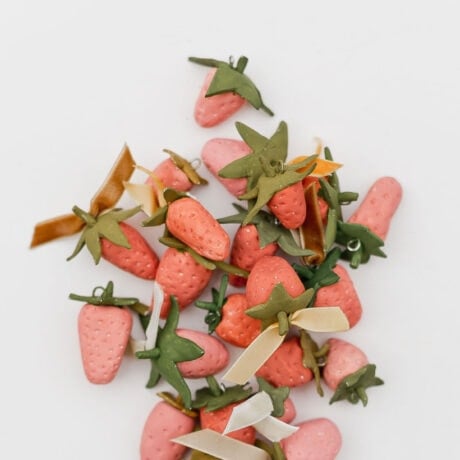
Clay strawberries that you can use Christmas ornaments, gift toppers, jewelry, or just cute little figurines.

Clay strawberries coming at ya! For the last few years, I’ve made a new batch of DIY ornaments and it
After I made the clay mushroom ornaments last year, I decided I would do more clay ornaments this year bit was so much fun. And I wanted to make something that Hayes would like, so I created a TON of clay strawberry ornaments.
Strawberries are one of his favorite foods and he calls them ‘hearts’ and it’s really cute.
But you’re here for the ornaments, not the story. So, click through to find out how I made all this strawberry ornaments.

Materials for Clay Strawberries
- air dry clay (and here’s a 2nd air dry clay option)
- wire
- wire cutters and wire pliers
- something to poke small holes (toothpick, etc)
- acrylic paint (or gouache) and paint brush

How to Make Clay Strawberry Ornaments
Pinch off a small chunk of air dry clay and roll it into a ball. I like to roll the ball on the table because it will get super smooth that way (no wrinkles or cracks).
Then lightly pinch on the end to make the bottom a little more pointed, like a strawberry.
Then flip it over and press the top against a flat surface to flatten the top of the strawberry.
Poke small holes / indentions all the way around the strawberry to look like seeds.
I used a drill bit to create indentions, but you can use a toothpick, the prong of a fork, etc. Set side.

Grab a small pinch of clay and roll into a ball and then squish it out flat. This part will become the leaves.
Cut little triangle shapes around the circle to make it look like leaves for the strawberry. See photo.
Then attach to the top of the strawberry.
You can score the top of the strawberry and bottom of the leaves base and then push them together.

Then poke a hole through the center (down through the leaves and a little bit into the strawberry).
Then pinch off a very small piece of clay (smaller than the leaves piece) and roll out into a thin tube. This will be the stem.
Poke the stem down into the hole you made in the previous step.
Cut off any excess of the stem so that it’s relatively short.

Now it’s time to make the hook so it can hang and be an ornament.
Cut a piece of wire 2-3 inches long. And twist the wire into a loop with a tail, for lack of a better way of explaining.
Cut off the long part of the tail (leaving a short length that will stick into the clay).

Press the wire tail into the strawberry, though the leaves, by the stem.
Wait for the air dry clay to dry over night or 24 hours.

Then, paint the hardened strawberries with acrylic paint or gouache.
I wanted the color to be very paint, so I dry brushed the paint on to make the color more muted.
Add a string or a wire hook to the loop you created in a previous step.
I used a small piece of velvet ribbon for each ornament to add a little flair and then a wire hook to actually hang onto the tree.
More DIY Clay Ideas
- These DIY earrings, with several different polymer clay techniques, are one of my most popular projects ever.
- These mushroom ornaments are probably my all-time favorite DIY ornaments I’ve made.
- I also shared how to make terracotta rainbow ornaments that I still love hanging on the tree.
- And last but not least, a tutorial for how to make a bolo tie, using clay.


DIY Clay Strawberries (to Use as Ornaments and Gift Toppers)
Ingredients
- air dry clay and here's a 2nd air dry clay option
- wire
- wire cutters and wire pliers
- something to poke small holes toothpick, etc
- acrylic paint or gouache and paint brush
Instructions
- Pinch off a small chunk of air dry clay and roll it into a ball. I like to roll the ball on the table because it will get super smooth that way (no wrinkles or cracks). Then lightly pinch on the end to make the bottom a little more pointed, like a strawberry. Then flip it over and press the top against a flat surface to flatten the top of the strawberry.
- Poke small holes / indentions all the way around the strawberry to look like seeds. I used a drill bit to create indentions, but you can use a toothpick, the prong of a fork, etc. Set side.
- Grab a small pinch of clay and roll into a ball and then squish it out flat. This part will become the leaves. Cut little triangle shapes around the circle to make it look like leaves for the strawberry. See photo. Then attach to the top of the strawberry. You can score the top of the strawberry and bottom of the leaves base and then push them together.
- Then poke a hole through the center (down through the leaves and a little bit into the strawberry.
- Then pinch off a very small piece of clay (smaller than the leaves piece) and roll out into a thin tube. This will be the stem. Poke the stem down into the hole you made in the previous step. Cut off any excess of the stem so that it's relatively short.
- Now it's time to make the hook so it can hang and be an ornament. Cut a piece of wire 2-3 inches long. And twist the wire into a loop with a tail, for lack of a better way of explaining. Cut off the long part of the tail (leaving a short length that will stick into the clay). Press the wire tail into the strawberry, though the leaves, by the stem.
- Wait for the air dry clay to dry over night or 24 hours.
- Then, paint the hardened strawberries with acrylic paint or gouache. I wanted the color to be very paint, so I dry brushed the paint on to make the color more muted.
- Add a string or a wire hook to the loop you created in a previous step. I used a small piece of velvet ribbon for each ornament to add a little flair and then a wire hook to actually hang onto the tree.
What else could you use these clay strawberries for?
I was thinking that these would actually be really cute to use for jewelry. Maybe some earrings or little charms for a bracelet or necklace? Just on a smaller scale.
If you decided to create little clay strawberries for jewelry, I would probably use polymer clay instead because it’s a little more durable after it’s baked.
7 comments | Click here to reply
So lovely and appreciate the muted tones. Would you kindly share the shades of goache you used?
AmandaYour blog posts are so thoughtful. Loved it.
NipponGreat project. Very simple and nice. 🙂
DinaYour photos are amazing!
This clay strawberries look amazing. You’re so talented.
Ivana SplitThank you Erin! That means so much to me. I love making new ornaments each year. It’s such a small and kinda silly thing, but it makes me happy. 🙂
Brittni-Brittni
You did it again Brittni! You have the cutest DIY ornaments 🙂
Erin HardingThese are so adorable!!! I love the shape, color, everything. I need to make these strawberries!! ♥️
Sara’s Art House