A terracotta clay ornaments DIY to cute to pass up!

I love making DIY ornaments around the holidays because they’re great gifts (if you actually make cute ones) and they’re usually super easy to make. So, this year, I made a whole bunch of ornaments to share and today’s is my absolute fave, so I’m sharing these first…
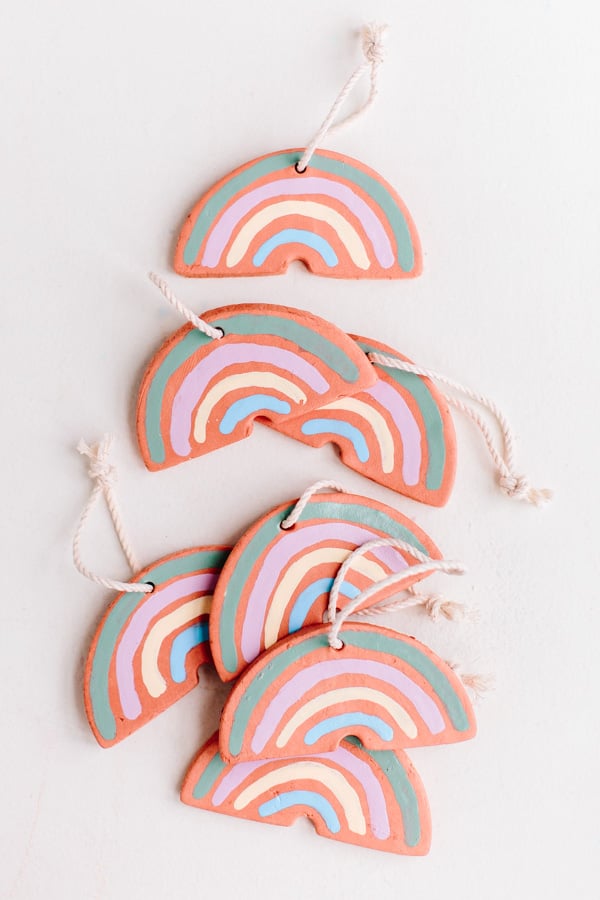
Terracotta clay ornaments! They’re super easy to make, super affordable, and actually look like something you’ll want to put on the tree (or add to stockings, etc). But they’re not just for the holidays! Make these cute clay rainbows, flowers, and more year round as gifts, party favors, and art pieces for your home.
A batch of more than 20 ornaments cost me about $10 to make and they look like something your could buy from a cool local shop (bonus!). Click through to make your own.

Clay Ornaments Supplies
To make your own, you’ll need…
- terracotta air hardening clay (I used a 2 pound block)
- cookie cutters in any shape you like (mine are linked in the steps)
- a rolling pin (that you use for non-edibles)
- nail polish in your fave colors
- a skewer or something similar for poking holes
- string and scissors
- scrap fabric, canvas, or craft mat for rolling out the clay
How to Make Terracotta Clay Ornaments
1. Start by rolling out the air dry clay with a rolling pin to a thickness between 1/4 and 1/2 inch. It might be easiest to cut the brick in half, form each into a ball and roll them out separately.
*I used a scrap piece of canvas underneath the clay so the color wouldn’t transfer to my table. Highly recommend doing something like this.

2. Then use your cookies cutters to cut out the shapes over and over again. And poke holes at the top of each shape with a skewer or something similar, so you can thread the string through later.
Once all the shapes have been cut, roll up the scrap pieces of clay and re-roll it out with a rolling pin to start the process over. You want to use up every little piece of the clay so you can make as many ornaments as possible.
I used these cookie cutter shapes from Etsy for my DIY ornaments: rainbow // cloud // flower (similar) // star.
3. Leave the shapes out to dry according to the instructions on the clay packaging. I let mine sit out for 24 hours and flipped them once half way through.

4. Once all of the pieces are completely dry, it’s time to paint! I used nail polish instead of craft paint for this project to make it look more like a fired ceramic piece. Nail polish is glossy, so it looks more like a glaze.
Just paint directly onto the clay with the nail polish brush, wait for it to dry, and apply a second coat.
5. Wait for the second coat of nail polish to dry before cutting string and knotting it through the holes and they’re ready to hang on the tree.

Is this clay project for kids or adults?
Both! This would be a fun project to get kids involved in, since the supplies are limited and the process is really easy. They can help roll the clay out, use the cookie cutters, and even paint the dry pieces (with supervision for younger kids).
But adults can make these too! I made all of these on my own and it was a relaxing project to tackle in an afternoon. I made a huge batch and plan to give some away as gifts to friends and hold onto the rest for decorating the tree each year. I also keep a few of the rainbows out year round as decoration in the house, since they don’t necessarily look like holiday ornaments.
What else can I use these clay ornaments for?
You don’t have to wait until the holidays to try this simple clay project. Since none of the shapes are especially themed to the holidays, you can tackle this clay technique year round.
These clay pieces make great gifts year round and even as party favors for a birthday. You can hang them on them on the wall as a unique piece of art or hang them from a door knob as decoration. They would look really cute hanging on a key ring or backpack / purse zipper too. So many ideas for what this clay pieces could turn into.
Have your own ideas? share them in the comments section, so I can add them here.
Do I have to use terracotta clay?
You don’t have to use terracotta clay. You can use any kind of air dry clay you want. I personally love the terracotta color – especially against the greenery of a Christmas tree. But it’s a preference thing.
And if you want a colorful option, you can always use polymer clay, which comes in tons of different colors, so you may not even need to paint the completed pieces, if you go that route. The only thing to note about polymer clays is that you’ll need to bake them in the oven – they’re not air dry. So, that’s one thing to consider.
I usually like to use oven bake clays on things like polymer clay jewelry, mini clay vases, and DIY bolo ties. But I wanted to throw that out there as another option just in case.


Terracotta Clay Ornaments DIY
Ingredients
- terracotta air hardening clay I used a 2 pound block
- cookie cutters in any shape you like mine are linked in the steps
- a rolling pin that you use for non-edibles
- nail polish in your fave colors
- a skewer or something similar for poking holes
- string and scissors
- scrap fabric canvas, or craft mat for rolling out the clay
Instructions
- Start by rolling out the air dry clay with a rolling pin to a thickness between 1/4 and 1/2 inch. It might be easiest to cut the brick in half, form each into a ball and roll them out separately.
- *I used a scrap piece of canvas underneath the clay so the color wouldn't transfer to my table. Highly recommend doing something like this.
- Then use your cookies cutters to cut out the shapes over and over again. And poke holes at the top of each shape with a skewer or something similar, so you can thread the string through later.
- Once all the shapes have been cut, roll up the scrap pieces of clay and re-roll it out with a rolling pin to start the process over. You want to use up every little piece of the clay so you can make as many ornaments as possible.
- I used these cookie cutter shapes from Etsy for my DIY ornaments: rainbow // cloud // flower (similar) // star.
- Leave the shapes out to dry according to the instructions on the clay packaging. I let mine sit out for 24 hours and flipped them once half way through.
- Once all of the pieces are completely dry, it's time to paint! I used nail polish instead of craft paint for this project to make it look more like a fired ceramic piece. Nail polish is glossy, so it looks more like a glaze.
- Just paint directly onto the clay with the nail polish brush, wait for it to dry, and apply a second coat.
- Wait for the second coat of nail polish to dry before cutting string and knotting it through the holes and they're ready to hang on the tree.
I love the idea of gifting sets of these budget-friendly ornaments to family and friends – especially since you can customize the shapes to each person’s interests, fave colors, etc.
Think you’ll make a set of these DIY ornaments this year? What ornament shapes would best represent you and your family if you made your own?
12 comments | Click here to reply
Thanks for sharing! How strong is this material?
VanessaThis looks so cool! What a fun craft to make with kids of friends for Christmas!
SuzanneOoh great project! These could be great as magnets! Thanks for sharing!
AliceThese are adorable .Im thinking of trying “dots”of polish on the second coat. Could even be glitter polish for the dots!
Kitty[…] Terracotta ornaments. […]
Friday Favorites – Cupcakes and CommentaryHow many ornaments (if I use same materials) does 2 lbs of clay make? These look awesome!
CoriThis is such a cute idea. The possibilities of different designs you could make and gift are endless.
Milly Egan[…] 5/ DIY Wooden Ball Ornaments 6/ DIY Paper Christmas Stars 7/ Printable Retro Ornaments 8/ DIY Terracotta Clay Ornaments 9/ DIY Wood Burned Monogram […]
36 Holiday Ornaments to Buy or DIY - Design CrushThe fact that they don’t even have to be baked was one of my fave parts of this project too, Jennifer. And ordering the supplies from Amazon makes it so easy! Hope you love how they turn out. Happy Wednesday!
Brittni-Brittni
OMG! I was just about to make some salt dough ornaments this weekend, but this terracotta option is so much prettier! (and less of a hassle since I don’t have to bake anything). Already adding the terracotta to my amazon cart… 🙂
Jennifer YuThanks Cat!
BrittniThe pastel colors look so good on the terracotta! The nail polish trick is so clever.
Cat