
Add soft texture to any basket with a simple looping method that will take plain containers from basic b to uniquely handmade in just a few minutes.
I love this DIY technique for plain, inexpensive baskets that could use a little something special. It’s budget-friendly and super easy. Click through for the step by step instructions.

Materials Needed for Woven Loop Baskets
- basket (that is flexible enough to poke a needle and yarn through)*
- thick yarn or roving (mine is from We Are Knitters in pearl grey)
- needle for yarn
- scissors
*My baskets are from Ikea and they were super affordable. When looking for baskets that are easiest to use for this project, choose a simple shape that lets the loops shine and one that’s not overly thick if possible.
How to Make Woven Loop Baskets
1. Determine a pattern you want to create with loops (ex: an all-over pattern, a line spaced pattern, a top border pattern, etc).
2. Then thread the yarn onto your needle and poke it through the basket (from the inside going out). Pull a very long piece of yarn through (a good starting point is 5-6 ft long for a medium size basket, but this vary drastically depending on your basket size) the basket. And knot off the other end inside the basket that is staying put.
3. Next, pull the yarn back through from the front to the back, leaving a loop that fits two fingers (you can do more or less if you like) in tact that doesn’t pull through. A good with is about 1/4 inch (distance between the first end of the loop and the other end of the loop). The further apart you make the width of the loops, the more pronounced they become.
4. Repeat the looping process over and over and over again until you’ve reached the desired look / design. You may need to add new pieces of yarn throughout the looping process as you run out of the long yarn line. Just always knot the end that stay inside the basket to keep it secure.
5. Once finished with the entire project, be sure to double to triple knot the yarn once more on the inside of the basket to make it secure. And it’s ready to use.
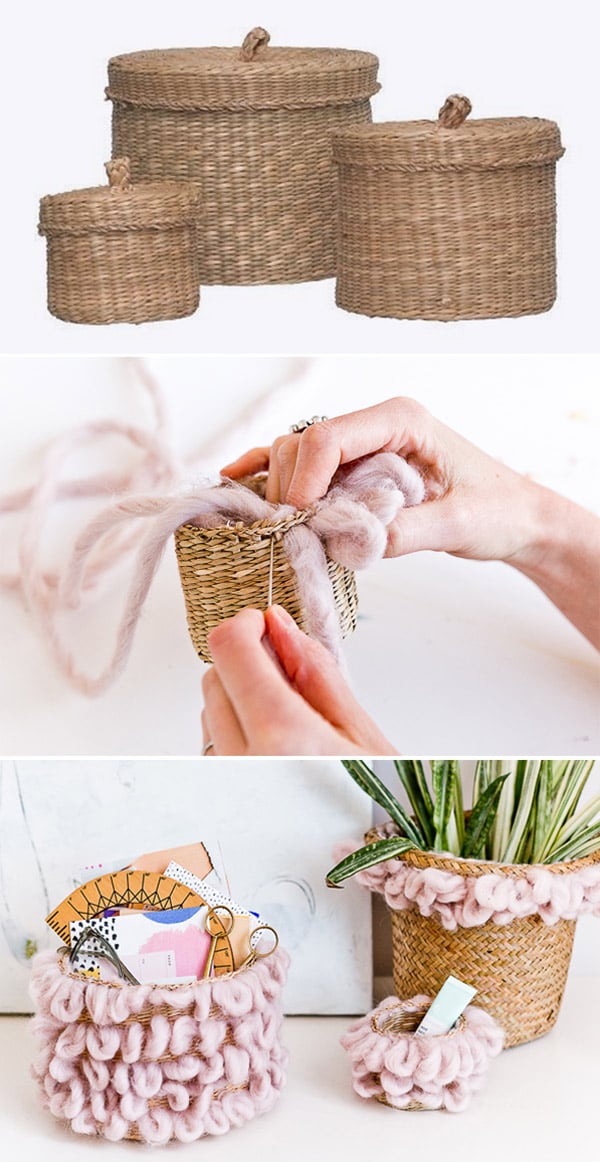
These baskets are great as storage (craft supplies, mail, odds and ends, etc, etc) or even as planters, if you stick a little plastic protector inside first.
I didn’t get many pictures of the planter version that only had a few layers of loops, but I think that one might be my fave of the three. Which one do you like best?


Photography Brittni Mehlhoff
What else could you use these little loop baskets for? Think you’ll give this home decor DIY a try?
7 comments | Click here to reply
Love this idea! It’s so adorable!
MicheleThis is such a cool idea! The baskets now look so cuuute! Will definitely try this.
Livi[…] 27. DIY basket storage […]
33 (DIY) Ways to Organize Everything in Your Life - Paper and StitchI love this idea is super cute
The pink pineapplehttp://thepinkpineappleblog.blogspot.com/
They look so extraordinary, wow!
Michellehttps://www.makeandmess.com/
Thanks Courtney. The muted pop of color worked well for these…the yarn color is actually called pearl grey, but it definitely looks more like a soft pink or dusty lilac then anything else.
BrittniThe baskets are so cute!! I love the color pink you used on yours.
Courtneyhttp://sugarcoatedbears.blogspot.com/