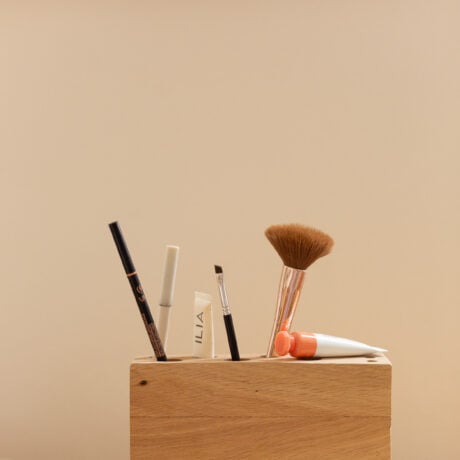
Is it a DIY pencil holder or a DIY makeup organizer? Idk, but either way, I like it.

Organization feels like a year round battle right now, at least in my house. So anything that helps bring a little order to the chaos is a win imo. Bonus points when it’s actually cute.
I made (well, remade) something to help keep smaller items (like pens, paint brushes, makeup brushes, eye liner) a bit more tidy. Admittedly, I’m not sure whether to call this project a DIY pencil holder or a makeup caddy. But either way, it’s so useful. And cute too.
Here’s the story… In the beginning of 2016, I made a little pen holder / makeup organizer thing with some scraps of wood. It got the job done, but looking back, it wasn’t exactly the cutest thing I’ve ever made. Or the most well crafted. Lol. I hadn’t been using power tools for all that long, at that point. So wood projects were still pretty new to me and it showed. Fast forward to now and I’m more confident working with wood and power tools, etc.
So! I decided to reimagine that old project from way back, now that I have more experience.
The idea of remaking something of mine from the past has sparked a new series called DIY Redo. Today’s project is the first one. Here’s how it will work… I’ll share photos of the old project, alongside the newly updated – hopefully more elevated and skilled version (and a tutorial). Wanna see what the older version of this project looked like?
Here’s the makeup brush holder I made back in 2016…

And here’s the reimagined version…


How does the new pencil holder compare to the old one?
Aside from the 2016 version being of lower quality in general, there are only a few differences between the two.
The original pencil holder was made from 5 pieces of thinner stacked wood (I believe it was pine).
The new DIY wood organizer is made up of just 2 pieces of wood (not including the feet). Much thicker then the original DIY and a much higher quality of wood.
This time around I used scrap pieces of white oak. They were leftover from one of my DIY nightstand projects.
Other than the difference in wood, the addition of feet to the bottom, and the fact that I decided not to paint it, remained the same.
It’s still reversible, like the old DIY. But instead of a pattern on one side, the feet are different when you flip it around. One side has rounded feet and the other side has flat slab feet.
The new one feels like something I can use in any room of the house without it feeling out of place. It’s more minimal in design, but also just as functional as the original piece.
What kind of wood would you recommend for a small project like this?
You can truly use any kind of wood for something like this. A hard wood or a softer wood.
You could go with something like common board or pine (soft woods), as a more affordable option. Or try something in the hardwoods family, like mine (white oak).
It’s really a budget and preference question more than anything else, I think.
Where can I find the wood you used for the updated project?
White oak and other hardwoods, like walnut, beech, alder, etc are going to be more difficult to find at nationwide hardware stores (like Home Depot or Lowes).
So you may need to search for a specialty lumber shop. Just google specialty wood store or specialty lumber shop and you should find one suited for small woodworking projects like this one, in your area.
What exactly can you use this wood organizer for?
I think it would be a great art supply caddy, like a pen holder / pencil holder. And that’s probably what I’ll use it for most.
This would be cute for kid’s art supplies too. But also works well as storage for makeup brushes, eye liner, etc.
What I like most about this project is that it’s so customizable to what you need. You can essentially create holes any size to accommodate whatever you want to organize.
And you can make it as tall or as short, as long or skinny as you want.

Here’s what you’ll need to make your own…
Pencil Holder Materials
- wood – I used thick white oak scrap wood that we had left over from the DIY nightstands in our bedroom. You can use any kind of wood you already have or inexpensive wood from a home improvement store.
- sandpaper block OR power sander – I used a power sander, but this can be done by hand as well. The sandpaper grit will be determined by the wood you have and how much finishing it needs. As a jumping off point, my wood needed a little shaping, so I used 80 or 100 grit sandpaper once the pieces were joined together. And then used a finer sandpaper (220 for finishing to get it super smooth).
- wood glue – I like Titebond and I usually use the premium water-resistant wood glue.
- sealant or stain (optional) – If you want to seal or stain the wood, you’ll do that at the very end. I didn’t think it was necessary for this project. But I could see it looking nice with certain woods or use cases.
Equipment / Tools
- saw- You can use use pretty much any kind of saw to cut the wood for this. I used a miter saw, which is great for cutting longer boards down. I used a much thicker wood for this project as well, which also is easily cut on a miter saw. NOTE: This compact Dremel saw is a great starter power tool if some of the bigger ones feel to larger, too heavy, or too expensive. I used a (now discontinued) version of this for several years, but this one is almost identical to the one I used. I loved how small it was and it felt easier to manage.
- drill bits, spade bits, and/ or forstner drill bits in multiple sizes – The sizes you choose for this will completely depend on what size holes you want. I did a variety of sizes, so I could fit different things in each hole.
- clamp(s) – You may need more than one, depending on how large your finished piece will be.

How to Make a DIY Pencil Holder / Makeup Caddy
1. Measure and cut wood.
Determine how long and tall you want your pen holder / makeup caddy to be. Then measure and cut out all the pieces of wood to the same exact length.
I only need two pieces of wood because the pieces I used were pretty thick already. But if you’re using a thinner wood, you may want more layers (similar to my original stacked design).
I found 8 inches long to be a good size. If you made this 12 inches or longer, you could have this cut for you at a home improvement store (the shortest they’ll usually cut is 12 inches). Just in case you don’t have a saw at home.
2. Sand the wood pieces and stack them to determine placement.
Next, give each piece a light sanding or a more heavy duty sanding if needed. Then wipe the wood clean with a dry rag.
I shared some details about the sandpaper grits I used in the equipment / tools section if you need a reference point.
I sanded every side of each of the two wood pieces to make sure everything was smooth and would fit together nicely. But there is more sanding to do after everything is glued, so you don’t have to go too crazy on sanding for this step, as long as the pieces fit together nicely.
Speaking of which, after sanding, stack the pieces on top of each other to determine an order that works, where all of the pieces line up.
Sometimes, if a board has a tiny bit of warping, you will only be able to line it up one way, if at all, so that’s where testing this comes in handy.
3. Glue and clamp the wood together with wood glue.
Next up is glueing the pieces together. For glueing, I like to do a squiggly line all the way across and then smear it all over with my finger.
I put wood glue on each piece of wood where they would join together.
Once the pieces are touching, sandwich them together, line them up, and use clamps to tighten them together to really bond the glue and get a tight fit.
After an hour or two, you should be able to remove the clamps without any issues.
4. Make the legs and sand the legs.
While you’re waiting for the glue to dry, you can make the wooden legs. I used a scrap piece of super thick dowel (leftover from my round coffee table DIY) and cut them down to size and then in half.
I cut them in half so that the back would be slightly different from on the backside, in case I wanted to flip it. So it’s still kind of reversible, like the older version of this project.
Sand the legs with a fine grit sandpaper to help make them smooth. And, if needed, use a coarser sandpaper to make sure the legs are exactly the same height.
Shouldn’t be a problem if you’re cutting them from the same piece, but just in case.
5. Drilling holes in the top of the wood.
Once the glue is completely dry and set, you can start drilling the holes in the top. Use a power drill to create the holes in the top of the glue together block.
You can use large drill bits, spade bits, and/or forstner drill bits in multiple sizes. The sizes that you use will be determine by what you want to use the organizer for. I believe the sizes I went with were: 1 1/2 inch, 1 inch, and 3/4 inch.
*Be sure to clamp the base down to your work surface before you start drilling. It will keep the wood from moving around and is much safer.
6. Sanding the base of the pen holder.
Sand any imperfections out of the wood base. If something isn’t quite lined up, you may be able sand it out / smooth that area.
If it needs a lot of work go with a more coarse sandpaper (like 80 grit for example) or if it just needs a little fine tuning – 120, 180, and 220 all work well.
7. Glue the legs onto the bottom of the wood base.
Lastly, glue the legs onto the bottom of the wood pencil holder base. Use wood glue.
I like to use clamps to make sure the legs are on super solid. You could also use blue painters tape though. I think that would work just fine.


DIY Pencil Holder and Makeup Organizer
Equipment
- saw You can use use pretty much any kind of saw to cut the wood for this. I used a miter saw, which is great for cutting longer boards down. I used a much thicker wood for this project as well, which also is easily cut on a miter saw. NOTE: This compact Dremel saw is a great starter power tool if some of the bigger ones feel to larger, too heavy, or too expensive. I used a (now discontinued) version of this for several years, but this one is almost identical to the one I used. I loved how small it was and it felt easier to manage.
- drill bits, spade bits, and/ or forstner drill bits in multiple sizes The sizes you choose for this will completely depend on what size holes you want. I did a variety of sizes, so I could fit different things in each hole.
- clamp(s) You may need more than one, depending on how large your finished piece will be.
Ingredients
- wood I used thick white oak scrap wood that we had left over from the DIY nightstands in our bedroom. You can use any kind of wood you already have or inexpensive wood from a home improvement store.
- sandpaper block OR power sander I used a power sander but this can be done by hand as well. The sandpaper grit will be determined by the wood you have and how much finishing it needs. As a jumping off point, my wood needed a little shaping, so I used 80 or 100 grit sandpaper once the pieces were joined together. And then used a finer sandpaper (220 for finishing to get it super smooth).
- wood glue I like Titebond and I usually use the premium water-resistant wood glue.
- sealant or stain (optional) If you want to seal or stain the wood, you'll do that at the very end. I didn't think it was necessary for this project. But I could see it looking nice with certain woods or use cases.
Instructions
Measure and cut wood.
- Determine how long and tall you want your pen holder / makeup caddy to be. Then measure and cut out all the pieces of wood to the same exact length. I only need two pieces of wood because the pieces I used were pretty thick already. But if you're using a thinner wood, you may want more layers (similar to my original stacked design).
- I found 8 inches long to be a good size. If you made this 12 inches or longer, you could have this cut for you at a home improvement store (the shortest they'll usually cut is 12 inches). Just in case you don't have a saw at home.
Sand the wood pieces and stack them to determine placement.
- Next, give each piece a light sanding or a more heavy duty sanding if needed. Then wipe the wood clean with a dry rag. I shared some details about the sandpaper grits I used in the equipment / tools section if you need a reference point.
- I sanded every side of each of the two wood pieces to make sure everything was smooth and would fit together nicely. But there is more sanding to do after everything is glued, so you don't have to go too crazy on sanding for this step, as long as the pieces fit together nicely.
- Speaking of which, after sanding, stack the pieces on top of each other to determine an order that works, where all of the pieces line up. Sometimes, if a board has a tiny bit of warping, you will only be able to line it up one way, if at all, so that's where testing this comes in handy.
Glue and clamp the wood together with wood glue.
- Next up is glueing the pieces together. For glueing, I like to do a squiggly line all the way across and then smear it all over with my finger. I put wood glue on each piece of wood where they would join together.
- Once the pieces are touching, sandwich them together, line them up, and use clamps to tighten them together to really bond the glue and get a tight fit. After an hour or two, you should be able to remove the clamps without any issues.
Make the legs and sand the legs.
- While you're waiting for the glue to dry, you can make the wooden legs. I used a scrap piece of super thick dowel (leftover from my round coffee table DIY) and cut them down to size and then in half. I cut them in half so that the back would be slightly different from on the backside, in case I wanted to flip it. So it's still kind of reversible, like the older version of this project.
- Sand the legs with a fine grit sandpaper to help make them smooth. And, if needed, use a coarser sandpaper to make sure the legs are exactly the same height. Shouldn't be a problem if you're cutting them from the same piece, but just in case.
Drilling holes in the top of the wood.
- Once the glue is completely dry and set, you can start drilling the holes in the top. Use a power drill to create the holes in the top of the glue together block. You can use large drill bits, spade bits, and/or forstner drill bits in multiple sizes. The sizes that you use will be determine by what you want to use the organizer for. I believe the sizes I went with were: 1 1/2 inch, 1 inch, and 3/4 inch.
- *Be sure to clamp the base down to your work surface before you start drilling. It will keep the wood from moving around and is much safer.
Sanding the base of the pen holder.
- Sand any imperfections out of the wood base. If something isn't quite lined up, you may be able sand it out / smooth that area. If it needs a lot of work go with a more coarse sandpaper (like 80 grit for example) or if it just needs a little fine tuning - 120, 180, and 220 all work well.
Glue the legs onto the bottom of the wood base.
- Lastly, glue the legs onto the bottom of the wood pencil holder base. Use wood glue. I like to use clamps to make sure the legs are on super solid. You could also use blue painters tape though. I think that would work just fine.
And that’s how you make a DIY pencil holder (that also doubles as a makeup organizer) with just a handful of materials. If you have any questions about the process, equipment used, etc let me know.
Which project do you like better? The original painted version or the new white oak one?
19 comments | Click here to reply
Really nice idea
Doodle CraftsI finally found this perfect DIY Pencil Holder and Makeup Organizer tutorial, and it’s so easy to make.
tdchingesLove that idea for the knitting needles, Olivia.
Brittni-Brittni
Love this idea! I might make this to store my knitting and crochet needles!
Olivia J[…] I use multiple times a day could stay out, as long as it fit on the new shelf I installed or in my DIY makeup organizer. And Jeff could keep out a couple of his most-used items too. Everything else had to go in the […]
Before and After: A Minimal Modern Bathroom Makeover for Spring (And Beyond)Thanks Sam. Here’s the shop where the print is from: http://shop.leahgoren.com/products
Brittni[…] 7. Laundry baskets by StudioDIY – 8. Wood makeup organizer by Paper & Stitch […]
10 DIY projects to organize your wardrobe & makeup - KittenhoodI really like the art print in the back! Where did you find it?
SamI love how you did a simple side and more colorful one! very cute!
AnaThe plain side seems to be the consensus, Carrie. I think that side might be my favorite too.
BrittniI love the plain side, it looks really simple but elegant! If i had those sort of DIY tools (my dad probably does somewhere, I might talk him into making me one!) I’d make one myself because its a nice little way to organise stuff! I’d probably have to go all out and stick gems and shiny stuff to mine, haha!
https://beautylabs93.wordpress.com/
CarrieAwesome Marwa.
BrittniI have a block of wood of this size, perhaps this is how I can use it!
Marwa | Enthralling GumptionThanks Michelle. 🙂
BrittniThis is perfect for my dressing table, what a wonderful project!
Michellehttps://www.makeandmess.com/
Thanks Emily. The plain wood is definitely a little cleaner / more modern. Glad you like it. 🙂 And love the idea of using it for paint brushes too. That’s perfect!
BrittniThis is cute. I like the plain wood side better. Something about the simplicity of it. I’m not sure I would use this in the bathroom since I try to keep a clean countertop; however, I could definitely use this for paint brushes in my craft room!
EmilyThanks Kirsti.
BrittniThis is so adorable! I will definitely be testing this out 🙂
Kirsti