
This week, Jenny Hoople from Authentic Arts is back to share yet another wonderful jewelry tutorial. You may remember her first tutorial here from a couple weeks ago on how to make a hand knotted necklace. And today, Jenny is sharing a tutorial for making an intricate falling water necklace. Take it away Jenny…
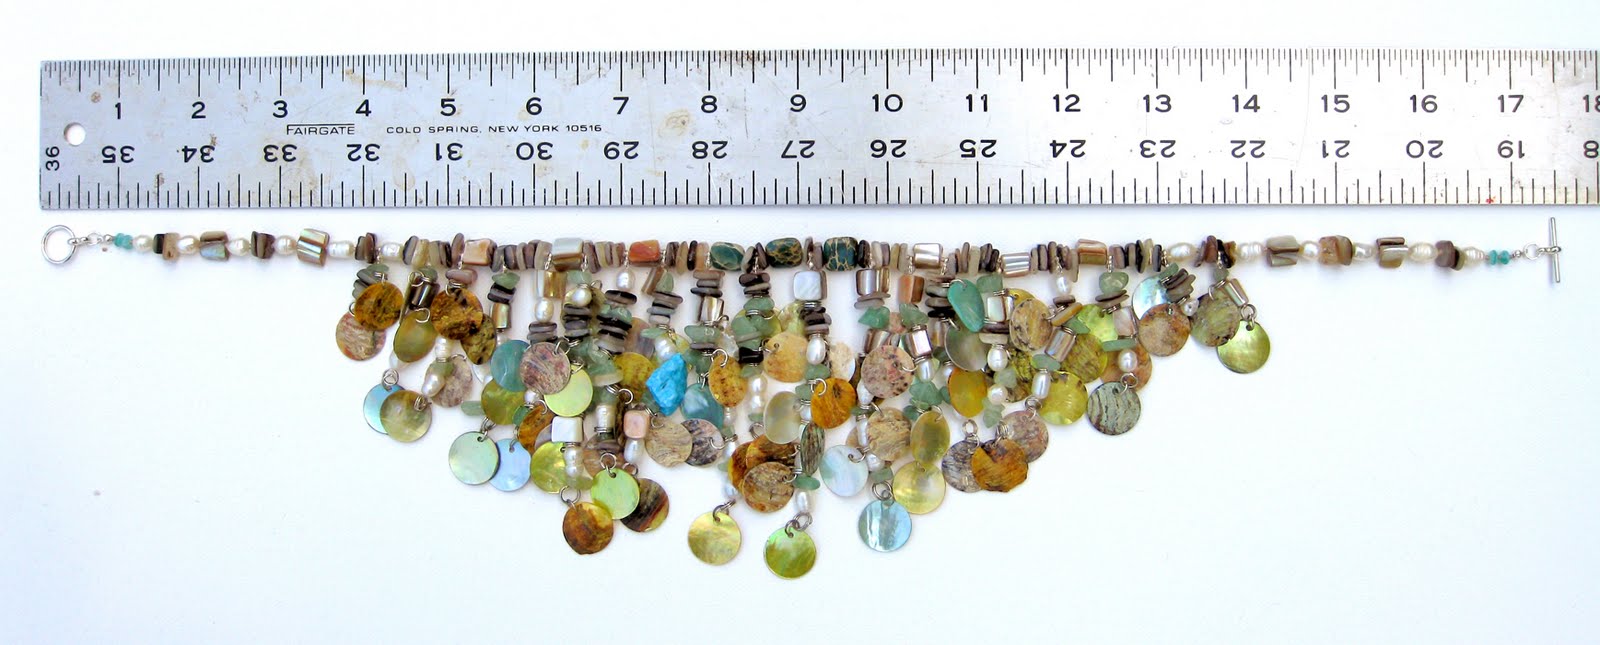
A customer of mine said it best, “The way it lays is so perfect it seems magical. And I love that it is just heavy enough to remind me that it is made of rocks and sea creatures.” This necklace is my favorite creation so far! Dripping with pearls, sea-green semi-precious stones, and tinkling shell coins. Accented with beautiful aqua terra jasper, a sprinkling of semi-precious aqua beads and a large natural turquoise bead (something blue!)
Of course you love it! Who wouldn’t? But you aren’t ready to shell out $140 to call it your own? Well, I’ve got good news, with $48 for materials, 6 hours of your time and these instructions, you can make one for your very own! Something this glamorous ought to be shared!! Never made a hand-knotted necklace before? See this Blog Post for a video tutorial on how to hand knot a beaded necklace.

It’s made with green aventurine chips, freshwater pearls, mussel-shell coins and shell beads and accented with bright, stabilized turquoise and unique aqua terra jasper beads. Please feel free to source materials yourself, I purchase most of them from Fire Mountain Gems. However, since I receive such a high discount when I order in quantity, I’m offeringFalling Water Kits in my Etsy shop, for less than you’d pay at Fire Mountain, complete with a color printout of the beading chart and instructions.
Finished necklace will measure 17″ around the neck.
Materials you will need (included in the Falling Water Kits):
- 1 – silver-plated toggle clasp
- 75 – silver-plated jump-rings, mm
- 73 – stainless steel split-rings, mm
- 21 – silver-plated bead-tips, mm
- 28 – mother-of-pearl cube beads
- 50 – freshwater pearls, white rice, mm
- 59 – green aventurine chips
- 99 – square-cut, black-lip shell chips
- 33 – yellow-dyed 15mm mussel-shell coins
- 31 – natural 15mm mussel-shell coins
- 10 – light-turquoise-dyed 15mm mussel-shell coins
- 1 – stabilized turquoise nugget, mm
- 3 – square aqua terra jasper beads, 10x10mm
- 4 – round green aventurine beads, 4mm
- 20 yds – size F silk beading thread, light green or grey
- Hypo Cement (to keep end-knots from unraveling)
- 2 – very fine, “wide-eye”, wire beading needles
- 1 – strong tapestry needle for pulling the knots tight
You’ll also need 1 or 2 pairs of small, smooth-jawed beading pliers.
A color printout of the beading chart is also included in the kit, or you may click on the picture of the beading chart below to download, view or print a PDF version of the beading chart:

This project is best done on a cloth to keep beads and findings from skittering all over the place.
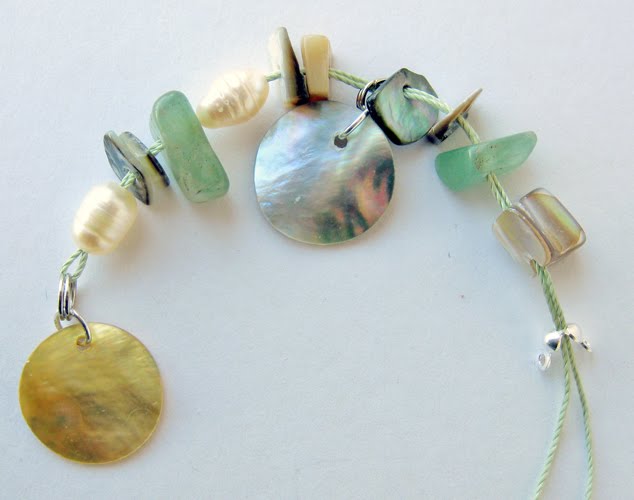
First, get out all your mussel-shell coins (keeping different colors separate) and attach a silver-plated jump ring and a stainless steel spring ring to each one using your pliers (as in the pictures):

Next, you’ll want to string the strands that hang down from the necklace’s base strand. I recommend starting at one side of the bead chart and working across, keeping the finished strands lined up in order on your table to keep them from getting mixed up.
- Cut off an appropriate length of silk thread (depending on the length of the strand you are making)
- Thread one end through the bead tip as shown and string on all the materials of that strand according to the bead chart (don’t make any knots during this phase,) then go back through the holes of every bead and split-ring, except the last one at the bottom, and thread back through the bead tip.

- Pull the thread through, pushing down the materials so they’re all snug against each other. Then with the two strands, tie a regular old granny knot, as shown, two times so that you’ve made a square knot as in the second picture. Dab a little bit of hypo cement on the knot, close the bead tip using pliers and snip off the leftover string.

- Do this for each hanging strand across the chart, keeping them lined up in order on your work table to avoid confusion later.
Now you’re ready to thread the necklace’s base strand, incorporating all those hanging strands you just finished.
- Start with two lengths of silk thread, about 40″ long, held together and threaded together on the beading needle.
- Tie a simple, tight, overhand knot in one end and snip off excess string, so that when threaded into the bead tip, it doesn’t stick out. Thread into the bead tip and dab with hypo cement. Close bead tip with pliers.
- Begin beading according to the chart (watch the instructional video on hand knotting, if you’ve never done it before) knotting after each bead (but not between square shell chips when they are strung together in a row, they look better without knots in between) and threading through the holes in the bead tips of the strands you’ve already completed as indicated in the chart. There is no need to knot after adding the dangling strands, just add the next bead and then knot.
- Repeat this until the last bead. Don’t make a knot after the last bead, thread the strings through the last bead tip and then make a knot, pulling very snug against the knotting needle to ensure that no space is left between the bead tip and the last bead.
- Snip off the string so that it won’t stick out of the bead tip, apply a dab of hypo cement and close the bead tip with the pliers.
Now all that’s left is to attach the clasp pieces to each end’s bead tip via a jump ring, and Voila! You did it!
27 comments | Click here to reply
Wonderful tutorial on the Falling Water Necklace! The steps are clear and easy to follow. Thanks for sharing!
xanderOh, this looks so beautiful, but it seems so difficult to make! I thought I didn’t even like beads and bead jewelry, I have always been more about pearls, especially the ones I get at www.pearlnecklacecenter.com. I know I am not so good at crafts to make this, but who knows, maybe I can persuade a friend of mine to make it for me? 🙂 Till then I will stay with my pearl jewelry. Thanks for the tutorial!
Flora RouseAbsolutely agree with you Maria. Even before i started making jewelry i always preferred handmade.
Selina[…] statement pieces, I’m intrigued by the Falling Water Necklace and the Bib-Style Necklace. Falling Water Necklace Bib […]
Quixotic Pixels » Beads and Baublesbeautiful necklace i like your necklace wonderful post.
Thanks.
JollygemsThat necklace is beautiful. There’s nothing better then a piece of handmade jewelry. Handmade just seems more personal and meaningful to me. For other beautiful pieces of handmade glass jewelry check out http://www.marcopolodesigns.com They have some of the most gorgeous pieces of Italian glass jewelry, and it’s all handmade!
MariaLovely necklace Jenny. I started with beading necklaces just recently after beading other stuff for quite some time and i love your work here, looks very classy 🙂
SelinaThe blog you have posted has been very useful to me. It has provided me with all essential details about the semi-precious stones that are available of late.
Semi Precious BeadsOur website is http://www.walletsbags.com There are all kinds of lovely and attractive products for you.Come on!Don’t miss the chance.
http://www.walletsbags.comhello
xubeibeiI have not done a lot with shell but I really like your necklace. The colours you have chosen give a fresh earthy feeling. One certainly could use leftover beads for this design. Very nice Thank you
HeatherFabulous!
MichelleIn response to Becky:
Thanks! It is a really versatile design! I’ve made a similar orange and yellow one and I’m itching to make one in pink!!
To everyone else:
Thank you, thank you for your praise 🙂
Jenny HoopleWow! Thanks for pointing that out Hess 🙂
(How embarrassing!) I forgot to put them in during the frenzy of editing!!
I’ve updated the original post on my own blog, hop on over for those measurements as well as all of the mm measurements that weren’t specified above and a link to the beading chart that works!
http://jennyhoople.blogspot.com/2010/05/falling-water-necklace-beading-tutorial.html
Jenny HoopleSimply stunning. I would love to say I have time to make one, but in reality I’m just going to sit here and be super jealous that you did. Love it!
JennyWow! That is fantastic… it is just…. Wow! thanks for sharing. I gotta give it a try…I wonder if I can do it?
TanyaI’m not seeing most of the mm sizes in the list above. 🙁
HessThank you for posting Jenny Hoople’s tutorial. It is thorough and concise, and accompanying photographs illustrate the techniques beautifullt. Easy on the eyes and the brain !
craziegracie8Ooh, I love this! And I actually have quite a few things in my bead stash that I could easily use for this design. Thank you for sharing!
Becky(Oh, I see now! The link in the article is the sold kit.)
The link I provided in the above comment will always take you to a Falling Water kit that can be purchased 🙂
Thanks everyone for your kind words!
Jenny HoopleJenny
In response to Hali’s question: I’ll be making as many kits as people want to buy! There’s one listed right now in the shop, the link above works to get to it, also, here it is again: http://www.etsy.com/search_results_shop.php?search_query=falling+water+kit&search_type=user_shop_ttt_id_6946254&ref=auto
Jenny HoopleBeautiful necklace! I may try it!
HollyHmm…you’re right Jeannie. That link isn’t working for me either. I have removed it for now and will add it back if I can get it working. For now, yu can just double-click that image for a larger view of the chart.
papernstitch-Brittni
This is gorgeous! The PDF beading instr. link is not working for me though! 🙁
jeannieWhat a beautiful necklace! I don’t suppose you’ll be making anymore etsy kits for this project? I’d love to purchase one.
HaliYou’re welcome Jenny. Thank you for creating it!
papernstitch-Brittni
Thanks so much, Brittni, for featuring my tutorial! It was a lot of fun to put together and is honored to be on such a fine blog 🙂
Jenny Hoople