Looking for Halloween home decor ideas that are easy and inexpensive? And of yeah…completely removable when the spookiest holiday of the year is over?! If so, this Halloween DIY has your name all over it!
This year, I wanted to create some spooky but simple Halloween decor for the entryway.
I started thinking about how I could not only do something cute on a budget, but ALSO something that didn’t require me hauling it up to the attic to store for next year after Halloween is over.
After going through a couple ideas, I came up with this spooky mirror Halloween DIY that is easy to recreate, budget-friendly, AND you can use any existing mirror in your house because the design is completely removable!
This clever Halloween home decor project can be used on the vanity mirrors in your kid’s bathroom, that entryway mirror that you’ve been meaning to add some holiday fun to, the mirror in your closet…literally any mirror in your home.
Want to make your own? Click through for the easy-to-follow tutorial for my DIY Halloween mirror.
Halloween Home Decor Idea: DIY Halloween Mirror
I hinted at this before, but I wanted to talk to you first about one of the big things love about this Halloween project. It’s not a one and done scenario! Which means, you don’t have to banish your Halloween decor to the attic when the holiday is over.
The painted designs can be scraped clean from the surface of the mirror with a small razor blade in just a few minutes. Leaving the mirror undamaged and back to it’s ‘normal’ everyday look.
I love holiday projects like this that only require a couple of materials and can be returned to everyday business as usual afterwards without having to store a bunch of stuff in the attic year after year. Who’s with me?
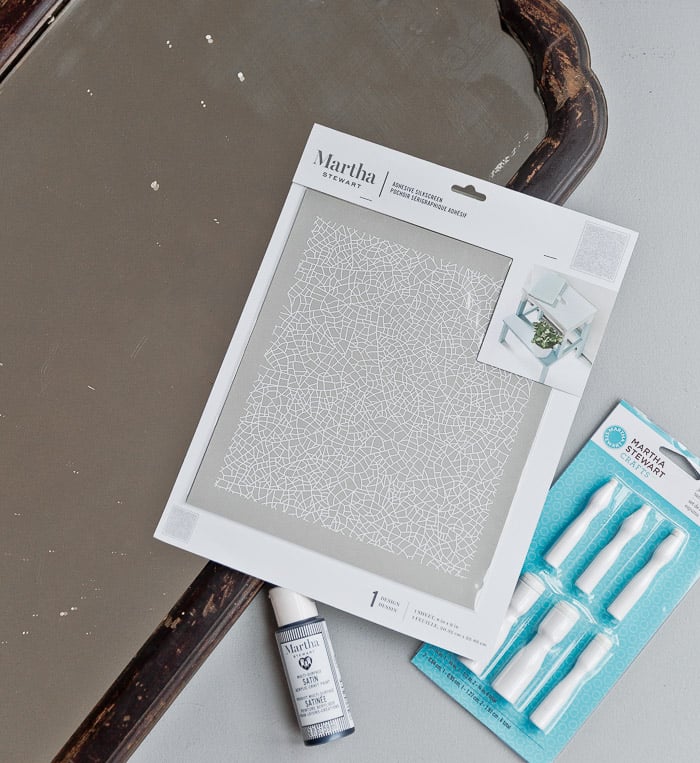
Materials
- adhesive silkscreen or stencil (mine is Martha Stewart Crackle)
- daubers or foam pouncers
- Martha Stewart’s Family Friendly Multi-Surface Satin Acrylic
- mirror
*If you’re looking for Halloween stencils, outside of the crackle pattern I used for this project, check out this Halloween stencil pack with spiders, pumpkins, bats, and more.
I like using Martha Stewart’s Family Friendly Multi-Surface Satin Acrylic specifically is because it works on lots of different surfaces.
You can use these particular paints on glass (which means it will also work on mirrors), canvas, wood, paper, metal, terra cotta, and fabric. Same goes for the stencils and silkscreens – they’re washable, reusable, and work on many different surfaces.
So, they’re great materials to have in your craft closet.
Note About Adhesive Silkscreen vs Adhesive Stencil
I’ve been using adhesive stencils all year, but this time I tried out an adhesive silkscreen instead (from Martha Stewart).
As it turns out, the process is identical to how would you use a regular adhesive stencil.
The only real difference between the adhesive silkscreen and the adhesive stencil is that the silkscreen material is more flexible – almost like a piece of fabric BUT still acts just like a stencil would to block paint from certain areas to create the desired effect.

How to Make a DIY Halloween Mirror
I love using stencils and silkscreens for projects like this because it drastically cuts down on the time and energy spent on creating the pattern.
AND is much more effective than I could ever be with a tiny brush and a steady hand at creating the same pattern over and over again.
Step 1: Clean the mirror.
To get started, first make sure your mirror is clean and free of debris.
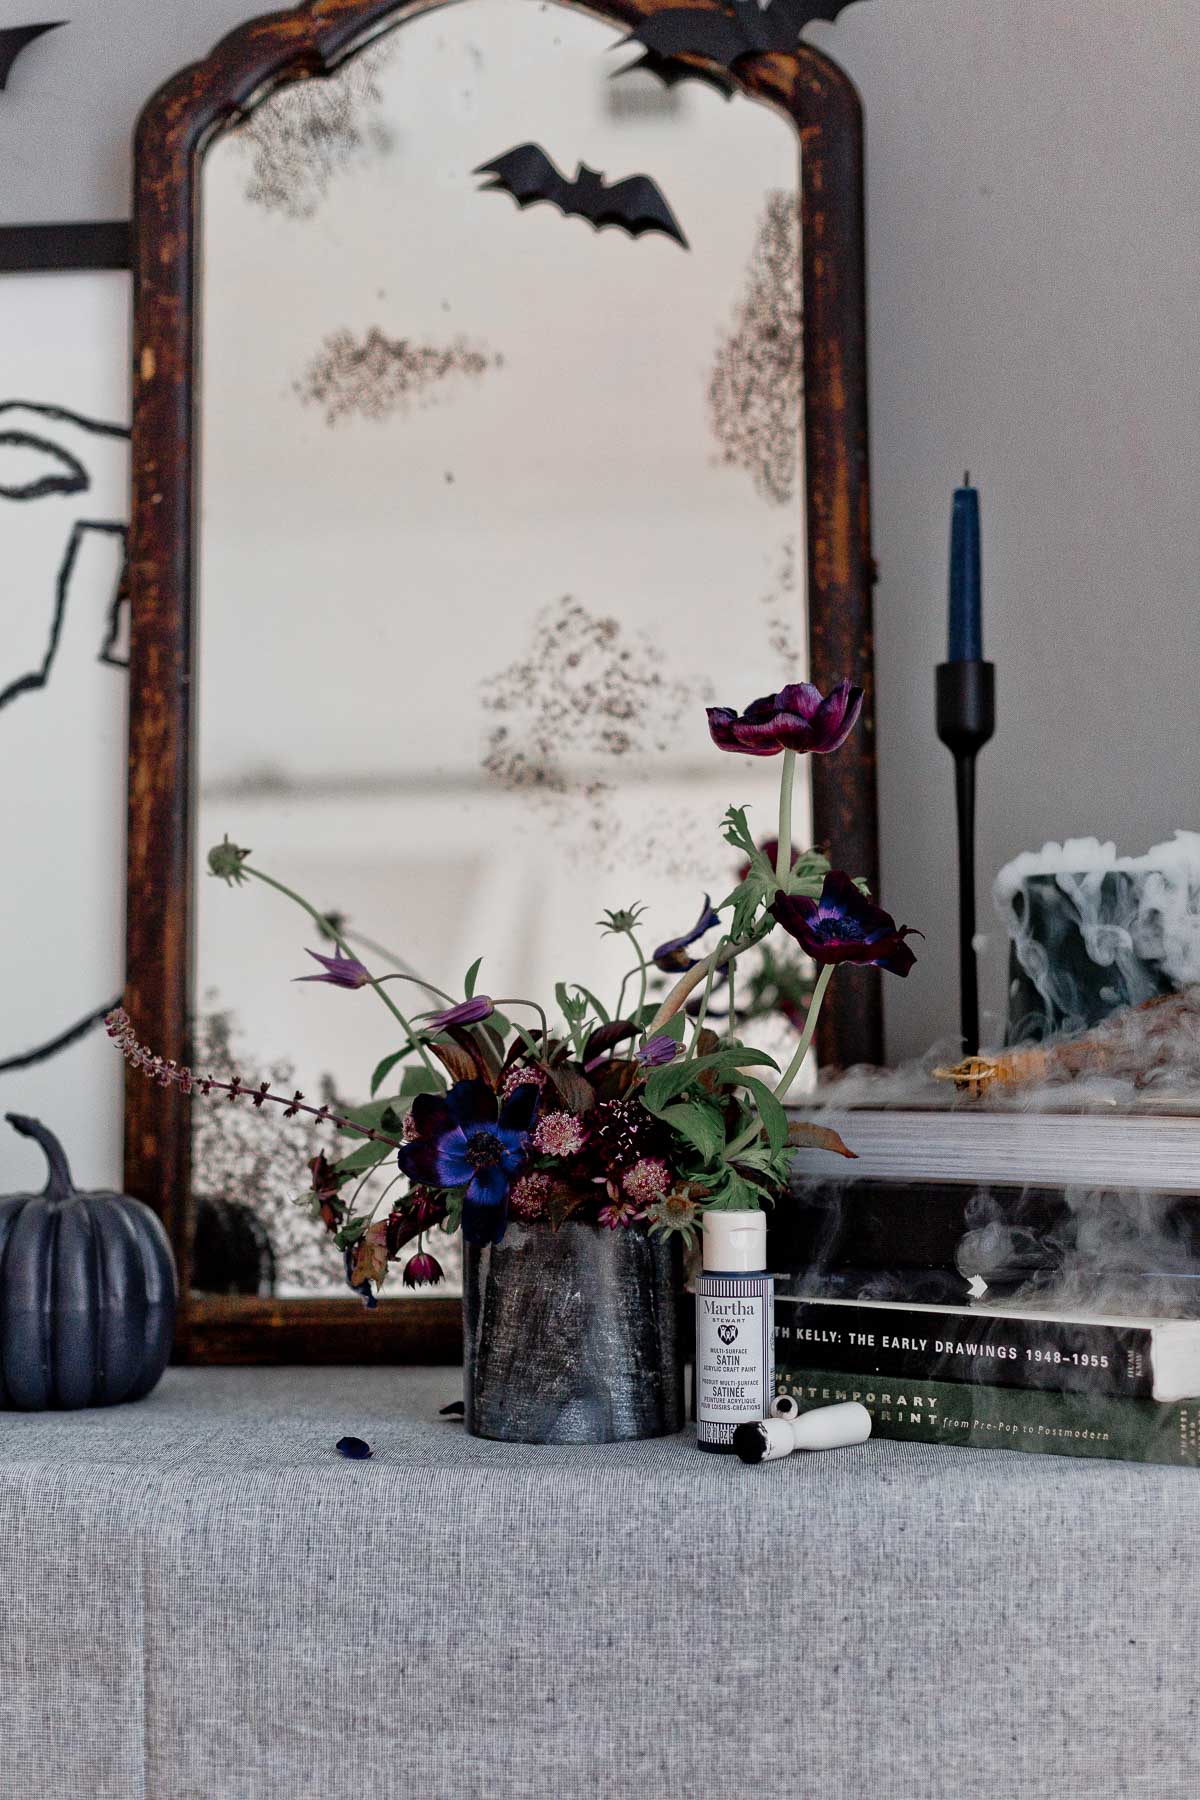
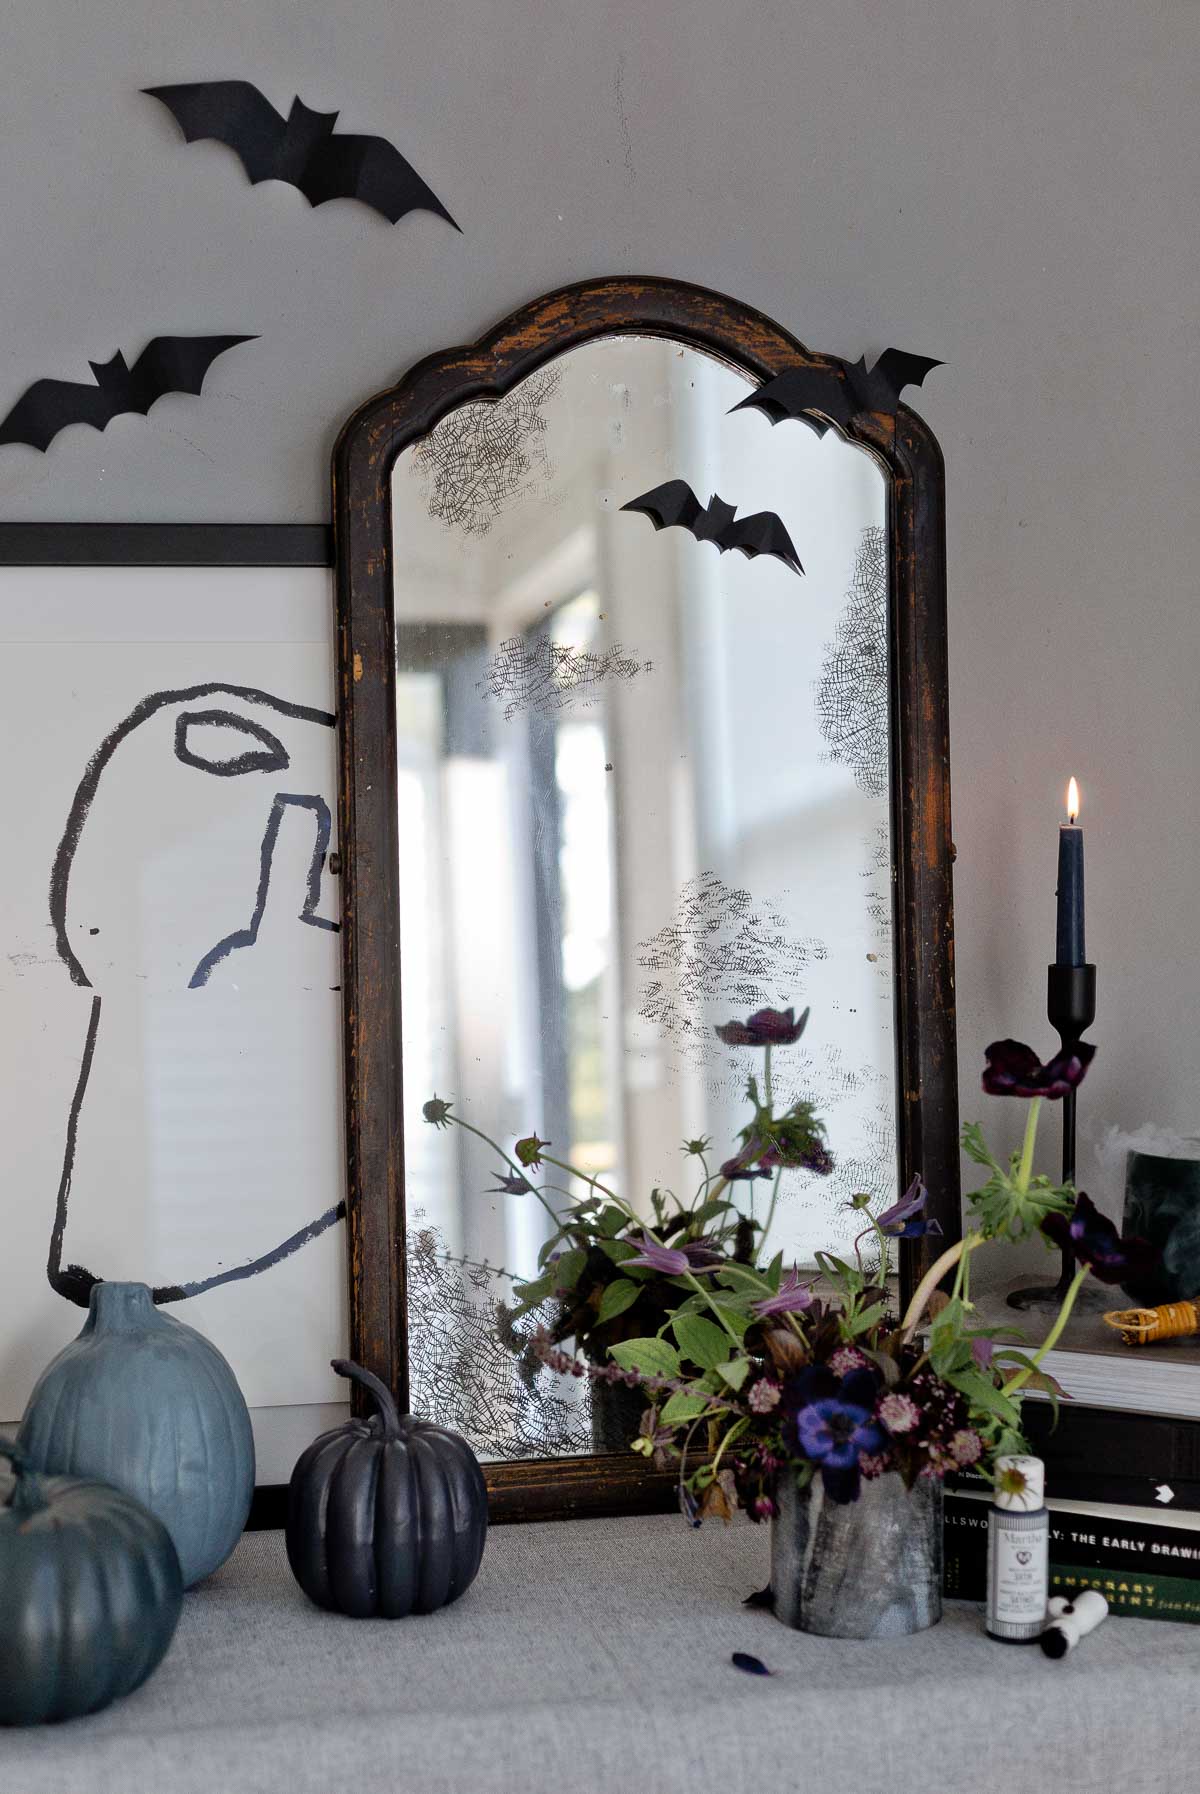
My mirror might look a little dirty in the photo, but that’s because it’s an antique mirror and those marks just won’t come off. I figured it went well with the vibe of the project though, so it doesn’t bother me.
Anyway, once the mirror is clean, remove the adhesive backing from the silkscreen.

Step 2: Attach stencil or silkscreen.
Place the crackle adhesive silkscreen on to the surface of your mirror.
Make sure to push the silkscreen down all the way around with your hands. This will ensure it is adhered to the surface really well before painting.

Step 3: Dab paint over the stencil.
Next, pour a small amount of the Marta Stewart paint onto a paper plate or paint palette and start painting. This paint is available in 78 colors and I used the color Black Belt for this project.
Dip a dauber into the paint and dab off excess paint onto your paint palette before pouncing a thin layer of paint over the the silkscreen.
See below for more tips on getting an antique / aged look on your mirror for Halloween.
One coat works great for this project – no need for additional coats of paint, especially since we’re going for a weathered / aged look.

Step 4: Peel silkscreen or stencil.
Now, while the paint is still wet, carefully peel the silkscreen off from the mirror surface to reveal the finished crackle design.

Step 5: Repeat 3 and 4.
Repeat steps 3 and 4 in various spots on the mirror to achieve the aged look perfect for Halloween.
Once finished, you can clean the silkscreen off with soap and water (while the paint is still wet) and let it dry before re-attaching the silkscreen to it’s backing again for storing.
Now your spooky Halloween mirror is ready to use. Bonus points if you add a few paper bats to the mirror and surrounding area.
BTW – I also used Martha Stewart’s Family Friendly Multi-Surface Satin Acrylic to create a spooky, stylish look for the pumpkins and other decorative items. So, this paint knows no bounds!

Tips for Getting an Antique / Aged Mirror Look
If you want a weathered / aged look to the crackle, like mine, I’d recommend just choosing select sections to paint onto the mirror at random. This helps make it look more antique and aged.
Additionally, I found that fading the paint out at the edges, which can be achieved with a lot less paint on the dauber, will also help with achieving the aged, antique mirror like mine.
And lastly, if you mess up, you can use a razor blade to scrape the paint off the surface of the mirror after it’s dry without damage and try again.
This is also a great trick for removing excess pattern from an area of the mirror if the shape created looks to deliberate, strangely shaped, etc.

How to Remove the Silkscreen Design After Halloween is Over
Once November hits, the crackle designs can be scraped clean using a small razor blade.
Just slowly scrape the surface that was painted with the blade until it’s been fully removed.
And clean off any extra residue with a mirror cleaner. That’s it! Easy as can be.


Have you ever painted or silkscreened a mirror before? Think you’ll try a removable design pattern like this one on a mirror in your house?
3 comments | Click here to reply
Pleasure to go through such wonderful work!!
FloranetThanks Kat! Hope to hear how it goes!
Brittni-Brittni
This is a really innovative idea! I can’t wait to try it!
Kat