
I’ve been (slowly) making progress on the studio renovations and the biggest studio change to date is finally done! Want to know what we did?! Built-ins! Now I realize it’s possible that those words may have never been uttered with an exclamation point after ’em, but I promise it’s a lot more exciting than that tiny little phrase lets on.
These built-ins are colorful, modern, DIY-friendly, and incredibly functional (so much storage!). PLUS, there’s seating! Can you tell I’m excited?! I am really pumped to share the project with you today, in partnership with the awesome folks at HGTV HOMETM by Sherwin-Williams.
I worked with a contractor to help create the build out, but I was very involved in the entire process, from design to build, and made sure to document the process (with instructions too), for anyone who wants to ‘weekend warrior’ something similar at home. It is completely DIY-able with the right tools. And the end result has given me tons of display storage for books, a place to sit and hangout, and hidden storage behind the faux wall for larger furniture items and props that I don’t want on display.


Want to see how this custom seating and storage unit was made? Click through for the DIY tutorial and more photos…
The general game plan for this build went something like this…create a faux wall to hide the things I don’t want to look at day after day, add storage and seating, make it look like it’s always been there, and (most importantly) make it look cool. Pretty straightforward.
We decided to work with maple plywood sheets to create a more raw, modern look and save a few bucks in the process, since plywood is pretty affordable. Even if I had had a bigger budget though, I would have done it the exact same way. From an aesthetic point of view, I really like the way plywood looks for projects like this. So, it was perfect.

Materials + Tools
- HGTV HOMETM by Sherwin-Williams Showcase Interior paint (available at your local Lowe’s)
- paint roller, paint brush, paint pan
- 3-4 maple 3/4 inch stain-grade plywood (this will vary depending on the size of your build)
- 2 1/2 interior finish nails or interior brad nails
- 2 1/2 inch finish nailer / nail gun
- table saw
- sanding block or sander
- natural wood filler
- tape measure
- small framing square
- drill
- countersink drill bit
- 1 5/8 coarse thread drywall screws
- soft clamps
- saw horses (optional)
- level (2 ft or home torpedo level)
- eye and ear protection
Instructions
1. Determine rough opening. Measure with the height, width, and depth of the opening that you are creating the built-in inside, with a tape measure. In my case, we measured the length in between the columns (107 inches), the height underneath the platform (50 inches), and the depth we wanted (16 inches).
Be sure to check the opening where your built-in will be to see if it’s level from left to right and front to back and make adjustments if necessary.
2. Next, draw out a basic design on graph paper to get an overall feel for what you’d like to create – shelving, seating, etc. FYI- When creating shelving and seating remember this general rule… you will need a support every 24 inches or shorter (24 inches is the max between supports before the wood may start bowing). AND if creating a seating area / bench, standard bench height is between 17 and 19 inches.
Once you have a solid plan, determine the appropriate measurement for the frame that the built-in will rest within (that would be the measurements that you took in step #1, minus at least a 1/2 inch for each dimension to give yourself some wiggle room).
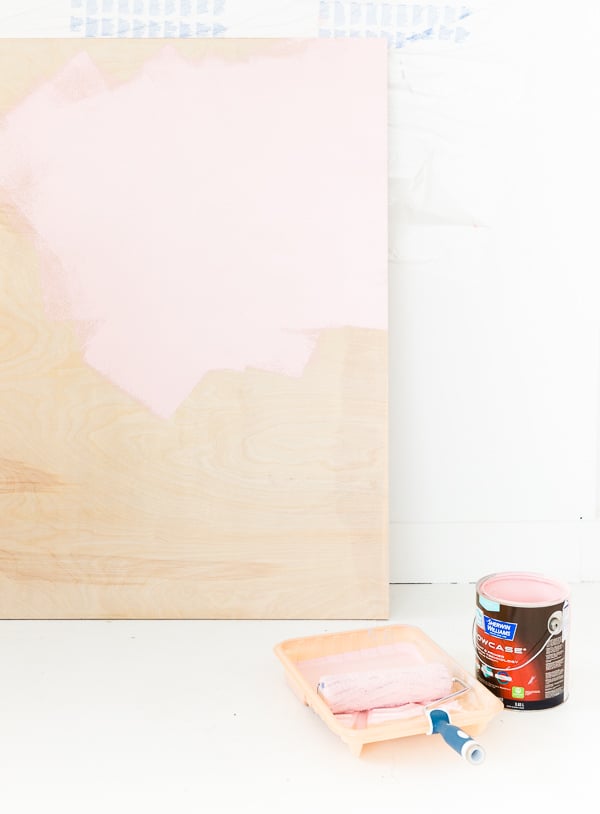
3. Once you have your design, it’s time to purchase supplies. Make sure you do the math on how much wood you’ll need ahead of time. Then, once you’ve purchased the wood, paint, and other supplies, the first thing you’re going to do is paint the largest sheet(s) of wood for the faux wall, since it will need time to dry. *If you’re not creating a faux wall, like mine, paint directly onto the drywall where the built-in will later be installed. This will save a lot of time later, so you don’t have to ‘cut in’ to every single box, shelf, etc after the built-in is installed.
Choosing a paint color… After a little back and forth, I landed on the color Lotus Flower (HGSW2046), which is part of the HGTV HOMETM by Sherwin-Williams Vintage Finds Color Collection. Naturally, the paint I selected was from the vintage / mid-century inspired color palette – big fan of the furniture designs and color palettes from that time period. I used HGTV HOMETM by Sherwin-Williams Showcase Paint and Primer in One (in a flat finish). Full disclosure, since I was painting directly onto wood, I wasn’t sure how many coats it would take to cover the woodgrain, even with the paint and primer in one. As it turns out, it covered the woodgrain without any trouble in one coat. ONE. This stuff is like gold! Thick, woodgrain-covering gold.
Having trouble deciding on a color? HGTV HOMETM by Sherwin-Williams solved this problem by creating 16 designer-inspired Color Collections, each with 20 paint colors carefully selected to work together in any combination. By working together in this way, each Color Collection helps to create room-to-room harmony – pluck colors from your paint’s Color Collection to tie into accessories, furniture, etc for a picture-perfect color combo.

4. While you’re waiting for the paint to dry, it’s time to start constructing the frame that your built-in will be housed in. Use a framing square to square up the corners and scrap wood to support the corners.
It is important to note, when putting together the frame, you need to use a countersink drill bit to pre-drill holes for frame assembly (step #4) and shelf assembly (step #5 below). This is a necessary step, so the wood doesn’t split.


5. Now for the good stuff… Start at the bottom of your frame, and using your design from step #2 as reference, take a small pencil and mark off where supports, shelving, and seating spots will go. Next, cut supports* to appropriate lengths and screw bottom supports in from the bottom of the frame (for entire unit – seating and shelving at same time). By doing this you’re securing the frame. Then continue building upwards, adding horizontal pieces to your supports, shelf by shelf as you go. Put nails in using a nail gun every 6 inches on every support.
*Be sure to measure twice and cut once when building a unit like this. Safety goggles are recommended while cutting too.

6. Once the frame, shelving, and seating has been constructed, it’s time to attach the faux wall (that was painted in step #3) to the back of the unit. *If you are not creating a faux wall like mine, skip this step.


7. Next, slide the unit into place and then check the unit on top sides and bottom to see if it’s level once again. If it’s not level, you can always use wood shims to make it level. Ours was level, so we did not have to use wood shims.
Secure frame to wall, or in my case, the platform beams, with a nail gun.

8. Finishing touches… Sand any sharp edges or small pencil marks with a sanding block if necessary. Add wood putty to any nail holes, to fill and then lightly sand over them. Touch up any paint that may have been scuffed up while assembling. And finally, if there are any small gaps between the frame and the opening, fill in the gap with a little bit of caulk.

And that’s it! Phew. That was a lot to get through, but we made it! And though this part isn’t exactly glamorous, I did want to share a final photo of the all that hidden storage I was talking about too, before getting to all the glam shots. This is why the faux wall was so important to me…You would never know all of this stuff was just behind that wall!
And yes – there is a second faux wall on the opposite side of this photo, which houses all of my props that I want to keep on display…I’ll be sharing that part of the build another day. So stay tuned.


Photography Amelia Tatnall + Brittni Mehlhoff
So…what do you think? Do you have a spot in your home that could use a built-in like this? Curious to hear your thoughts.
—
This post is in partnership with HGTV HOMETM by Sherwin-Williams. Like what you see? Try it out to see for yourself and leave your own review here for a chance to win a $100 Lowe’s gift card! Thanks for supporting the brands that help keep Paper & Stitch running.
26 comments | Click here to reply
I love this! How do you not see screw holes anywhere? When you say put nails every 6 inches, what did you use nails for and what did you use screws for?
Alanna[…] for what I wanted the desk to look like and based the storage cubbies underneath off of the custom DIY seating and storage built-ins I shared from my old studio space. The end result is a pretty solidly-built desk for under $100! […]
Dual Purpose Room Makeover: A Guest Room / Home Office with Renter Friendly Design Solutions - Paper and Stitch[…] I spotted while we were shopping for supplies, but plywood fit into our budget so much easier! Practical DIY Plywood Storage Bench An unused wall was packed with function thanks to this DIY storage cubby meets bench. What a […]
Modern DIY Plywood Projects - 15 Ideas to Inspire You | Dans le LakehouseHi Jamie. It’s raw – no veneer edging.
BrittniVery nice and useful design.
jamiecurious why you did not iron on edge veneers to avoid the jagged plywood edges?
I love all the storage, shelving and seating that you created, plus the look of the natural plywood.
Hilary L Hahn[…] [Source] […]
Decor Crush: Millennial Pink - The Crafted LifeI love this deocration is very cute
The pink pineappleThe Pink Pineapple
New post:http://thepinkpineappleblog.blogspot.com/
[…] credit: 1, 2, 3, 4, 5, 6, […]
D E S I G N L O V E F E S T » WEEKEND AT HOME / 56I loved this post! I’m always on the lookout for new DIY storage solutions.
Britini[…] DIY found here. […]
Main Scoop – HAWTHORNE AND MAINThis is fabulous! Love how it turned out.
sara | alice & loisI love how it came out! It looks both useful and really pretty in your studio!
Holly WadeI love this idea! There’s so much storage space and it looks so organized!
www.thebeautydojo.com
Andrea HandojoWow that built in looks really cool, wish I had a place that I could build them.
Jessica SperryHonestly this looks SO FREAKING GOOD!!
Ashley | Sugar & ClothThanks Rachel. I was really happy with how it turned out. 🙂 Glad you like it.
BrittniOMG it’s so perfect! I love that little nook. And don’t even get me started on that lovely shade of pink!
Rachel M SmithThanks Kimberly! It’s provided SO much extra storage we actually have extra room now. Yay! There was really no storage in here before, so this unit has really come in handy so far.
BrittniSo clever to build a faux wall to hide the mess! I love how the built-in unit has different size openings; it has a nice visual effect and is perfect for tall vases and smaller items. I always hate when my objects don’t really fill the space.
KimberlyThanks so much Michelle. I’m loving it too.
BrittniBeautiful, I love the colours and how everything is arranged!
Michellehttps://www.makeandmess.com/
Thanks Christin. 🙂
BrittniLOVE THIS!!!
ChristinThanks Kathleen! I highly recommend creating something like this (even on a smaller scale that’s not built in), if you need storage.
BrittniI love how this turned out!! If my apartment had an extra room in it, I’d love to transfer my craft stuff in there and use a built-in to keep it organized.
Kathleen