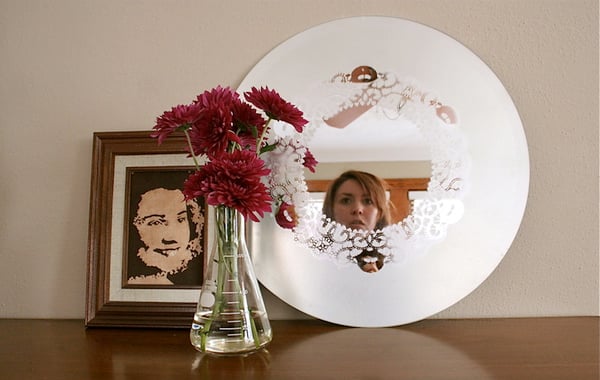
An etched mirror like this one is within reach with just a few supplies. It’s so easy to recreate this frosted mirror DIY (even if you’ve never DIYed anything before).

If you like the look of etched mirrors, but don’t have the budget for one right now, or you just want to create something custom for your home, try this mirror DIY!
With just a few supplies, you can create an etched mirror / frosted mirror in no time. Honestly, this project only has four materials (including the mirror)!
P.S. Even if you’re not a fan of the doily design that I created, there’s still something to learn here.
This frosted mirror technique can be used to create tons of interesting and unique designs. Click through to see what I mean.
Make an Etched Mirror in Minutes
Get the look of an etched mirror in minutes, without having to use heavy, expensive, and sometimes toxic creams.
I opted for a frosted glass spray paint that provides the same look, but takes way less time AND is more affordable.

Materials Needed for Frosted Glass Mirror
- round mirror (framed or unframed)
- paper doily
- frosted glass mirror spray
- double-sided tape

How to Make a Frosted Glass Mirror
1. Start my cleaning the mirror with soap and water to remove any debris or dirt, and let dry.
2. Choose a paper doily that works for the size mirror you have. My doily is about a third of the size of mirror.
On the backside of the doily, place double sided tape all over.
You will want to overload it with tape so that you can stop the spray from going into areas you don’t want it to be.
But you also want to be sure not to put tape over any areas that are suppose to be “open” in the doily.
Then turn over and secure to the mirror anywhere you wish.
Remember: The area you put the doily, will be the only spot in the mirror you will actually be able to see a reflection when we are done.
3. Place mirror down on flat surface.
Shake frosted glass spray according to directions and then spray 7-12 inches away from the mirror in even, sweeping strokes.
Thin layers are the best way to go about this to avoid drips and other inaccuracies.
Wait for each coat to dry (about 15-10 minutes) before applying the next coat. My mirror took four coats.
4. After the last layer is completely dry, gently remove the paper doily and double-sided tape from mirror.
Clean with damp cloth and you are ready to hang.

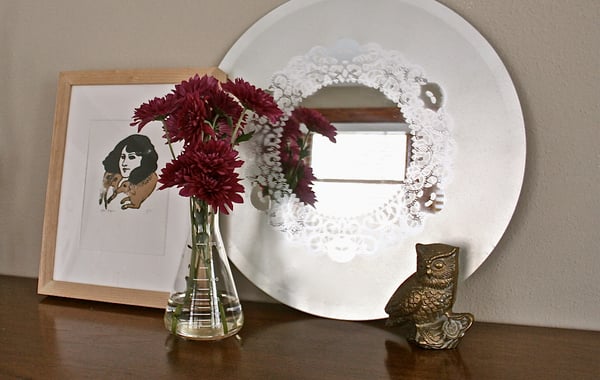
Now that you’ve seen how to make a frosted glass doily mirror, maybe you’d like to check out some more DIY mirror ideas?
This one below is my current favorite…

How to Make a Frosted Glass Mirror
Ingredients
- round mirror framed or unframed
- paper doily
- frosted glass mirror spray
- double-sided tape
Instructions
- Start my cleaning the mirror with soap and water to remove any debris or dirt, and let dry.
- Choose a paper doily that works for the size mirror you have. My doily is about a third of the size of mirror. On the backside of the doily, place double sided tape all over.
- You will want to overload it with tape so that you can stop the spray from going into areas you don't want it to be. But you also want to be sure not to put tape over any areas that are suppose to be "open" in the doily. Then turn over and secure to the mirror anywhere you wish.
- Remember: The area you put the doily, will be the only spot in the mirror you will actually be able to see a reflection when we are done.
- Place mirror down on flat surface. Shake frosted glass spray according to directions and then spray 7-12 inches away from the mirror in even, sweeping strokes.
- Thin layers are the best way to go about this to avoid drips and other inaccuracies. Wait for each coat to dry (about 15-10 minutes) before applying the next coat. My mirror took four coats.
- After the last layer is completely dry, gently remove the paper doily and double-sided tape from mirror. Clean with damp cloth and you are ready to hang.


Looking for more colorful inspiration? Check out my color blocked DIY mirror idea that uses transparent glass paints to create unique mirrors with tons of personality. Customize your mirror to any color you can imagine!
45 comments | Click here to reply
Absolutely beautiful
Laura KlikFantastic!! I will definitely make one of these. thanks for the great idea!
Regards,
sewforNha Phong
[…] 29. Spraypainted Doily Lace Mirror by Paper & Stitch Have you noticed the comeback that lace is making? Brittni created a lovely delicate ‘frame’ by using a doily as a stencil. […]
30 Amazing DIY Decorative Mirrors | test[…] 29. Spraypainted Doily Lace Mirror by Paper & Stitch Have you noticed the comeback that lace is making? Brittni created a lovely delicate ‘frame’ by using a doily as a stencil. […]
30 Amazing DIY Decorative Mirrors - Pretty Handy GirlYikes. Thanks for letting me know Asia. I will be contacting them.
papernstitchJust so you know, shelterness.com has stolen all your photos and summarized your tutorial here:
http://www.shelterness.com/diy-frosted-glass-doily-mirror/
Asia CitroI can’t wait to try this for tablescape mirrors.
Mary Beth[…] be a part of it. My project for a lacy frosted glass mirror is on page 46. You may remember the original mirror project from the papernstitch blog a couple of years ago if you’ve been around for a […]
I’m in Women’s Day magazine | seattle prop styling + diy projects by brittni mehlhoffPretty and creative. Mirrors are mostly functional. This one makes you take a second look.
Angel Jewelryabsolutely lovee it…thanx so much for sharing..have got to get me some doilies and a fun mirror !! :o)
Pinky[…] Lace Mirror […]
Crafts 4 « Kate1975's BlogIt’s a fantastic idea!!!!!
Caterina[…] Tutorial […]
Inspiration | a red appleThanks so much Anna for the shout out in your recent roundup. Love the other mirror projects you included as well. 🙂
papernstitch-Brittni
Hi, love your mirror, thanks for the tutorial. Wanted to let you know I featured it on my blog, seemommymake.blogspot.com.
Thanks!!
Anna[…] wird was Kreatives angewandt. Dank papernstitch werden aus langweiligen Spiegel Eigenwerke entstehen. Ich weiß nicht wie’s euch geht, aber […]
Spieglein Spieglein an der Wand… | Matrjoschki[…] be perfect to hang by my jewelry. the easy DIY tutorial can be found on a super cute blog called papernstitch (also where this picture came […]
mirror inspiration « moments and momentos[…] house. Brittini over at Paper N Stitch has a tutorial on how to make a home staple more feminine. The Frosted Doily Mirror is so easy, you can literally do it in between all of your house chores and it will be finished by […]
Tutorial We <3: Frosted Doily Mirror « workshop[…] 16, 2010 in things I think are neat | Tags: mario, mirror 01| This Doilie mirror from Stitch & Paper. (Visit her site for a […]
Neat things: Doilie Mirror & Rap « hello. sorry about the typos.I tried this! I’m posting about it on my blog tomorrow. Thanks for the tutorial!
Taylorthanks everyone!
papernstitchThis is so pretty! I know many people who would LOVE this as a gift. Thanks for the cool idea! I’m going to make this a future post (credited to you of course :D).
actsofflairSimply cute!
Phares CauseyAdorei, muito criatico, maravilhoso!!!
Dani GrossiSo have to try this!!!
Mike T.Hey, followed this project from d*s. Thanks for a great idea; i have some old blue frosted glass paint lying around, so I’ll try this for sure! Have also subscribed and looking forward to your future posts. Cheers!
Kitschcrazyi love this! i didn’t know that there was spray glass etching stuff. very cool. i can’t wait to try this!!
SoraiaGreat idea! You’d want to check your paper doily beforehand, to be sure it doesn’t have any “hanging chads” obstructing the punched-out design. I could see this working really well using colored spray paint, too, and with overlapped and/or off-center doilies.
Also, the phrase is “case in point”. 🙂
SabraI have a whole new respect for doilies. Thanks for sharing!
AmandaFantastic!! I will definitely make one of these. thanks for the great idea!
ErinTHIS IS JUST PLAIN RADNESS!
Miss B.ohh- where is that cute little vase from ? <3
jowow. that is one great idea!! thanx for sharing!
louHow easy to DIY! It’s darling.
JeaneeLove it! It’s on my list of things to try!
evieI love this idea!
lovesfool=)
ShanonI LOVE this! So simple with GORGEOUS results. You’re so clever.
sloeginfizzThank you so much Shannon. 🙂 Yes, I know how much you love mirrors. The mirror I used actually reminds me of one of the mirrors you have photographed before…forget what else was in that photograph (but i love it).
papernstitchI love it and the best part…not a whole lot of materials or instructions!
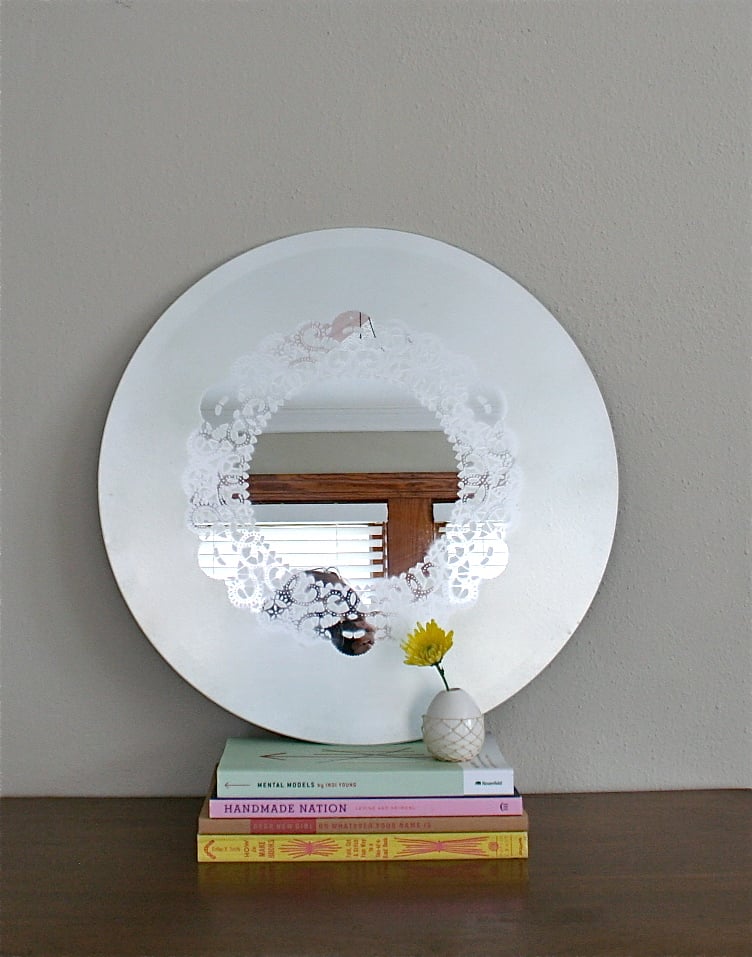
JoannaI love the display you created with the mirror – the yellow flowers really pop against the white mirror!
Piper aka one sydney roadThis is the best yet that you’ve posted! What a cool idea, and so easy. It could work in so many environments. And you KNOW I love a good mirror. =)
ShanonThanks so much Susan and Tammy. Glad you like it.
papernstitch-Brittni
What a beautiful project! I love this.
Tammytotally going to have to try this…
Susan Petersen