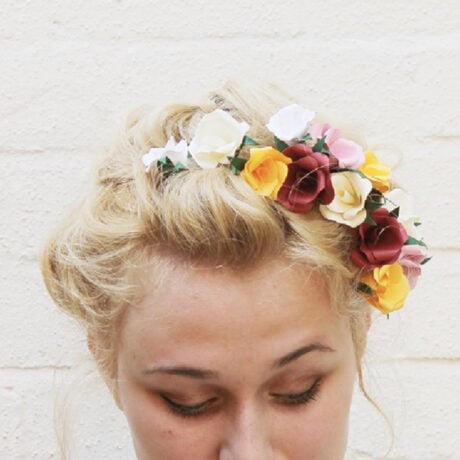
Because flower hair accessories never go out of style, today we’re making our own! They’re so cute and easy. But also, way more customizable and flowy than a flower crown because you can place each flower individually. Making them great for braids and other up dos.


Ally from Now That’s Pretty has kindly offered to share a colorful paper flower hair accessory DIY with you. And let me tell you…I am totally in love with this idea. Definitely a must-try. Take it away Ally…
A sure sign that it’s summer is when every girl in every magazine suddenly has flowers in her hair. For us girls without a styling team watching our every flyaway, there has been a dozen amazing flower crown tutorials floating about the web, all ready to transform us into summery flower fairies.
However! Flower crowns can be a little awkward to wear; firstly, they are not very adaptable, you’re pretty much going to have to settle with hair down. And secondly they can sometimes skirt around the edges of simply looking like you’ve plonked some flowers on top of your head.
I wanted to create a flower hair accessory which was totally adaptable to different hairstyles and still looked delicate and pretty.
The best part is also how much potential you have with these little spirals; for my prom up-do I replaced flowers with pearls for a sophisticated look and in the future I fully intend to try out some bows. If you try out any be sure to share!

Supplies for making hair flowers
- good quality paper cardstock
- scissors
- 2 knitting needles of different thicknesses (or similar)
- glue gun
How to Make Flower Hair Accessories with Paper
1. First cut out your petals. You will need one tear drop shape for the centre and then about five rounded heart shapes.
2. Take a small knitting needle and roll the tear drop to make the centre of your rose.
3. Now take your heart shape and pinch the base around a large knitting needle.
4. With a small knitting needle curl the tops of your petals backwards.
5. Curl all of your petals in this way.
6. To assemble your rose start by gluing the tear drop shape into the centre of one of your petals.
7. Continue to build up your rose in this way adding petals diagonally opposite.
8. When you’re finished your rose should look like this!

Supplies for making the spiral fitting
- wire – I used 20 gauge wire for this project.
- round nose pliers
- flat nose pliers
- wire cutters
- glue gun
How to Make Spiral Fitting for your Flower Hair
1. Using the very base of your round nosed pliers make a large circle. This will be the centre of your spiral and where you will be gluing your flower.
2. Using your flat nosed pliers hold your wire and keep rotating and twisting round until you have a wire spiral.
3. Cut off your spiral leaving a short tail.
4. Using the smallest part of your round nosed pliers make a small loop at the end or the tail. This is just to round off the edges so it doesn’t hurt your head.
5. Now holding the centre circle gentle pull out your spiral.
6. Add a big blob of glue gun to the centre of your spiral and glue on your paper flower.


And you’re done! To wind in your flowers simply thread the end of your spiral into your hair and twist.
The spirals work best when applied into tight hairstyles or up dos but can also be reasonably secure in loose hair.
How to Make Paper Flower Hair Accessories
Ingredients
- good quality paper cardstock
- scissors
- 2 knitting needles of different thicknesses or similar
- glue gun
- wire - I used 20 gauge wire for this project.
- round nose pliers
- flat nose pliers
- wire cutters
Instructions
- First cut out your petals. You will need one tear drop shape for the centre and then about five rounded heart shapes.
- Take a small knitting needle and roll the tear drop to make the centre of your rose.
- Now take your heart shape and pinch the base around a large knitting needle.
- With a small knitting needle curl the tops of your petals backwards.
- Curl all of your petals in this way.
- To assemble your rose start by gluing the tear drop shape into the centre of one of your petals.
- Continue to build up your rose in this way adding petals diagonally opposite.
- When you're finished your rose should look like this!
- Using the very base of your round nosed pliers make a large circle. This will be the centre of your spiral and where you will be gluing your flower.
- Using your flat nosed pliers hold your wire and keep rotating and twisting round until you have a wire spiral.
- Cut off your spiral leaving a short tail.
- Using the smallest part of your round nosed pliers make a small loop at the end or the tail. This is just to round off the edges so it doesn't hurt your head.
- Now holding the centre circle gentle pull out your spiral.
- Add a big blob of glue gun to the centre of your spiral and glue on your paper flower.
- And you're done! To wind in your flowers simply thread the end of your spiral into your hair and twist. The spirals work best when applied into tight hairstyles or up dos but can also be reasonably secure in loose hair.
 This guest post was written by Ally Ebdon. Ally is currently based in Edinburgh, UK. She splits her time between writing for her DIY blog Now That’s Pretty, running her custom ukulele business and ensuring that the entire house is covered with confetti.
26 comments | Click here to reply
this is so pretty! I love all the vibrant colors, I definetly need to do this. I have a few friends who would also adore this. Thanks sooo much for sharing this! : )
eden nur[…] You can check out the wonderful tutorial HERE. […]
DIY Paper Flower Hair Accessories | Ecka & PeckaEcka & PeckaAdorable; what a fabulous idea! Did you have any issues removing them from your hair (tangles, etc)?
Rachel | 52 Weeks Projectvery beautiful thanks
Meshthank you for the tutorial! It looks wonderful!
Linda[…] Photo: Paper n Stitch […]
6 Wedding DIY Projects You Can Do On A Saturday | The Knot Blog – Wedding Dresses, Shoes, & Hairstyle News & Ideas[…] Paper flower hair accessories DIY from Ally for Paper & […]
5 DIYs to Try This Weekend | Paper & Stitchoh wow… that is some serious loveliness! i would like to try making this to put in my 4 year old niece’s hair… totally cute tutorial, ally. 🙂
lyndsay // coco cake landI love how customizable the flower placement can be! So great!
KathleenThis is gorgeous! It would be perfect for a DIY wedding hair piece.
Hillaryhttp://lovelyonabudget.blogspot.com
Oh good, Rachel! I’m sure they’ll look great in your hair.
papernstitchSo dreamy! Even though I have shorter hair, I’m totally going to try this. I’m eyeing my dusty scrapbook paper with newfound respect!
Rachel LinquistReally, Becca? I don’t remember ever seeing anything like this before…Now, I’ll have to research it. You’re making me curious. 🙂
papernstitchGorgeous! They used to make lots of hair accessories with that spin base in the early 2000s and I was obsessed. These are so cute!
-Becca
BeccaAgreed Kelly! Ally is one clever (DIY) cookie. Loved this project! And thanks again to Ally for sharing it with my readers!
papernstitch-Brittni
This idea is genius!! The brilliance that is Ally strikes again. Love it!
Kelly @ Studio DIYYes! Quick and simple are requirements for me too, these days. Thanks for stopping by Lauren!
papernstitchthis is so pretty… and looks pretty quick and simple, requirements for personal craft projects these days. can’t wait to make a few!
laurenThis would so cute for a little girls birthday party. Wouldn’t it, Diane? I’d totally rock it too though! 🙂
papernstitchthis is absolutely the sweetest thing! oh how I wish I had a little girl to braid the flower garland through her hair!
Diane @ homesweethomemadeGlad you like Ally’s tutorial Kaisa. I am hoping to try this out over the weekend with some different types of paper flowers. Such a fun idea!
papernstitchThose flowers look gorgeous and it’s such a good idea to use them in hair! Thanks for sharing! xx
KaisaAnd speaking of gorgeous…your blog is so lovely Sophie! Thanks for stopping by.
papernstitchThis is GORGEOUS
SophieTotally! Let me know how it goes, Juni!
papernstitchlove this! I’m definitely going to try this one out. a lot more versatile than flower crowns for sure.
juni // hej juni