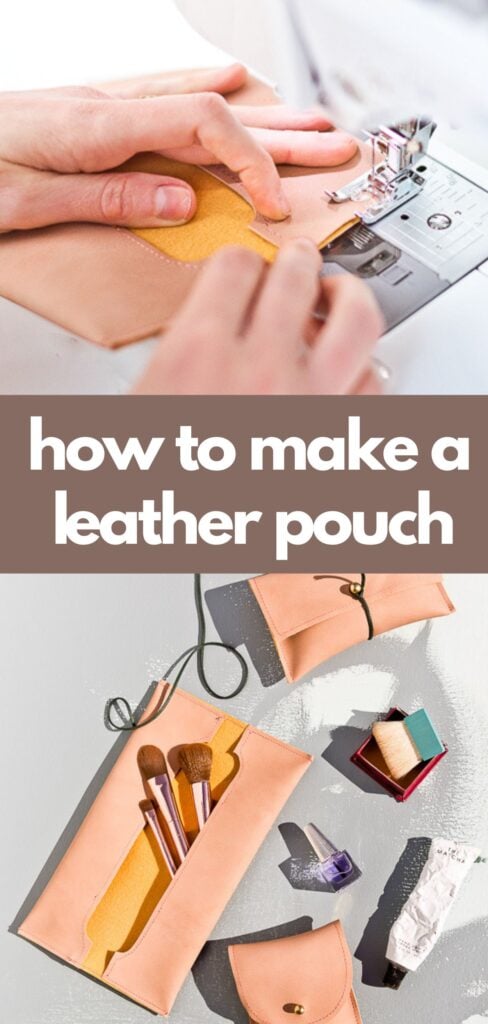
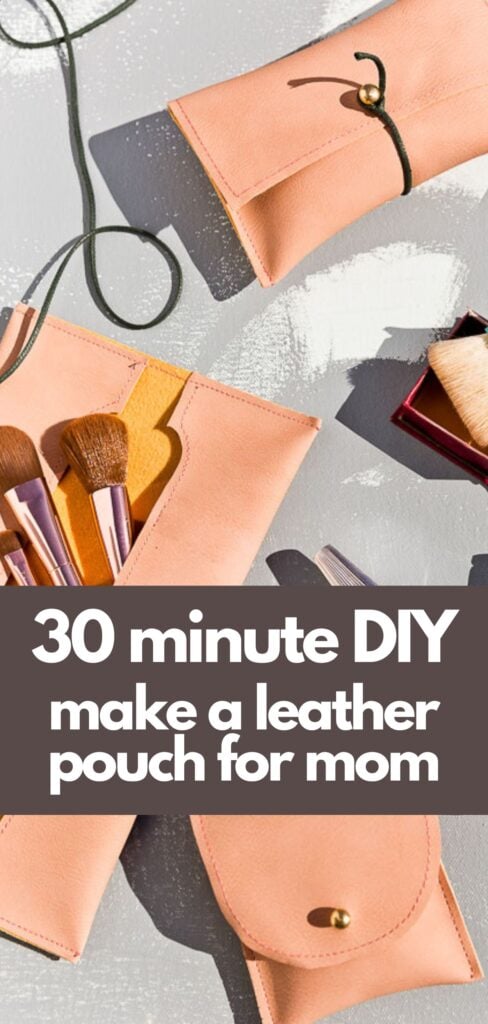

These leather pouches are so useful day-to-day and make great gifts as well! Oh, and did I mention, they can be made in under 30 minutes?!

I’ve been thinking about little gift ideas lately that would be useful (and cute) for anyone, but especially moms since Mother’s Day is right around the corner. And immediately these little pouches popped in my head.
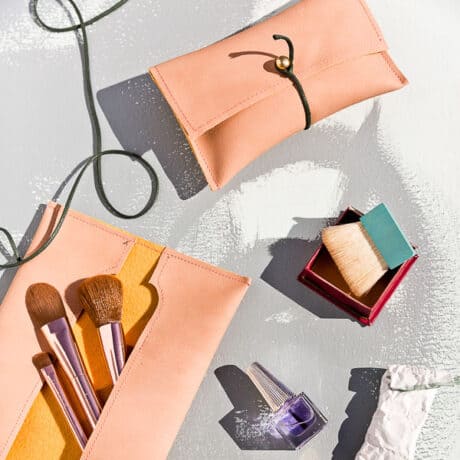
They’re a super easy sewing DIY that can be used for makeup essentials, cash, business cards, etc – throw them in your purse or drawstring bag when you’re out and about or your carryon when you’re traveling. You can use these little guys for almost anything and they’re super durable too. Click through for all 3 ways to make a leather pouch in under 30 minutes.

Materials for DIY Sewn Leather Pouches
- light to medium weight leather (or faux leather)
- cord (leather, suede or cotton)
- gold button and screw back
- leather hole punch
- scissors
- ruler or measuring tape
How to Make DIY Sewn Leather Pouches
I made one version of these pouches last year for a workshop day I did in Chicago, but never shared the tutorial. And then made two more to compliment the first style for a little more variety. Here’s the how-to for each of the three pouches…

#1: Long DIY Wrap Clutch
1. Cut the full rectangular piece needed to get started. Mine measured 10 inches by 11 inches.
2. (optional) If desired, to make it look like the one in the photo, you can cut a long notch on each of the two long ends, leaving about an inch on each side. This would cut slightly into the dimensions provided in the first step. See photo for an example of how each pouch was cut from one piece of leather.
3. Then sew a decorative stitch around the two ends that you’d potentially be notching, with the sewing machine.
4. Next, fold the two ends in toward the center that you just stitched and sew the ends down on each side. Backstitch at the beginning and end.
5. Flip over and stitch a long cord onto the back middle at one end. The cord I used was 36 inches long so that I could wrap it around the pouch a bunch of times, if desired. Wrap around the closed pouch once filled with makeup brushes, etc. Done!


#2: Small Rounded DIY Button Pouch
1. Cut the long rectangular piece needed to get started and then curve one end, as shown in the photo. Mine measured 11 inches by 3.75 inches (height measurement taken from top of the curve to the flat bottom).
2. Fold the length into thirds, then stitch the bottom half of the pouch together on the two ends to form the bottom, with a sewing machine. Backstitch at the beginning and end of each side.
3. Then sew a decorative stitch around the curved end.
4. Next, determine where you want the button hole to be. Make a mark with a pen or pencil on the top (rounded) part of the pouch. Then hole punch that mark with a leather hole punch.
5. Next, fold the flap over and make a mark through the hole that was created, through to the other part of the pouch. Hole punch that mark as well.
6. Then, add screw piece in through the back of the second hole, and screw the button on top of that screw. Fold the top flap over, putting the top flap hole through the button closure. Done!

#3: Medium DIY Button Pouch
1. Cut the long rectangular piece needed to get started and then curve one end, as shown in the photo. Mine measured 10 inches by 6 inches.
2. Fold the length into thirds, like the last pouch.
Then stitch the bottom half of the pouch together on the two ends to form the closed bottom part of the pouch, with a sewing machine. Backstitch at the beginning and end of each side.
3. Then sew a decorative stitch around the top flap (around the three edges) with the sewing machine to match.
4. Next, determine where you want the button hole to be. Make a mark with a pen or pencil on the top (rounded) part of the pouch. Then hole punch that mark with a leather hole punch.
Fold the flap over and make a mark through the hole that was created, through to the other part of the pouch. Hole punch that mark as well.
6. Then, add screw piece in through the back of the second hole, and screw the button on top of that screw.
Fold the top flap over, putting the top flap hole through the button closure.
7. Next, flip the pouch over (so the back is facing up) and stitch a cord onto the back middle at one end. The cord I used was 6.5 inches long.
Wrap around the button of the closed pouch once filled and you’re done!

These DIY pouches are perfect for storing jewelry…like maybe some cute clay earrings. As well as makeup storage on the go, for days when you want to skip the big bulky bags. More makeup organizer ideas here.

Sew Easy: DIY Sewn Leather Pouches (3 Ways)
Equipment
- leather hole punch
- Scissors
- ruler or measuring tape
Ingredients
- light to medium weight leather or faux leather
- cord leather, suede or cotton
- gold button and screw back
Instructions
- Cut the full rectangular piece needed to get started. Mine measured 10 inches by 11 inches.
- (optional) If desired, to make it look like the one in the photo, you can cut a long notch on each of the two long ends, leaving about an inch on each side. This would cut slightly into the dimensions provided in the first step. See photo for an example of how each pouch was cut from one piece of leather.
- Then sew a decorative stitch around the two ends that you'd potentially be notching, with the sewing machine.
- Next, fold the two ends in toward the center that you just stitched and sew the ends down on each side. Backstitch at the beginning and end.
- Flip over and stitch a long cord onto the back middle at one end. The cord I used was 36 inches long so that I could wrap it around the pouch a bunch of times, if desired. Wrap around the closed pouch once filled with makeup brushes, etc. Done!
Notes
Crafting Emma Spear // Photography Brittni Mehlhoff
Which pouch is your favorite? Think you’ll make one of these guys for your mom this year? Or maybe yourself?
10 comments | Click here to reply
Thank you for the inspiration. I’m struggling with grief and will have an empty home due to my son and his wife moving to their first house. My husband and I loved making things from leather. And I miss that. My daughter-in-law loves little pouches for her makeup. These will be perfect.. and will keep me busy through the long winter nights. Thank you they’re a perfect step to help heel my heart.
JanieceCan you please show what the inside of all the pouches look like?
red rose[…] DIY sewn leather pouches (for makeup, travel, etc) 2. graphic tees DIY from Almost Makes Perfect 3. modern bathroom […]
6 Weekend DIYs to Try - Paper and StitchI love post looks perfect
The pink pineapplehttps://thepinkpineappleblog.blogspot.com
Thanks Michelle. The wrap clutch is my fave too!
BrittniHow beautiful this idea is! I especially love the wrap clutch, it looks so precious!
Michellehttps://www.makeandmess.com/
Thanks Courtney. They’re super useful for throwing into larger bags that don’t have pockets (like my purse for example). So I’ve been using them non-stop.
BrittniThat pouch is so cute! I love how it turned out.
Courtneyhttp://sugarcoatedbears.blogspot.com/
Thanks Rena. 🙂
BrittniThey look really good!
Renaxx from Bavaria/Germany, Rena
www.dressedwithsoul.com