Create your own weaving loom for less than $20! This budget-friendly project is perfect for the crafty person in your life…even if that person is you.

If you’ve ever wanted to create a weaving from scratch (and not just one of the many DIY weaving hacks I’ve put together over the last year), this project is for you.
We made a giant loom (and a small one too), adapted from a project that Jess and her husband whipped up a while back, and I’m sharing the tutorial today.
Surprisingly, making your own loom is really straight forward and super budget-friendly, if you choose the right materials.
And you can easily adapt the instructions to the kind of loom you’re wanting too – a standing loom (that has legs that kick out for stability) or a lap loom for smaller projects that is more portable, etc.
PLUS, you can customize the size of the loom to any dimensions you want.
Click through to make your own loom from scratch, for under $20!

DIY Standing Weaving Loom
The instructions below are for the larger 24×36 inch standing loom.
If you want to make the smaller lap loom, scroll down to to the bottom for the materials list and instructions for the smaller loom.

Materials and Tools for DIY Standing Weaving Loom (24×36)
- one 1×3 select pine board that is 6 ft long (mine cost $5.92)*
- one 1×3 select pine board that is 8 ft long (mine was $8.32)*
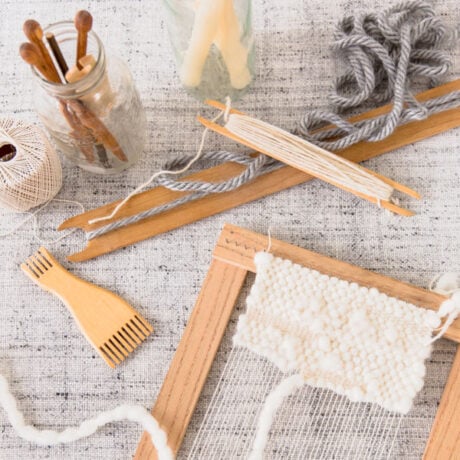
- 1 inch finishing nails or panel board nails (both of these work best because they have a small head – good for stringing up the loom and removing the finished weaving)
- eight 1.5 inch screws
- ruler or tape measure and pencil
- hammer and drill
- 2 inch middle hinges (only need these if adding legs to your loom)
- thin chain and 4 eye screws (only need these if adding legs to your loom)
- wire cutters (for cutting the chain – again, only need if making legs for loom)
*You can use any type of wood here you’d like, but I used select pine board to make it look the best it could on a tight budget.
If you use common board, the final cost will be even cheaper.
And if you use something like poplar or oak, the final cost will be a bit more than pine. Each wood type will have it’s own pros and cons.

Instructions for DIY Standing Loom (24×36)
1. Cut the piece of wood down to size (the dimensions of each piece of wood are shown in the supplies shot).
Then, start laying out the pieces to create the loom shape.
I put the 2 longer pieces (36 inch pieces) on the bottom and 2 of the shorter pieces (24 inch) on top, as shown in the photo.

2. Next, begin screwing the pieces together. You may want to create a pilot hole first to avoid splitting the wood.
Just two screws diagonal from each other (as shown in photo) seemed to work really well for each of the 4 corners.
You can always do 4 screws per corner if you feel like that’s better though. Mine felt really secure after just two screws in each corner though.
Screw all 4 corners the same way, making sure that the corner is squared off before screwing.
FYI -You may want to clamp the pieces of wood together first (if needed) to make sure nothing moves around while screwing, etc. Not required though.

3. Once the base is complete, you can either add legs (which I’ll show you how to do) OR skip this one and move onto the next step.
If you’re adding legs, you’ll use the remaining two 24 inch pine pieces for the legs.
Flip the loom base over, so that the long vertical pieces are on top (as shown in photo).
Then measure 12 inches from the top, and attach the hinges to both the loom base and the top of the legs (as shown in photo).

From there, you can add screw eyes (one to each of the legs and one to each of the base pieces across from it) and then attach the two together with the thin chain from the supplies list.
You can do this by double or triple knotting one end of the chain once it’s inside the eye of the screw and then bringing it across to the other eye screw (on the leg side for example), and knotting that side around the eye screw as well.
Making sure the chain is tight when you have the leg fully extended to where you want it to be.
Then, repeat this process on the other side.

4. Next, it’s time to add the finishing nails.
Make sure the loom is facing right side up (as shown in photo – with shorter horizontal wood base pieces on top of the longer ones).
Make a mark every 1/4 inch OR 1/3 inch (this is a preference thing based on how tightly woven you want your weavings to be), all the way across the top horizontal piece of wood and the bottom horizontal piece of wood.

Then, hammer a nail in at every mark, in a straight line across. Use the photo for reference.
You’ll do that on the top and bottom of the loom and then it’s ready to be strung up for use.

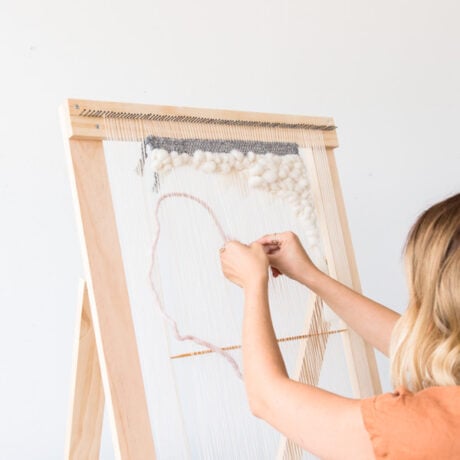
To create your warp, tie a knot around the first nail in the upper corner with your yarn / string.
Then, keeping tension in the string, bring the string down to the first nail at the bottom of the loom, wrap around that nail, and continue back to the top of the loom (this time wrapping around the second nail).
Then go back down to the bottom second nail, etc.
Repeat this process until the entire loom is strung and then knot the very last nail on the bottom right to finish it. Cut off excess string from end of knot and it’s ready for weaving.
If you’re still not sure how to string your loom, you can check out this YouTube video I found for a visual.
No need to double up the string as they did in the video though.

DIY Lap Weaving Loom
If you’re making the smaller lap weaving loom instead of the larger standing weaving loom, the dimensions and materials will be slightly different.
The finished lap loom in the photos is 12×18 inches.
Here are the materials and instructions for making the DIY lap loom…
Materials and Tools for DIY Lap Loom (12×18)
- 1 /2 x 2 oak (mine came in a 3 ft pieces and was $6 per piece – I bought 2 pieces to create a loom that was 12×18)
- 1 inch finishing nails or panel board nails (both of these work best because they have a small head – good for stringing up the loom and removing the finished weaving)
- eight 1 inch screws
- ruler or tape measure and pencil
- hammer and drill
The large loom was made with pine and the small loom was made with oak. Oak is a little more expensive, but looks a little nicer, so it’s kind of a preference thing. You can use either one for this project. Both pine and oak are good options.
Instructions for DIY Lap Loom (12×18)
The instructions below are for the smaller 12×18 inch lap loom. If you want to make the standing loom, scroll up for the materials list and instructions for the bigger loom.
1. Cut the piece of wood down to size – you’ll need two 12 inch long pieces of 1×2 and two 18 inch long pieces of 1×2 for this one.
Then, start laying out the pieces to create the loom shape.
I recommend putting the 2 longer pieces (18 inch pieces) on the bottom and the 2 shorter pieces (12 inch) on top of that. This will give you a little more space for hands, etc when weaving later.
2. Next, begin screwing the pieces together. You may want to create a pilot hole first to avoid splitting the wood.
Just like in the larger loom, two screws diagonal from each other seemed to work really well for securing each of the 4 corners.
You can also use finishing nails instead of screws for this if you prefer, but I would recommend also using some type of wood glue in between the two pieces of wood if you go that route.
3. Now it’s time to measure for the nails. Make sure the loom is facing right side up (with shorter horizontal wood base pieces on top of the longer ones).
Make a mark every 1/3 inch, all the way across the top horizontal piece of wood and the bottom horizontal piece of wood.
Then, hammer a nail in at every mark, in a straight line across. You’ll do that on the top and bottom of the loom and then it’s ready to be strung up for use.
To create your warp, tie a knot around the first nail in the upper corner with your yarn / string.
Then, keeping tension in the string, bring the string down to the first nail at the bottom of the loom, wrap around that nail, and continue back to the top of the loom (this time wrapping around the second nail).
Then go back down to the bottom second nail, etc.
Repeat this process until the entire loom is strung and then knot the very last nail on the bottom right to finish it.
Cut off excess string from end of knot and it’s ready for weaving.
If you’re still not sure how to string your loom, you can check out this YouTube video I found for a visual. No need to double up the string as they did in the video though.
More Weaving Related DIYs to Try
- DIY Obsession: weaving on a potholder loom
- weaving a wall hanging with colorful yarn
- how to make a potholder with your hands


DIY Standing Weaving Loom (24x36)
Ingredients
- one 1x3 select pine board that is 6 ft long mine cost $5.92*
- one 1x3 select pine board that is 8 ft long mine was $8.32*
- 1 inch finishing nails or panel board nails both of these work best because they have a small head - good for stringing up the loom and removing the finished weaving
- eight 1.5 inch screws
- ruler or tape measure and pencil
- hammer and drill
- 2 inch middle hinges only need these if adding legs to your loom
- thin chain and 4 eye screws only need these if adding legs to your loom
- wire cutters for cutting the chain - again, only need if making legs for loom
Instructions
- Cut the piece of wood down to size (the dimensions of each piece of wood are shown in the supplies shot). Then, start laying out the pieces to create the loom shape.
- I put the 2 longer pieces (36 inch pieces) on the bottom and 2 of the shorter pieces (24 inch) on top, as shown in the photo.
- Next, begin screwing the pieces together. You may want to create a pilot hole first to avoid splitting the wood. Just two screws diagonal from each other (as shown in photo) seemed to work really well for each of the 4 corners. You can always do 4 screws per corner if you feel like that's better though. Mine felt really secure after just two screws in each corner though.
- Screw all 4 corners the same way, making sure that the corner is squared off before screwing. FYI -You may want to clamp the pieces of wood together first (if needed) to make sure nothing moves around while screwing, etc. Not required though.
- Once the base is complete, you can either add legs (which I'll show you how to do) OR skip this one and move onto the next step. If you're adding legs, you'll use the remaining two 24 inch pine pieces for the legs.
- Flip the loom base over, so that the long vertical pieces are on top (as shown in photo), then measure 12 inches from the top, and attach the hinges to both the loom base and the top of the legs (as shown in photo).
- From there, you can add screw eyes (one to each of the legs and one to each of the base pieces across from it) and then attach the two together with the thin chain from the supplies list.
- You can do this by double or triple knotting one end of the chain once it's inside the eye of the screw and then bringing it across to the other eye screw (on the leg side for example), and knotting that side around the eye screw as well. Making sure the chain is tight when you have the leg fully extended to where you want it to be.
- Then, repeat this process on the other side.
- Next, it's time to add the finishing nails. Make sure the loom is facing right side up (as shown in photo - with shorter horizontal wood base pieces on top of the longer ones).
- Make a mark every 1/4 inch OR 1/3 inch (this is a preference thing based on how tightly woven you want your weavings to be), all the way across the top horizontal piece of wood and the bottom horizontal piece of wood.
- Then, hammer a nail in at every mark, in a straight line across. Use the photo for reference. You'll do that on the top and bottom of the loom and then it's ready to be strung up for use.
- To create your warp, tie a knot around the first nail in the upper corner with your yarn / string. Then, keeping tension in the string, bring the string down to the first nail at the bottom of the loom, wrap around that nail, and continue back to the top of the loom (this time wrapping around the second nail).
- Then go back down to the bottom second nail, etc. Repeat this process until the entire loom is strung and then knot the very last nail on the bottom right to finish it. Cut off excess string from end of knot and it's ready for weaving.
DIY Lap Weaving Loom
Ingredients
- 1 /2 x 2 oak mine came in a 3 ft pieces and was $6 per piece - I bought 2 pieces to create a loom that was 12x18
- 1 inch finishing nails or panel board nails both of these work best because they have a small head - good for stringing up the loom and removing the finished weaving
- eight 1 inch screws
- ruler or tape measure and pencil
- hammer and drill
Instructions
- Cut the piece of wood down to size - you'll need two 12 inch long pieces of 1x2 and two 18 inch long pieces of 1x2 for this one.
- Then, start laying out the pieces to create the loom shape. I recommend putting the 2 longer pieces (18 inch pieces) on the bottom and the 2 shorter pieces (12 inch) on top of that. This will give you a little more space for hands, etc when weaving later.
- Next, begin screwing the pieces together. You may want to create a pilot hole first to avoid splitting the wood. Just like in the larger loom, two screws diagonal from each other seemed to work really well for securing each of the 4 corners.
- You can also use finishing nails instead of screws for this if you prefer, but I would recommend also using some type of wood glue in between the two pieces of wood if you go that route.
- Now it's time to measure for the nails. Make sure the loom is facing right side up (with shorter horizontal wood base pieces on top of the longer ones). Make a mark every 1/3 inch, all the way across the top horizontal piece of wood and the bottom horizontal piece of wood.
- Then, hammer a nail in at every mark, in a straight line across. You'll do that on the top and bottom of the loom and then it's ready to be strung up for use.
- To create your warp, tie a knot around the first nail in the upper corner with your yarn / string. Then, keeping tension in the string, bring the string down to the first nail at the bottom of the loom, wrap around that nail, and continue back to the top of the loom (this time wrapping around the second nail).
- Then go back down to the bottom second nail, etc. Repeat this process until the entire loom is strung and then knot the very last nail on the bottom right to finish it. Cut off excess string from end of knot and it's ready for weaving.
Photography Brittni Mehlhoff
Crafting assisted by Jess Smith and Cori Maass
And that’s how you make your own weaving loom from scratch on a budget! It’s hard to believe that all of the materials cost less than $20 for each loom. Especially since buying a pre-made version would be at least 5 times that price! Not bad, right?!
Think you’ll make a DIY weaving loom like these guys? If so, which one seems more up your alley? The big papa or the baby loom?
13 comments | Click here to reply
Where did you get your loom comb and accessories?
LaurenI just built this, thank you for the easy tutorial. I can’t wait to use this baby!
Kate[…] 3. faux map drawer dresser from I Spy DIY 4. DIY magnetic display rail from The Merrythought 5. how to make a weaving loom 6. large crystal planter from Jojotastic 7. geometric acrylic earring DIY from A Beautiful Mess 8. […]
8 DIYs to Try This Weekend - Paper and StitchHi,
I really want to make the larger loom included in this post but I’ve scrolled through the post several times and have been unable to locate the measurements for the wood pieces.
Would someone be willing to share this information? Thank you!
NoahI love it! I can’t wait to try it
Rachelle[…] – If you’ve been dying to give weaving a try, learn how to make your own loom. […]
Friday Links - The Crafted LifeThanks Pink Pineapple. And YES – you should totally make one of these, Michelle. 🙂
BrittniI need to do this, this is such a great idea!
Michellehttps://www.makeandmess.com/
Amazing idea is so creative great post
The pink pineappleNew post:http://thepinkpineappleblog.blogspot.com/2017/10/nyfw-day-5.html
Thanks Gemma. 🙂 Can’t wait to do some real weavings on these looms.
BrittniHeck yes! What a brilliant DIY!
Gemma
Gemmawww.fadedwindmills.com
Aw, thanks Courtney. Happy to hear that.
BrittniIt turned out so well. I love it!
Courtneyhttp://sugarcoatedbears.blogspot.com/