You’ve seen a halo braid, but have you seen a half halo braid? Here’s a half halo braid (hair tutorial) that will take less than ten minutes to recreate.

The half up, half down hair trend has been coming back recently, with the ever popular hun (half up, half down bun). And I have to admit, it’s been getting me a little nostalgic for the old days…
I used to wear my hair that way ALL the time, back in middle school and part of high school too…Whether it was a messy hun (yes, I did rock that look back in the day) or just a half up, half down pony.
So, today we’re adding a new little twist to the trend and doing a something we’ve dubbed the half halo braid. Is that a thing already? I don’t know, but it probably should be. So easy and looks like you spent a lot more time on your hair than you actually did. Click through for the quick and easy hair tutorial…


Hair Tutorial: Half Halo Braid
1. Start with curled or wavy hair.
Prep roots throughout with your favorite texturizing product. This is the one Rachel, our hair guru, likes most. Works great and it’s not expensive at all.
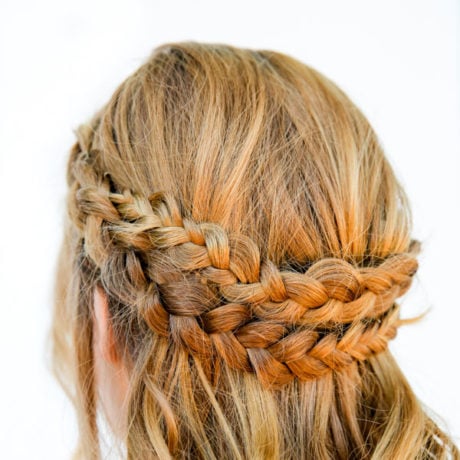
2. Section the hair out.
Next, taking the top half of your hair, split it into two sections and braid each with an inverted braid (as shown in the photos).
*Keep a couple of pieces out in the front, to frame your face, if you want a look similar to what you see in the photos. If not, just include those front pieces as part of your braids.
Note: As you’re braiding each side, make sure to leave your crown area out of the braids so that you don’t have a part down the back.
3. Make it messy.
Once your braids are finished spread them by tugging at pieces to give it a loose, easy look. Feel free to add more texturizing product if you need more “messiness” from your braids.
4. Wrap each braid around the head.
Wrap each braid around creating a halo look. And secure each with bobby pins, making sure to tuck in and hide the loose ends.
5. Add hairspray if desired.
Finish by spreading your braids anywhere they might need it and add a spritz of your favorite hairspray. Done! Pretty simple, right?


Hair Tutorial: Half Halo Braid in 10 Minutes
Instructions
- Start with curled or wavy hair. Prep roots throughout with your favorite texturizing product. This is the one Rachel, our hair guru, likes most. Works great and it's not expensive at all.
- Next, taking the top half of your hair, split it into two sections and braid each with an inverted braid (as shown in the photos).*Keep a couple of pieces out in the front, to frame your face, if you want a look similar to what you see in the photos. If not, just include those front pieces as part of your braids.Note: As you're braiding each side, make sure to leave your crown area out of the braids so that you don't have a part down the back.
- Once your braids are finished spread them by tugging at pieces to give it a loose, easy look. Feel free to add more texturizing product if you need more "messiness" from your braids.
- Wrap each braid around creating a halo look. And secure each with bobby pins, making sure to tuck in and hide the loose ends.
- Finish by spreading your braids anywhere they might need it and add a spritz of your favorite hairspray. Done! Pretty simple, right?
Hair by Rachel Brewer
Modeling by Amelia Tatnall
Photography by Brittni Mehlhoff
What hair trends are you loving right now? Think you’ll give this half halo braid a try?
P.S. For more braid tutorials like this one, visit the braid tutorials page.
13 comments | Click here to reply
I wore a halo braid in my best friend’s wedding! I love how simple and elegant it looks, and it’s relatively quick and easy to do! Thanks so much for posting all the neat ideas!
MorganThis is so cute and simple, love it.
Meg | Meghan Silva’s Blog
Meghan Silva@MeghanSSilva on Instagram
So cool. Would love it if you could check out my new post on how to plan happiness in 2016!
AlionaKisses xo | From Aliona With Love
This hairstyle is so cute, and I think I could even manage to pull it off!
Paige
Paigehttp://thehappyflammily.com
Wow, this looks so lovely. Can’t wait to give this a try!xx
Beth MayGlad you like it Chloe. 🙂 Let me know how it goes.
BrittniThis is such a cute hairstyle! Looks very impressive and intricate, but so simple to recreate. I’m always struggling to find easy braided hairstyles, but I’ll be giving this a go soon! x
ChloeHaha. Thanks Lex! Yep, it’s been bun nation over here too, for way too long. Nice to try out some new hair ideas every once in a great.
BrittniThose braids are beautiful, B! It would be a nice break from the daily bun I’ve been sporting since 2012!
Lexy | ProperHi Michelle! Amelia (the model in the photos) has long layers, so I guess it would depend on how short your layers are. If your layers are super short, the hair texturized would be even more helpful and a few extra hair pins to tuck in any pieces that stick out of the braid. Hope that helps! 🙂
BrittniSuch a beautiful and so romantic look, that’s exactly what I like! Unfortunately the whole thing gets a bit difficult with layered hair, but I will try nonetheless. Thanks for sharing!
Michellehttps://www.makeandmess.com/
Glad you like it, Monique!
BrittniHow incredible does this hairstyle look?! WOW! I love it!
Monique | WritingMonique