Mini planters made of colored plaster! It’s a clever and colorful DIY that you’ve gotta try!

I used to do Plaster of Paris crafts pretty frequently, but more recently switched to concrete for projects I would have previously made with plaster. It’s the same exact process and I love the look of concrete, so it made sense.
BUT a while back, I got to thinking about how I might be able to add color to plaster for some mini planters I wanted to make. I did some research online, but couldn’t find a solution anywhere.
Probably because the powder consistency of plaster is pretty important to it setting up properly, etc. So it’s not just a matter of tossing in some acrylic paint and calling it a day.
And yes, it’s true that I could just paint them after they’re set, which I’ve done before. But I wanted the color to be a part of the material, not an afterthought. The texture is different, etc, etc.
So, after some experimenting, I landed on something that actually works! It will tint plaster nearly any color you want without changing the consistency of the plaster. And now that I’ve figured it out, I… 1) wanted to share it with you, in case you want to try this on your own. And 2) I will be using this technique way more than necessary. Haha.
Click through for the ‘secret ingredient’ that makes this process possible AND my simple tutorial for making pastel mini planters for cacti and succulents.

Materials Needed for Mini Planters
- plaster powder (available on Amazon – also know as Plaster of Paris)
- powdered tempera paint – THIS IS THE SECRET INGREDIENT (lots of options on Amazon, I used this brand but any will work)
- silicone shot glass molds (this is exactly what I used, but there are loads more on Amazon)
- matte medium (to seal the plaster)
- paint brush
- sandpaper (fine grit)
Where to Buy Plaster of Paris
If you’d prefer not to purchase Plaster of Paris on Amazon, there are lots of other places you can find this affordable crafting material.
Typically, you can find Plaster of Paris locally at craft stores and art supply stores, like JoAnn’s, Michaels, and Dick Blick. Sometimes it’s in the kids crafts area.
But you can also find Plaster of Paris available at home improvement stores, like Lowe’s and Home Depot, as well as places like Walmart and Target.
Some of which are also available online, so I’ve linked them above just in case.
Where to Find Rubber Molds for Plaster
There are so many options out there. But any silicone or rubber mold will work just fine, whether it’s intended for food or crafts. Just make sure if you use a food mold for crafts, it stays for crafts only after that. Don’t switch back to food use after using it for plaster.
So for example, I used silicone shot glass molds to create these mini planters because they were the perfect shape for what I was looking for.
But you also use ice cube molds, chocolate molds, etc. Or just skip the food molds all together and go straight for the craft molds, which you can find all over Etsy from independent sellers.
What else can I use as a mold for plaster?
You’re not limited to using silicone or rubber molds for plaster projects either.
You can also use recyclable items around your house, like milk cartons or thin plastic containers from individual cups of oatmeal, yogurt, mac and cheese, etc.
You can even use something like a mailing tube, like I did for this DIY concrete vase.
Just follow the instructions for that tutorial and swap out the concrete for plaster…and still use the cooking spray.
There are endless possibilities for Plaster of Paris crafts.

How to Make Colored Plaster
Using a 5 to 1 ratio, scoop 5 parts powdered plaster into a medium sized container, and then scoop 1 part powdered tempera into the bowl.
Stir together until an even color throughout is achieved.
FYI – You could probably use in less powdered tempera than that, to be honest. It really doesn’t take much. The more color you add, the more vibrant it will be, put if you add too much, it will eventually cause the plaster to set incorrectly or not at all.
How to Make Mini Planters from Colored Plaster
1. Mix the colored plaster.
Once you have mixed together the colored plaster you’d like to use for this Plaster of Paris craft, you can get started with the mini planters.

2. Add water.
Stir in water to the bowl, while stirring, until you reached a consistency similar to pancake batter (a little thicker than that is still fine though).
Plaster sets very quickly, so you’ll need to work fast.
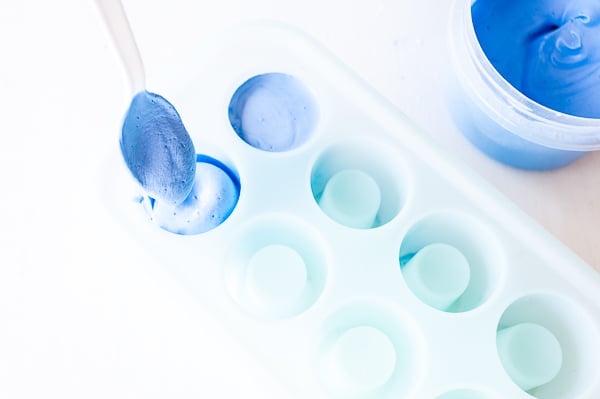
3. Pour into molds.
Pour mixture into silicone mold or scoop it in with a spoon.
Gently tap the filled molds on a flat surface to get out any air bubbles and then aside until hardened (1-2 hours should be fine).

4. Remove from molds.
Once they are completely hard to the touch, remove the mini planters from the mold one at a time.
5. Sand the planters.
Use a fine sandpaper to sand down the bottom of each planet, if there is any unevenness.
Then let the planters finish air drying for a full 24 hours, if possible.
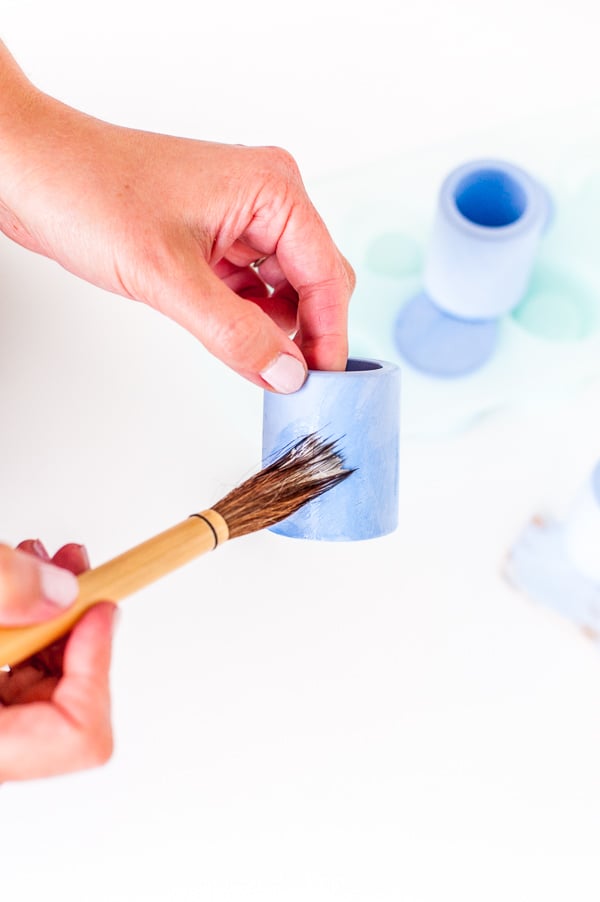
6. Seal the planters.
Next, seal each mini planter with a matte medium, which basically creates a thin layer of plastic so they will no longer be soluble (important if you’re going to put plants in them).
Wait for the matte medium to dry completely before planting succulents and cacti.
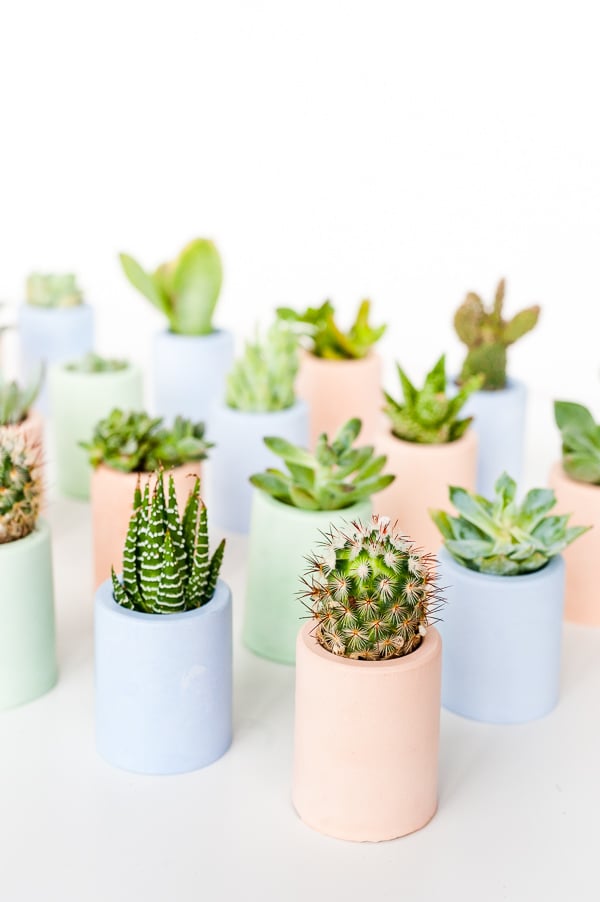
I found that small succulent cuttings are perfect for this size starter planter. And when the plant outgrows the container, you can replant it in a larger version.


How to Make Colored Plaster
Ingredients
- plaster powder available on Amazon - also know as Plaster of Paris
- powdered tempera paint - THIS IS THE SECRET INGREDIENT lots of options on Amazon, I used this brand but any will work
Instructions
- Using a 5 to 1 ratio, scoop 5 parts powdered plaster into a medium sized container, and then scoop 1 part powdered tempera into the bowl. Stir together until an even color throughout is achieved.
- FYI - You could probably use in less powdered tempera than that, to be honest. It really doesn't take much. The more color you add, the more vibrant it will be, put if you add too much, it will eventually cause the plaster to set incorrectly or not at all.
Notes

DIY Colored Plaster of Paris Mini Planters
Ingredients
- plaster powder available on Amazon - also know as Plaster of Paris
- powdered tempera paint - THIS IS THE SECRET INGREDIENT lots of options on Amazon, I used this brand but any will work
- silicone shot glass molds this is exactly what I used, but there are loads more on Amazon
- matte medium to seal the plaster
- paint brush
- sandpaper fine grit
Instructions
- Once you have mixed together the colored plaster you'd like to use for this Plaster of Paris craft, you can get started with the mini planters.
- Stir in water to the bowl, while stirring, until you reached a consistency similar to pancake batter (a little thicker than that is still fine though).
- Plaster sets very quickly, so you'll need to work fast.
- Pour mixture into silicone mold or scoop it in with a spoon.
- Gently tap the filled molds on a flat surface to get out any air bubbles and then aside until hardened (1-2 hours should be fine).
- Once they are completely hard to the touch, remove the mini planters from the mold one at a time.
- Use a fine sandpaper to sand down the bottom of each planet, if there is any unevenness.
- Then let the planters finish air drying for a full 24 hours, if possible.
- Next, seal each mini planter with a matte medium, which basically creates a thin layer of plastic so they will no longer be soluble (important if you're going to put plants in them).
- Wait for the matte medium to dry completely before planting succulents and cacti.
- I found that small succulent cuttings are perfect for this size starter planter. And when the plant outgrows the container, you can replant it in a larger version.
Photography Amelia Tatnall
Styling Brittni Mehlhoff
Think you’ll give this mini planter project a try? What do you think of all the pastel colors?
64 comments | Click here to reply
Hi, beautiful pots! I was wondering, what color Jack Richeson powder did you use for the pinkish pot? I want to try this by buying one color first instead of the full set of powder powders and would like to start with that color. Thank you!
Monahii, just wondering if the color faded after it dried? or did it stay the same vibrancy when it dried?
Christian UrbinaHi Sarah. Yes, I would assume any powdered paint would be fine.
BrittniCan you use any powdered paint?
SarahOh my gosh. Really? I had no idea. So interesting.
BrittniThe same technique is used to make giant sidewalk chalk. Cover the bottom of toilet paper roll with aluminium foil. Scoop the colored plaster into the top of the roll. Let it dry. Peel off the paper and aluminium foil. You will have a very large piece of sidewalk chalk. We have been doing this with preschool students for years. 😃
Sharon JohnsonGreat coloring idea, and great succulents on a shelf display 🙂
Dawn Hagrn[…] DIY mini planters (and how to dye […]
63 Awesome DIY Gifts for Everyone on Your List + What's your Favorite Gift You've Ever Received?! - Paper and StitchIt sounds like you may need another coat, Kamille. Maybe the first layer absurd into the plaster a bit? Once you have a good strong coat on the surface (that hasn’t soaked in), they should be fine – the sealant basically creates a plastic layer. You may want to test one out with water in it first (just sit it in the sink first to be safe).
Brittni-Brittni
LOVE this! I just made the pots but had some trouble with the matte finish, it still feels chalky and you can kind of see my brushstrokes, is that normal? I’m worried if I add the soil and water, the color and plaster will leak. It’s not mailable, just chalky and full of brush strokes… I appreciate any advice you can give me! Still hoping to make this work and use them as Christmas gifts and a groovy southwest western accent in our new guest room! Xoxo
KamilleHaha. Happy to hear that Nick. Glad it helped you!
BrittniHOLY SHIT! Thank you!!!! I have been doing test samples for a week to color plaster for some large scale body molds I plan on doing and you just solved everything. WOW, you are awesome! Much Love from Missoula, Montana.
nick kakavas-nick
Unfortunately, I don’t know if a larger option, Mariah. But if you find one, definitely let me know. 🙂
BrittniDo you know of any type of mold to use with this same technique but in order to create a larger planter?
MariahBeautiful! Thanks for sharing
Karen[…] 1. DIY planters made of custom tinted plaster 2. embellished straw sloth DIY from A Beautiful Mess 3. DIY ring handle bag from A Pair and a Spare 4. DIY terrazzo earrings from Ctrl Curate 5. fresh fruit crostinis with homemade goat cheese 6. concrete table lamp Ikea hack 7. DIY notebooks with wallpaper scraps […]
7 Weekend Projects to TryHi Marie. Any silicone mold will work great.
BrittniLove it! Have you used any other molds successfully?
Marie[…] DIY mini plaster planters […]
15 DIY Ideas to Cure Spring Fever - The Sweetest Occasion — The Sweetest Occasion[…] and succulents that doubled as wedding favors. The most impressive part? The bride made the planters and grew some of the succulents herself! Their wedding cake was made from multiple naked cakes then […]
Springfield Manor Winery & Distillery Wedding | Julia + Stephen | Anny Photography | Destination Fine Art Wedding Photographer[…] DIY Pastel Planters from Paper & Stitch […]
A Spoonful of Alice - Living Room Ideas - Living Room Wishlist - A Spoonful of Alice[…] Speckled clay pottery DIY from Passion Shake 2. How to color plaster (and DIY mini planters) 3. DIY weaving hack (no special skills or tools required) 4. DIY […]
6 DIYs to Try This Weekend - Paper and Stitch[…] 1 · 2 · […]
» GreeneryTOC TOC vintage | Blog sobre estilo de vida, decoración y maternidadHi Brandy. These will make great wedding favors! I have not experimented with using other options for coloring the plaster other than the pigment powder. So I can’t really to speak to whether food coloring would work. Sorry, wish I could help with that, but since I haven’t tried it that way, I’m really not sure. 🙁
BrittniThese are EXACTLY what I was looking for for my wedding favors, so thanks!
I’m going to get the supplies to give it a try today, but I was curious if you had experimented with coloring the water before adding it to the plaster? I was thinking about getting gel food coloring to pigment the water, but being that the powdered acrylic is so highly pigmented, I don’t know that it would make a big difference to the finished project, if any at all.
BrandyHI Jennifer. Yep, it still works without the powdered tempera. Here’s a plaster project from way back that didn’t use powdered tempera. It will be white in color without any pigment: http://www.papernstitchblog.com/2013/05/08/make-this-modern-diy-candle-votives-on-a-budget/
Brittni[…] Stylohotmilo | Paper & Stitch […]
Cómo pintar el alma con el color del 2017: GreeneryIf you do not use the powdered tempera paint what color will they turn out to be? Also will it still work. I’m trying to make them look like cement and they are out of the paint you suggested
JenniferColors are inspiring. Planters are simple but classy. I will try making these, probably will use recycled plastics to create different shapes and sizes. Great post. Thanks.
RichardYou can definitely go that route, Patricia, but it will give you a slightly different look.
BrittniHi there! Have you tried panting on the plaster after it is dry but before you seal it? Was curious if that worked and if so, what type of paint would be best suited for that. Thanks so much for sharing this wonderful idea!
Thank you!
PatriciaYes, used tempra paint for cement handprints for preschool kids that I taught. Works great!
GenieThese are super cute! Thanks for the DIY!
Shelby[…] Vías: papernstitchblog, blueisinfashionthisyear, omundodejess, helloeventos, pinterest […]
TREND| DECORA TU ESPACIO CON SUCULENTAS - NoSoloDecoI would love to know the brand of plaster and matte medium you used… There are so many to chose from and you’re came out so perfectly!
India[…] Cement pots via Paper & Stitch […]
Top 9 DIY – Plant Inspired |[…] I think I might have to try out this DIY one day, would be a great way to uniformly display all of my succulent and cacti {Image 7} […]
Weekly Wonders! #5 - MushavilleThese are beyond cool…
Handmade charlotteAbsolutely amazing. I’m going to try them with my art classes at school. Thank you for the idea and inspiration.
SallyLovely subtle colourful planters. Where do you obtain your lovely silicone moulds?
Clive StevensThis is so neat!!! I love it and the cactus plants!!!
Regina / Head Glam Girl at Margarita Bloom
Regina DebreczeniMargarita Bloom | Retro Vintage Skincare & Beauty
http://www.margarita-bloom.com/
Blog: http://www.cherrylipsblondecurls.com
Twitter: @mbglamourville @margaritabloom
Instagram: @margaritabloom
Wow so cute. I’ve never used plaster before but have always been curious about trying it out. The planters are amazing, I love how they turned out and all the colors.
Maridan ValorI’m going try it this week… and have u seen the molds on wish.com? That’s where I have gotten all mine from..they work great with plaster.. just a thought
Alie NielsenThanks Leslie. The exact one I bought is linked in the materials section, toward the top of the post. It’s the shot glass mold from Amazon. Hope that helps.
Brittni-Brittni
What a beautiful idea!!! Love it? Could you tell me where did you get The mold from?thx Leslie
LeslieI’m not sure. I didn’t think actual paint would be a good idea because of the consistency. But it’s worth a try, Allie. Let me know how it goes, if you give it a try.
BrittniThese r awesome… do u think tempra paint would work, just cut down to 4:1:1?
Alie NielsenAny plaster powder you find at your local craft store is fine, Joni. I’d recommending sealing the plaster, as instructed in the tutorial. I don’t have any experience with what you mentioned regarding using sponges to soak up water into planters, so I can’t speak to that. 🙂 But it sounds like it would be fun to experiment on your own with that.
BrittniDo they need to be sealed? What happens if you do not seal them? I am thinking that unsealed they could be sat on a damp sponge to wick up water to the plants and self water them. Like unsealed clay pots you buy for plants. Also is there any special plaster mix that you prefer to use? Thanks!
Joni Solis[…] Nice ideas on getting more done when you work from home…this goes for moms too. This is a game changer, for real. Great tips for growing your Instagram […]
THE MAIN SCOOP - HAWTHORNE AND MAINNicely done. Love how colorful they are. I’ll have to do the same with my planters.
Ivan Jordon[…] Love these super-sweet mini planters? Make them yourself with this tutorial by Paper & Stitch […]
We Are Scout | HUNTING. GATHERING. MAKING. THE GOOD STUFF.These would be perfect party favors, Julia. I used Liquitex brand mate medium. You can get it at any craft / art supply store.
BrittniThese are so cute! Perfect favors for a shower I am hosting. Which matte medium did you use?
Thanks! Julia
Julia[…] Tinted plaster? Now I want to make all the plaster things. via Paper & Stitch […]
Teepee Kids Decor – Tinted Plaster How-to – Water Illustration | Small for BigI really love your idea, I think it’s great that we can have such beautiful colours, it will give me great pleasure to make these pots I just hope I can get all the ingredients her in Scotland. thank you for sharing with us all.
Madalene[…] – Loving these mini planters! […]
Friday Links - The Crafted LifeI love the pastel colors! Here’s the million dollar question, though: Can you use the powdered tempera paint with concrete? It’d be great to be able to color that instead, so you could skip the sealing step. Have you tried it?
RachelThese are so cute! What a great idea to use powdered tempera paint–and that blue powder color. Wowza! 😀
xx Hannah // www.HomemadeBanana.com
HannahThese are the cutest planters ever! I’ve been looking for a nice centerpiece for our kitchen table, this might fit the bill!
<3 Vicki @ Wilde in the World
Vicki @ WITWThey look so so amazing and cute, who knew that you can colour plaster?!
Michellehttps://www.makeandmess.com/
This plants looks so lovely in this colorful mini planters. Amazing!
Anastasia PotapchukThanks Maja. 🙂
BrittniWauw! really cool!
MajaX Maja