
Finishing up some last holiday projects over here. Nothing like a down-to-the-wire DIY idea, huh? And I wanted to share this holiday ornament DIY that is kind of special to me.
This year is Hayes’ first Christmas and I wanted to design a special ornament for him to remember his first Christmas. Since his middle name is Moon (named after our dog Luna, who passed away and was our first ‘baby’), I thought it would be cool to create a moon ornament for him.
Somehow, that led to the tradition of getting him a new moon ornament every year until he turns 18. And then that someone led to creating a zillion moon and star ornaments this year to start off his collection. So, today I’m sharing the tutorial for these fabric moon and star ornaments that I designed. Emma sewed all of them. Thanks Emma!
I wanted to share the tutorial in case you need a last minute gift idea (ornaments make the greatest gifts if you ask me) OR you just want to make a few of these as non-ornaments in the new year to hang from door knobs, presents, etc.


Materials
- moon and star template here
- mustard color linen fabrics
- thread to match the fabric colors
- poly fill for stuffing (I buy mine from Amazon as usual)
- scissors
- pencil
- straight pins
- sewing machine
Instructions for How to Make Moon and Star Fabric Ornaments
1. Begin by drawing a moon and star shape directly onto your fabric. OR use my moon and star template here that you can print and trace (and make bigger or smaller on your computer before printing, if desired).
2. Next, measure an additional 1/2 inch seam allowance around the shapes. Then cut out the shape and use it as a template for the others. You’ll need two identical pieces to create one finished moon or star.
3. Sew along the star shape or moon shape that you drew in step one. Personally, I love making the star shapes a bit more wonky (ie not perfectly even star points). So if you like ’em that way too, just take some liberties with the shape when you begin the sewing – making them a little uneven.
Leave a 1-3 inch opening unsewn for the polyester fiberfill to go into. Be sure to back stitch on either side of the opening.
4. Now flip the shape right side out. Use a pencil or small dowel to push the tips out as far as possible. Fill with polyester fiberfill. Tease the fiberfill before stuffing it to eliminate lumps in the ornament shapes.
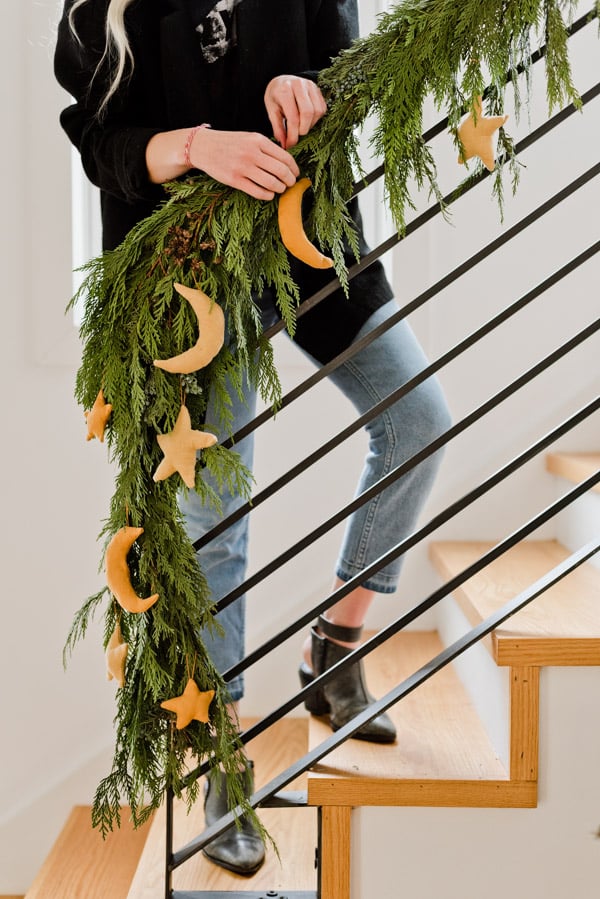
5. Lastly, hand sew the opening by using an invisible stitch. And add a short string through the top of each shape to hang it from the tree…or stair garland in my case.


Sewing (and modeling) Emma Spear
Photography Amelia Lawrence
Have you made any ornaments for your tree in the past? Do you have any traditions when it comes to holiday ornaments or decor, like the one I mentioned I’m starting for Hayes? Would love to hear what you do in your family!
3 comments | Click here to reply
Hey Y’all! It’s getting closer to Farmgirl Goods launch! Our expected launch is March 2019! We have some absolutely amazing artisans and craftsman that we will be featuring on our site! Remember everything is handpicked by myself and we only approve the finest products! Our collections include home decor, kitchen, bath and body, apparel, jewelry and arts and collectibles.
Please email us on our site to find out if you can be on our site! We will begin traveling again to different cities on the hunt for unique products again soon!
www.farmgirlgoods.com
Ashley HughesThanks so much. Merry Christmas to you too, J Eddi.
BrittniMerry Christmas.
J. Eddi