
There have been so many changes upstairs at the studio since I moved in two years ago, but one thing has stayed the same for far too long: the pattern half wall. I loved it and all, don’t get me wrong. But when you stare at it almost everyday it starts to lose it’s fun factor. So, I gave that part of the space a little makeover with some help from Lowe’s as part of the 12 rooms in 12 months series and am finally sharing it today!
AND I’m also spilling my secrets for getting the perfect paint job every time! I’ve painted SO many rooms over the years (completely by myself) and have learned from all my past mistakes so you can get straight to the good stuff! Click through for all the details. And as a reminder, here’s what the space looked like before…
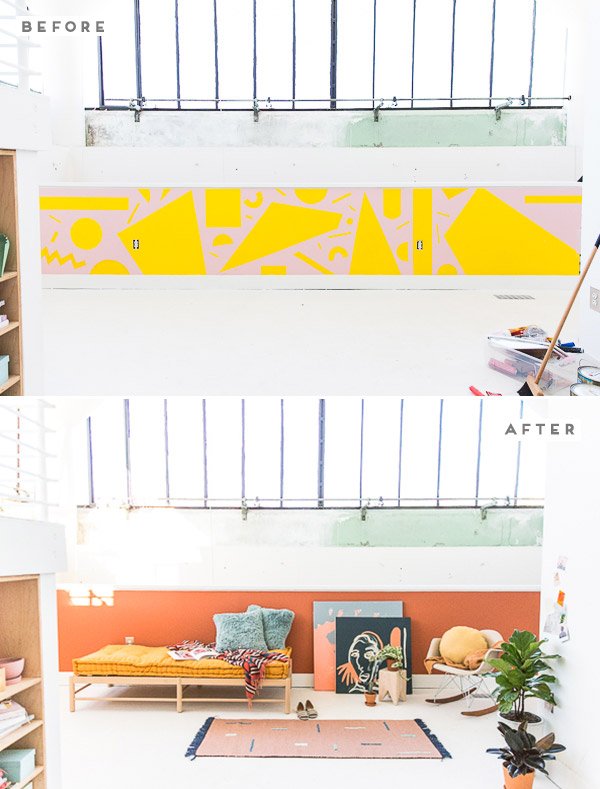
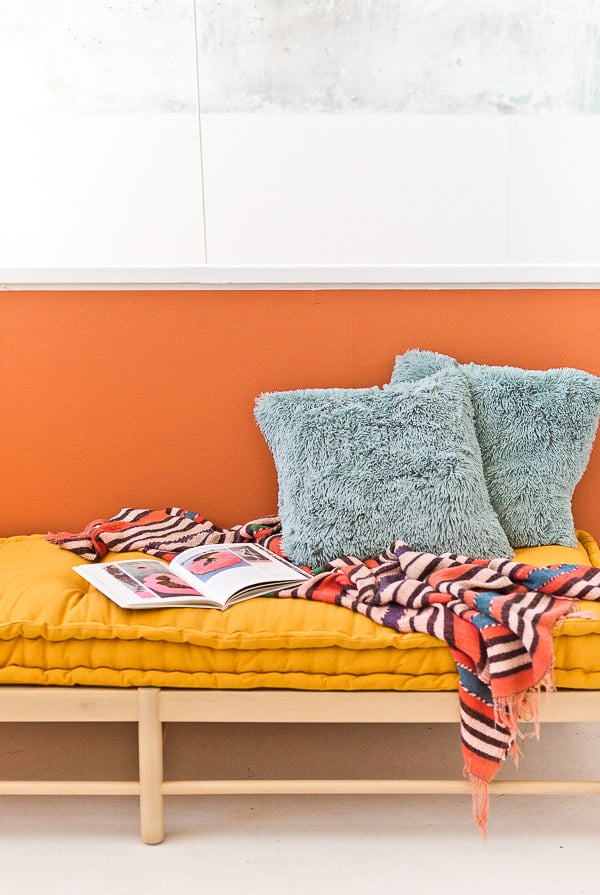
Bye bye pink pattern, hello solid rust! I love the clean slate that a solid wall color is giving me up there. So much so that I added a daybed in case I need a quick nap at work. Not mad about that!
But before settling on the paint color and redecorating, I had a few things I had to work out – starting with what color to choose!

I always, always, always, paint big swatches directly on the wall when trying to decide on a new wall color (two coats usually – wait for the paint to dry in between coats too). So, I narrowed my paint selection down to three options at Lowe’s, brought them all back to the studio and tested them out on the wall. I used the HGTV HOME by Sherwin-Williams Infinity interior paint (in flat – I always use flat paint no matter what the room). The colors I brought home to try were: Red Cent, Emerald Shore, and Mod Yellow.
Once they were all on the wall, I was surprised how torn I still was (honestly loved all three), but ultimately went with Red Cent because I cannot resist a good rust / terra cotta color to save my life. What color would you have chosen if you were me?


So, after prepping the surface, which mainly entailed a damp cloth to remove any dirt, dust, debris from the trim ahead of time, I taped everything off with painter’s tape. Then a good, solid coat of paint (right over the existing pattern -no priming necessary) was all I needed, and the wall was as good as new and looking totally different.
This is why I love painting so much. The transformation is always dramatic and it’s a super cost-effective way to completely change a space. A gallon of paint is under $50.

My Top 3 Tips for the Perfect Paint Job Every Time
1. Always prep your surface!
This is a step that a lot of people forget about because everyone just wants to get started. But prepping your surface is a really important step. And I’m not talking about priming, I’m talking about cleaning. I sweep and dust the entire area I’m painting (and the floors and ceiling near it if necessary) first. Then use a damp cloth to remove any dirt, dust, or debris leftover that could cause paint not to stick. Wait for the area to dry from the damp cloth fully before moving on to any other steps.

2. Use the right tools for the job!
I don’t skimp when it comes to paint and painting supplies because the high quality stuff performs better AND lasts longer. My recommendation would be to look for a paint and primer in one that’s of high quality, like HGTV HOME by Sherwin-Williams Infinity interior paint (a complete one-coat paint + primer that goes on ultra-smooth for a beautiful finish). It will take less time and money in the long run if you pick a good quality paint. I promise.
My other essentials painting tools include: high quality painter’s tape, a canvas drop cloth (always canvas over plastic because on plastic the paint dries very slowly which isn’t ideal for tracking paint around the room on your shoes, etc), a short handle 2 inch brush (for trim work), a comfortable paint roller frame and good paint roller cover (make sure to get the right nap cover for your wall surface when looking at roller covers), a metal paint tray and a paint tray liner.

3. Keep it uniform!
Once you get to the actual painting, keep it uniform (in pressure on the handle, coverage on the wall, and thickness of application). There are lots of ways to paint a wall with a roller and brush and people seem to be very opinionated about which way is ‘best’. This is how I do it… Using long(ish) W or zigzag strokes, I apply the paint to the surface as evenly as I can – going as close to the trim at the top and bottom as I can with a roller to make cutting in with a brush easier and less noticeable.


And that’s it! I love the earthy vibe of the upstairs loft with this new paint color. But I’m so curious to know what you think?!
Are you as in love with the color as I am? Or would you have chosen a different color for this project?! I’m all ears, so let me know what you think in the comments below.
—
This post is in partnership with Lowe’s. All opinions are my own. Thank you for supporting the brands that help keep Paper & Stitch running.
SaveSave
17 comments | Click here to reply
I think you are right about sweeping and dusting first before painting. My nursery needs to be repainted. I’ll have to consider getting a painter with the right tools to help out.
Tex HooperI appreciate what you said about painting the upstairs loft a different color. I need to get a painting crew to redo my nursery.
Tex HooperIt’s interesting how you mentioned that you used a damp cloth to remove any dirt, dust, and debris in order to prep the surface. My husband and I are wanting to paint our living room. We’ll probably need to call a professional painter just to make sure that the job gets done really well.
Monica Chavez[…] takes the layering game a step further with canvas vignettes for her plant babies. Her entire loft color scheme works the plants in so they look like an […]
11 Bold Ways to Use Plants Everywhere in Your House + The Trick to Grow Them Anywhere | ctrl + curateThanks Kris. Unfortunately, the daybed is no longer available (picked it up about four months ago). 🙁
BrittniGorgeous! And could you please share where I can find that lovely daybed?
KrisI love your second tip about how higher quality paint and painting supplies can perform better and last longer. My husband and I are thinking about repainting our living room this year. We’d love to have a professional come out and do it. We don’t have the time, tools, or experience to do it ourselves.
Lucy GibsonThis color is so perfect, what an unexpected eye-catcher! And in m opinion, much better than the pink 😀
Michellehttps://www.makeandmess.com/
Great idea,thanks for sharing
The pink pineapplehttps://thepinkpineappleblog.blogspot.com/
Thanks so much Cat. That makes me happy to hear… I typically go a little safer as well, but I thought I’d take a risk this time, since it’s only paint and I’m so glad I did. 🙂
BrittniLove the rust! I usually go for ‘safe’ color palettes, but that rust is so unexpected and why I always come back to your blog 🙂
CatThanks Courtney. Much appreciated.
BrittniI love how everything turned out. It looks so cool.
Courtney Hardyhttp://sugarcoatedbears.blogspot.com/
Hi Shay. Totally hear you on this color not being for everyone. 🙂 Personally, I love it – especially on a short wall like this one. But totally get where you’re coming from.
Brittni-Brittni
I have never been a fan of rust, but that’s just a personal preference. You do a great job with your decorating.
ShayThanks Judy. Sounds like your little one is going to have one cool bed. 🙂 Happy Friday!
BrittniWhile I love your tips about painting, what caught my eye was the daybed. We are moving in May and our little one will be getting a full bed. I plan on taking the twin mattress and making a heavy cover for it and some pillows and making a daybed/couch out of it for the bonus room. I had planned just to put it in the room with a comforter on it, but I like the look of having more of a ‘cover’ on it. And some fun pillows.
Judy H