
It’s no secret that I love a good rug DIY, but did you also know that I love project ideas that use rugs to create entirely new things that aren’t rugs at all?
That may seem like a weird thing to love, BUT rugs can often be an affordable, heavy-duty textile perfect for projects that need some sturdiness or weight to them. Hello extra long lumbar pillow, I’m looking at you.
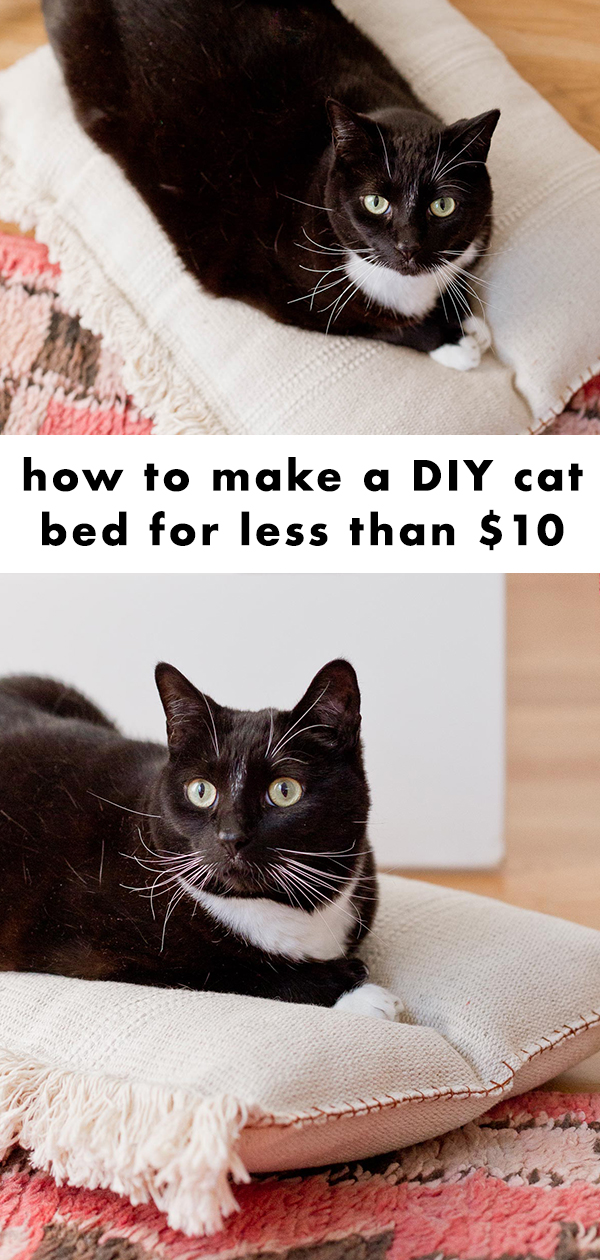
So, along those line, today I’m sharing a whole new way to use a rug…and it only cost $4. Well, it would have cost closer to $8 if I didn’t have the rest of the materials, but still – under ten bucks is pretty damn good.
Okay, okay…what is it already?! It’s a DIY cat bed that can also be used for other pets (as long as they’re not giants. So basically, cat-sized dogs would be fine.


Cat owners know the struggle… Cute cat beds can be difficult to find, even if you genuinely enjoy endlessly searching online for an option that doesn’t involve an obnoxious pet pattern / print of cat paws or something along those line.
And then when you do find one you actually like, it costs way more money than you thought a cute little cat bed should cost. Right?! Which is why I wanted to share my version of a DIY cat bed that costs a fraction of the cost of a normal pet bed AND actually looks like something you might want to have in your home. Haha.
Bonus! It’s a really easy project that doesn’t require much DIY skill or even a sewing machine! It’s hand stitched and only takes about an hour to make. Yay!

The thing that really helps keep the budget of this rug low is the rug source, so I wanted to be sure to link it for you. I used the SORTSO rug from Ikea for this project and it costs $3.99!
For that price, I can’t recommend this rug enough for the job. If you’re looking for a super affordable, neutral option that is still thick and sturdy for pet use, that Ikea rug is it! And speaking of materials, here’s the full list…
Materials Needed for DIY Cat Bed
- embroidery thread
- embroidery needle
- thread that matches color of rug
- sewing needle
- 2×3 woven rug
- polyfill
- pencil or tailors chalk
How to Make a DIY Cat Bed

1. Fold the rug in half and blanket stitch each of the two sides with embroidery thread. Start by hand sewing a blanket stitch along each side of the folded rug.
To create a blanket stitch, thread your needle from the inside of the rug about 1/4” from the edge. Loop over and thread your needle through the same spot. Then, thread the needle through the loop and pull.

2. Stuff the DIY cat bed with polyfil. Now that two of the sides are closed up, you can stuff the inside with polyfil (or something similar – you could use fabric scraps for example as an alternative).


3. Next, sew the tasseled end of the rug. Using a basic stitch and a regular needle with a thread that matched the color of the rug, sew the tasseled end of the rug closed.
Note: Before completing the last few stitches, add any additional polyfil that may be needed if it looks like it won’t be plump enough.

4. Sew colorful Xs to tuft the cushion. Start tufting the cushion by finding the center. Mark your X with pencil or tailors chalk on both sides and thread your needle with embroidery thread at the top point of the X.
Poke your needle all the way through the other side to the same point of the X. Create the first line on the X by threading your needle to the opposite point. Continue 4-6 times.
Once you’ve completed the first line of the X, thread your needle under to the point of the second line of the X and repeat previous step. Once your X is complete, knot and trim your thread.
Repeat 2 more times to create 3 Xs along the center of the cushion. And that’s it. Your DIY cat bed is ready to use.

Another option, if you just want a super neutral cat bed with no extra colors would be to match the embroidery thread you use for the blanket stitch and X tufted detail to the rug color. You can see an example of this is some of the photos.


This DIY cat bed seriously costs less than $8 to make – even if you have to buy every single supply / material. If you have one or two of these items at home already (like the poly fill and/or the embroidery floss) it will be even cheaper! How’s that for budget-friendly?!
2 comments | Click here to reply
I made this with the same IKEA rug a couple months ago right before we adopted our kitty! I did it with blue embroidery floss and love how good it looks—cats beds are usually not an element of decor, but this one totally is! Sadly, our kitty didn’t understand at all that she was supposed to sleep on this cushion and doesn’t care for the catnip I sprinkled on it, so it went unused… until recently when she suddenly decided it was the best spot to sit in the house. Cats, right? Thanks for the tutorial!
Kendall[…] Source link Craft […]
A DIY Cat Bed that Cost Less than $8 to Make – Miif Plus