
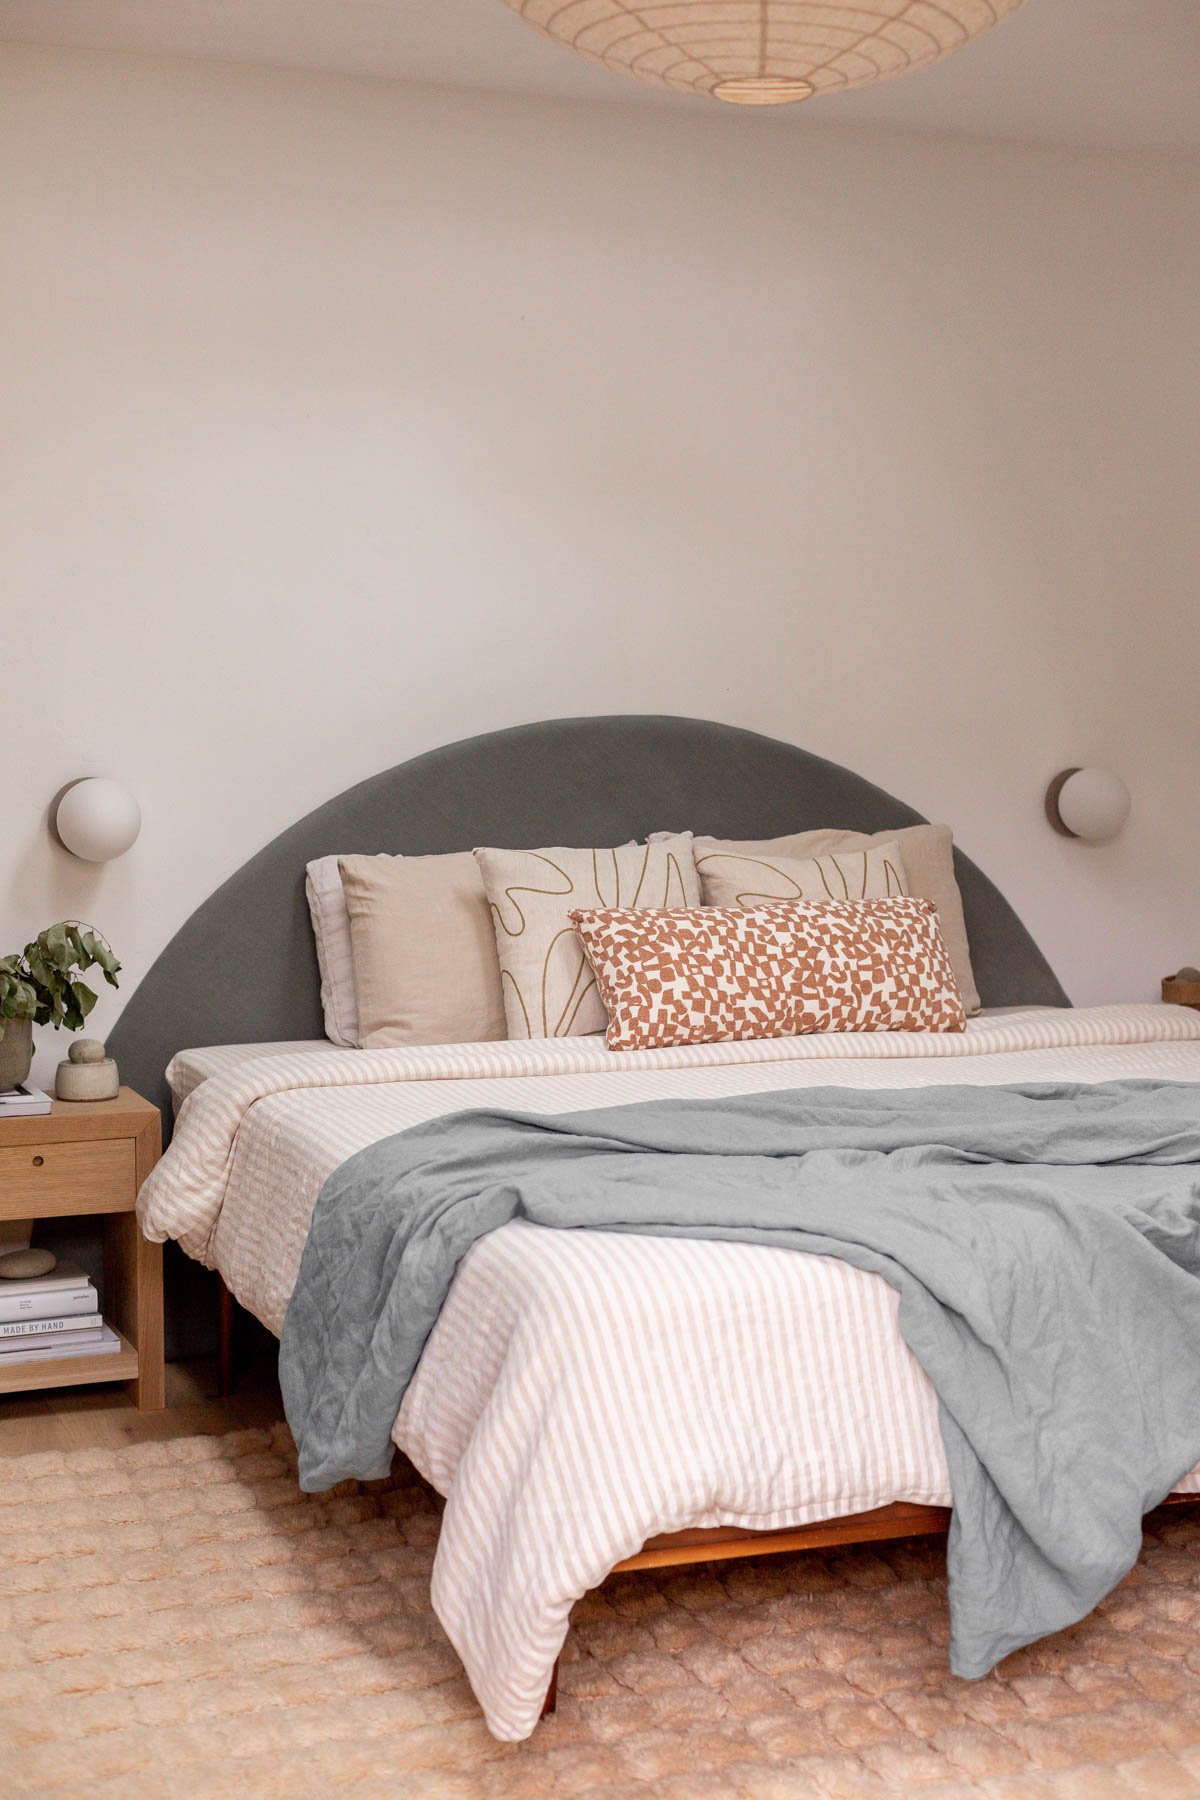
An upholstered headboard DIY that makes a statement, for under $200! I love this round headboard idea – it’s the perfect weekend project for DIYers to tackle and will absolutely transform your bedroom. My only wish is that I had made it sooner.

Have you seen the oversized half circle headboards popping up on home tours and Pinterest lately?
I love the look and I was pretty sure I could DIY my own, so I gave it a try and it turned out (almost) just like I pictured. I’ll explain later. But for now, the details!
Wanna make a round DIY headboard? The whole project can be completed in a weekend and costs less than $200 (or even lower in price if you have some of the basic materials already). Similar headboards cost $800-2,000 if you buy them online or in a store. Click through to see how I made it.

Materials and Equipment Needed
- 4 MDF sheets that are each 2×4 ft
- 2 pieces of upholstery foam (each 24 x 72 inches, like this)
- fabric yardage (I used around 1.5 yards of linen)
- spray adhesive
- wood glue
- furniture straps / furniture anchors
- string
- 1 nail and hammer OR heavy duty tape (like duct tape)
- marker
- measuring tape
- scissors
- serrated knife (or electric knife)*
- staple gun (and staples)
- jigsaw or similar
Notes on Materials
MDF panels
I used 4 panels that are 2×4 in size to make it easier to transport in my car. You don’t necessarily have to go with this exact size and the number of panels needed will vary based on the size of your bed.
My bed is a king size bed and the completed headboard took 4 panels.
Upholstery foam
This is also called high density foam. It comes in white and green.
I think the green is easier to find, BUT if you don’t have a really thick fabric to cover over this, the green will show through your fabric and make it look kind of green when its all done. That’s what happened to mine. Not a big deal, but wanted to mention.
If you can only find green, you can always add a thin white fabric (or interfacing fabric, etc) onto it before adding your final layer of fabric.
The foam is available at craft stores and even some home improvement stores.
It comes in varying thicknesses and you can use any thickness you like. The thicker the foam, the more expensive, just FYI.
I think 2 inch foam is the thickest I would do for this project and 1 inch foam is the thinnest I would do for this project, if you’re looking for a guide.
Fabric yardage
Make sure when you buy your fabric that the width is at least 4-6 inches larger than what the completed height will be of your headboard.
For example, the completed height of my headboard is 48 inches, so I needed the width to be at least 52-54 inches wide so that I could cover the headboard completely with enough room to staple it onto the back of the headboard.
And for length, you’ll want to get yardage that is at least 4-6 inches longer than the final length of your headboard.
You need extra width and length so that you can pull the fabric up and over the foam and back to the back of the headboard for stapling when then project is in its final phase.

How to Make a Round Headboard
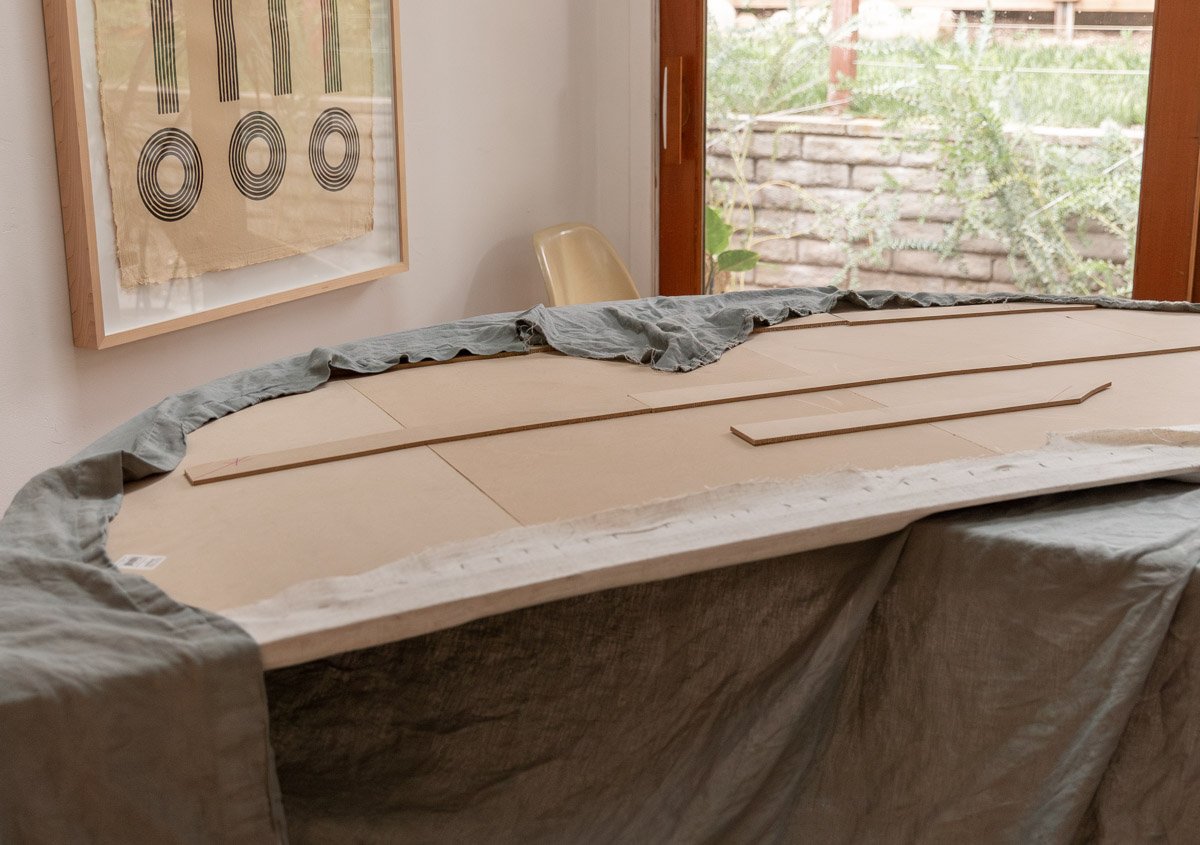
1. Create the arch shape.
Start by lining up all four MDF panels (or whatever number of pieces you decided to go with), so they all touch.
They can be laid out flat on the floor on in a straight line standing up, as long as the angle for each is the same (like if they’re resting against a countertop or something).
Next, using a measuring tape, find the bottom center (or very close to center if you’re using four panels like me).
Then, using either a hammer and a nail to mark that spot OR a very strong piece of tape (like a few pieces of duct tape), attach a long string (this would be award the very bottom center of the panels.
Figure out the size of the half circle you want to create. Attach a marker to that spot on the string and create the half circle.
The nailed down or taped down string will act as the even tension you need to create a perfect half circle. And the length of the string will determine the overall size of the half circle.


2. Cut the panels.
Now that you have the headboard mapped out, you can cut the individual MDF pieces with a jigsaw, following the lines you just created.
I recommend using clamps to secure each board while you’re cutting.
Once all the pieces are cut, line them up again to make sure all the edges flow smoothly to the next panel. If so, you can move onto the next step. If not, make the adjustments needed and recut if necessary.

3. Cut scraps into long pieces.
After cutting the panels into shape, you will have some scrap pieces leftover. Don’t throw those away! You can use them.
Cut the scrap pieces into long strips 2-3 inches wide and as long as you can get them.
These will be used as supports to connect the panels together and make the pieces solid / strong.

4. Attach the panels to one another on the back.
Next, line up the headboard pieces on the ground (bad / backside facing up) so they form the half circle shape. And make sure each piece is touching the next. You want them to be as close together as possible.
Now attach the long strips of scrap MDF to each panel with a generous amount of wood glue, connecting pieces that are right next to each other, over the seam (as shown in the step photo).
Repeat this process over and over again, in as many places as you feel necessary to make the panels secure. You can use my photo as an example. I just used every piece of scrap MDF I had.
While the wood glue in trying, if you have something heavy (like books) you can put on top of the pieces to help them make a strong attachment over night, do that. I used whatever I had lying around.
Wait for the glue to dry overnight or according to packaging before moving onto the next step.

5. Attach the foam to the panel base.
If you haven’t already, move the headboard outside at this point. Because the next step involves spray adhesive and you don’t want to spray that stuff indoors.
With your headboard facing up, spray the top half of the headboard with spray adhesive. Then quickly roll out the first piece of foam, directly onto the headboard and press down with your hands to help it adhere.
I used a full uncut roll at the top and it almost entirely covered the top of the headboard (see photo for the two little edges that weren’t covered).
The bottom half of the headboard is much longer and I knew it wouldn’t cover the whole thing. So I cut the second piece of foam in half and attached them to each end of the bottom (see photo) using the spray adhesive again.
At this point there is foam overhang pretty much all the way around the headboard, which will be cut down in the next step.

6. Shave off any excess foam from the sides.
Give the spray adhesive a little time to dry (15 minutes or according to packaging). Then, stand the headboard up with the help of a friend or use something tall for it to rest against.
And then, using a serrated knife or electric knife, very carefully shave off / cut the excess foam from the headboard.
Try to do the cutting at a 90 degree angle all the way around so that you don’t have any visible chunks missing when the headboard is covered and completed.
Note: You’ll use every single scrap of foam you cut to fill in the other areas on the headboard, so keep that in mind.

Once all the excess has been cut off, spray the adhesive and fill in the top side parts of the headboard that are still not covered in foam first, since those will be the most visible.
Then use any remaining scrap foam to cover the bottom middle area that is still without foam.
If you use the same amount of foam (and same size) as me, you will be left with a small area at the bottom middle that will not have any foam. It will never ever be seen when it’s finished and installed.
So I didn’t think it was important enough to buy a whole other roll of foam since they’re pretty expensive. You can obviously buy a third roll of foam though if you think it’s going to bother you.

7. Add batting and attach fabric.
Let the spray adhesive dry before moving onto the next step: covering the foam!
So, when I completed this project, I didn’t add any interfacing fabric or foam batting on top of the upholstery foam. I just went straight to the linen fabric. And for cost saving purposes, I think that was a good choice.
BUT for design purposes, it wasn’t exactly the best choice. Because the linen fabric was kind of thin and when the headboard was finished, the whole thing had a green tint to it.
You could see the foam color through the fabric. It just changed the color visually though, you can’t actually see the foam though the fabric. That said, you have two choices for the next step.
If you have a thick fabric that when laid over the foam does not change color, you’re ready to cover the headboard in fabric and be done within project.
BUT if your fabric is thin and/or you can see the color coming through the fabric, you’ll either need to add an under layer of white fabric OR a layer of interfacing fabric / batting fabric.
Once you have that part figured out, it’s time to complete the headboard by stapling the fabric (or fabrics) all the way around the headboard. You’ll pull the fabric over the top of the headboard and staple it onto the back of the headboard.
I like to start in the center and work my way out. After you have the first staple in, go across to the opposite end, pull the fabric as taught as you can get it and staple the other side of the fabric down.
Do that on the sides of the headboard as well, in a few key places, and then you can just go around the whole headboard, pulling and stapling the fabric every inch or two. This part takes a while!

8. Install.
I would recommend using furniture straps / furniture anchors to secure the headboard to the wall.
There are lots of different furniture anchors out there, so just follow the instructions on the packaging. Select ones that don’t stick out from the wall too far, so they won’t be seen.
Also, last thing on installing… When you install you want to make sure the headboard will rest on the floor, this will remove any possible strain on the furniture straps from how heavy the headboard is.
And also just give it the look that it’s just effortless resting on the floor.

Headboard Q & A
This is already an incredibly long tutorial. BUT I wanted to make sure I was super thorough with the information I shared for this DIY fabric headboard.
So I put together a Q and A based on the questions I’ve been asked about this project so far.
If you have any other questions you’d like me to answer, be sure to leave a comment and I’ll do my best to answer it for you.
How much did this round headboard cost to make?
It depends on the size and the thickness of MDF and foam thickness you select. But to give you a better idea of how much mine ended up costing, I’ll share the breakdown…
Surprisingly the foam was the most expensive part of this project.
I spent $70 on the foam and still ended up a little short, which you can see in one of the step photos. BUT it didn’t matter at all because you can’t see that part in the finished headboard.
And then each piece of MDF was $9 – so a total of $36 for that. $7 for the spray adhesive and roughly $30 for the fabric.
Everything else on the tools and materials list I already had (and many of those items I’m assuming you would have as well – like one nail, a hammer, scissors, etc).
So that puts the grand total for this headboard at $152.
It will cost a little more than that if you don’t already have some of the other basic items, like scissors, wood glue, string, etc.
How long did the headboard take to make?
I didn’t work on it non-stop consecutive hours, so I don’t know the exact number of hours. But I would say its a great weekend project.
You can get all the pieces cut and then glued together one day and then do all the foam cutting / attaching and fabric covering the next day.
It doesn’t take all day or anything either. So there would be some doing time breaks in there and jus general ‘I’m tried, I need a break’ breaks in there too.
Can you use something over the MDF to make the base for the headboard?
Yes! You can use whatever wood / wood-like material you feel comfortable with. I went with MDF because it’s cost effective and lightweight.
The completed headboard ended up being a little heavy. I could sill pick it up and move it by myself (and I did), but it wasn’t super fun.
AND you can also use one big piece, instead of panels like I did.
Why did you use panels instead of one solid piece?
I needed something that I could fit in my car and pick up and move easily by myself. So that’s why I went with panels.
One of the other things I like about this project, and using panels, is that it shows you can use whatever you have, or can find, or can afford. You can use one solid piece, two panels, twenty small scrap pieces, etc.
It’s a pretty forgiving project that way, since you’ll never see the back or know what’s underneath the fabric and foam once it’s installed.
How did I decide the height of a headboard?
This is really just personal taste. If you want something super bold or don’t want to hang any artwork above your bed, a tall headboard is a great option.
I went somewhere in between with mine, at 48 inches high. Which also happened to be the height of the panels before I started cutting them down, so it made things easy.
For a kind size bed, I thought 48 inches tall was perfect. Makes a statement without overwhelming the room.
What are the final dimensions of this DIY king headboard?
The length at the floor (longest part of the headboard) is roughly 96 inches. And the height, at its tallest point, is about 48 inches.
Which makes it perfect for a king size bed. There is 10 extra inches of headboard on each side of the bed frame, for a bolder / chunky look.
You can kind of see that in the photos, if you look down toward the floor. See how it goes out beyond the length of the platform bed?
Can you use a different thickness of foam for this project?
Yes! Generally speaking, the thinner the foam, the less expensive it is.
So, using a thinner foam, might be a way to bring your budget down further. But also, will make the cushiness of the headboard less plush. So it’s a trade off.


Any more DIY headboard ideas?
Of course there are! I’ve made a few headboards over the years and I love them all (hope you will too).
- A more classic shape (rectangular) for an upholstered DIY upholstered headboard
- Go the easy (and cheap) route and painted headboard
- And finally… 21 more DIY headboard ideas – there are some REALLY good ones on this list.
And speaking of more headboards. I recently updated this round headboard project with new fabric. Here’s how it turned out…

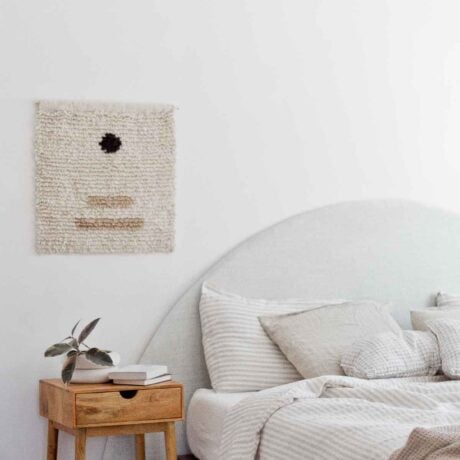
Headboard Update (as of 2/28/24)
I’m often asked how projects hold up over the years. So I wanted to give an update on how the round headboard DIY has held up.
I completed this headboard project more than two years ago now. We’ve moved to a different home since then and brought the headboard with us. It’s held up great and still looks awesome, imo. Didn’t have any issues transporting it either, during the move. This headboard is solid.
The only change I’ve made since I originally created the headboard is updating the fabric. When we moved, I wanted something with more contrast for our bedroom. So I dyed an old linen duvet cover, cut it up, pulled it tightly over the existing piece and stapled it all the way around, on the back. Just like I did the first time.
DIY Headboard Idea (Half Circle Headboard Tutorial)
Equipment
- measuring tape
- Scissors
- serrated knife (or electric knife)*
- staple gun (and staples)
- jigsaw or similar
Ingredients
- 4 MDF sheets that are each 2x4 ft
- 2 pieces of upholstery foam each 24 x 72 inches, like this
- fabric yardage I used around 1.5 yards of linen
- spray adhesive
- wood glue
- furniture straps / furniture anchors
- string
- 1 nail and hammer OR heavy duty tape like duct tape
- marker
Instructions
Start by lining up all four MDF panels (or whatever number of pieces you decided to go with), so they all touch. They can be laid out flat on the floor on in a straight line standing up, as long as the angle for each is the same (like if they're resting against a countertop or something).
- Next, using a measuring tape, find the bottom center (or very close to center if you're using four panels like me). Then, using either a hammer and a nail to mark that spot OR a very strong piece of tape (like a few pieces of duct tape), attach a long string (this would be award the very bottom center of the panels.
- Figure out the size of the half circle you want to create. Attach a marker to that spot on the string and create the half circle. The nailed down or taped down string will act as the even tension you need to create a perfect half circle. And the length of the string will determine the overall size of the half circle.
Now that you have the headboard mapped out, you can cut the individual MDF pieces with a jigsaw, following the lines you just created. I recommend using clamps to secure each board while you're cutting.
- Once all the pieces are cut, line them up again to make sure all the edges flow smoothly to the next panel. If so, you can move onto the next step. If not, make the adjustments needed and recut if necessary.
After cutting the panels into shape, you will have some scrap pieces leftover. Don't throw those away! You can use them.
- Cut the scrap pieces into long strips 2-3 inches wide and as long as you can get them. These will be used as supports to connect the panels together and make the pieces solid / strong.
Next, line up the headboard pieces on the ground (bad / backside facing up) so they form the half circle shape. And make sure each piece is touching the next. You want them to be as close together as possible.
- Now attach the long strips of scrap MDF to each panel with a generous amount of wood glue, connecting pieces that are right next to each other, over the seam (as shown in the step photo).
- Repeat this process over and over again, in as many places as you feel necessary to make the panels secure. You can use my photo as an example. I just used every piece of scrap MDF I had.
- While the wood glue in trying, if you have something heavy (like books) you can put on top of the pieces to help them make a strong attachment over night, do that. I used whatever I had lying around.
- Wait for the glue to dry overnight or according to packaging before moving onto the next step.
If you haven't already, move the headboard outside at this point. Because the next step involves spray adhesive and you don't want to spray that stuff indoors.
- With your headboard facing up, spray the top half of the headboard with spray adhesive. Then quickly roll out the first piece of foam, directly onto the headboard and press down with your hands to help it adhere. I used a full uncut roll at the top and it almost entirely covered the top of the headboard (see photo for the two little edges that weren't covered).
- The bottom half of the headboard is much longer and I knew it wouldn't cover the whole thing. So I cut the second piece of foam in half and attached them to each end of the bottom (see photo) using the spray adhesive again.
- At this point there is foam overhang pretty much all the way around the headboard, which will be cut down in the next step.
Give the spray adhesive a little time to dry (15 minutes or according to packaging). Then, stand the headboard up with the help of a friend or use something tall for it to rest against.
- And then, using a serrated knife or electric knife, very carefully shave off / cut the excess foam from the headboard. Try to do the cutting at a 90 degree angle all the way around so that you don't have any visible chunks missing when the headboard is covered and completed.
- Note: You'll use every single scrap of foam you cut to fill in the other areas on the headboard, so keep that in mind.
- Once all the excess has been cut off. Spray the adhesive and fill in the top side parts of the headboard that are still not covered in foam first, since those will be the most visible. Then use any remaining scrap foam to cover the bottom middle area that is still without foam.
- If you use the same amount of foam (and same size) as me, you will be left with a small area at the bottom middle that will not have any foam. It will never ever be seen when it's finished and installed. So I didn't think it was important enough to buy a whole other roll of foam since they're pretty expensive. You can obviously buy a third roll of foam though if you think it's going to bother you.
Let the spray adhesive dry before moving onto the next step: covering the foam!
- So, when I completed this project, I didn't add any interfacing fabric or foam batting on top of the upholstery foam. I just went straight to the linen fabric. And for cost saving purposes, I think that was a good choice. BUT for design purposes, it wasn't exactly the best choice. Because the linen fabric was kind of thin and when the headboard was finished, the whole thing had a green tint to it. You could see the foam color through the fabric. It just changed the color visually though, you can't actually see the foam though the fabric.
- That said, you have two choices for the next step. If you have a thick fabric that when laid over the foam does not change color, you're ready to cover the headboard in fabric and be done within project. BUT if your fabric is thin and/or you can see the color coming through the fabric, you'll either need to add an under layer of white fabric OR a layer of interfacing fabric / batting fabric.
- Once you have that part figured out, it's time to complete the headboard by stapling the fabric (or fabrics) all the way around the headboard. You'll pull the fabric over the top of the headboard and staple it onto the back of the headboard.
- I like to start in the center and work m way out. After you have the first staple in, go across to the opposite end, pull the fabric as taught as you can get it and staple the other side of the fabric down. Do that on the sides of the headboard as well, in a few key places, and then you can just go around the whole headboard, pulling and stapling the fabric every inch or two. This part takes a while!
Install! I would recommend using furniture straps / furniture anchors to secure the headboard to the wall. There are lots of different furniture anchors out there, so just follow the instructions on the packaging. And try to select ones that don't stick out from the wall too far, so they won't be seen.
- Also, last thing on installing... When you install you want to make sure the headboard will rest on the floor, this will remove any possible strain on the furniture straps from how heavy the headboard is. And also just give it the look that it's just effortless resting on the floor.
11 comments | Click here to reply
Hi Alex. We’ve had this headboard for four years now and it’s never been an issue for us. But I imagine its a preference thing.
Brittni-Brittni
2” foam seems kind of thin…is it comfy? 🙂
Alexnice job!! looks great
mtI don’t think this would work with cardboard, Emilie. But maybe worth giving it a try. Who knows.
Brittni-Brittni
I wonder if it would work with cardboard as a base, rather than wood… what do you think ?
emilieHi I love this so much and am gonna do it for my bedroom! What fabric did you use exactly?
Jennifer MartinI’ve been looking for new headboard options and came across your tutorial. Love it! Can you tell me what the height of your mattress is from ground to top of mattress? We have an 18” tall bed frame so I’m curious how tall I might need to make the headboard to achieve the same look. Thank you!
NicoleTrim excess fabric from the back of the headboard to neaten it up. Add a few more staples, as needed, in areas where the fabric has been folded or doubled up on the back of the headboard.
ThorntonIt looks beautiful.
Hena TayebI have been wanting to get a headboard for my bed since I haven’t had one in a while, but never thought of making my own. This is awesome!
Thank you for sharing
AliceWhat a fabulous post!!
Nippon