
After the last DIY rug I shared ended up being my most popular project of all time (so far at least), it only seemed fair to go for round two in the do-it-yourself rug department. This one is completely different from the first though. It’s a patchwork! And it takes far less time than the last one. Hallelujah!
It’s still large scale, so if you like big rugs (and you cannot lie), be sure to check this one out!
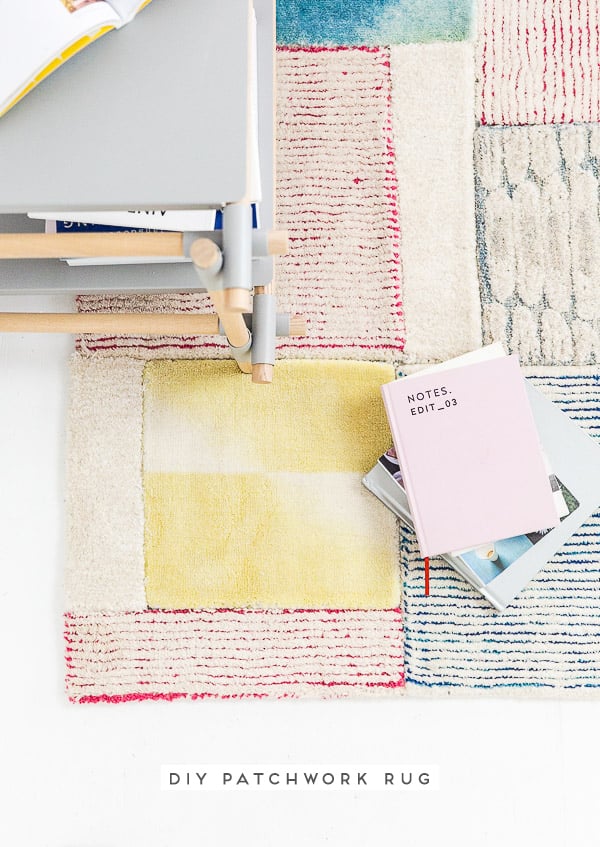
So here’s the deal… Over the last year, I’ve been collecting little sample pieces of rugs that would go on clearance at West Elm for anywhere from $1.99-9.99 (all of mine were from there – but other places do this too, once rugs have been discontinued). Do you know what I’m talking about? They’re so cute and cheap little DIY materials. When I first started buying them, I had no clue what I was going to do with them. But eventually, I decided they’d be perfect for a patchwork rug.
This rug DIY is waaaaaay faster to complete than the last rug I made, in case you’re wondering. It took 3-4 hours from start to finish to complete, as opposed to several days for the other one. Sooooo… definitely a quicker project if you’re hoping to tackle a rug! Want to make your own? Here’s how…

Materials / Tools for Patchwork Rug DIY
- rug or carpet samples*
- super sharp scissors or a boxcutter
- fray block
- yarn in a neutral color (or one that matches your rug pieces)
- yarn needle or upholstery needle
*Look for rug samples that are all the same thickness (or close to the same thickness) so it looks cohesive when it’s all stitched together. Also, the number of rug samples you’ll need depends on the size rug you want to make and the size of your rug samples, since they’re all different sizes. You can also go with carpet samples if you find any that you like, but those are mainly just solid colors, no fun patterns usually.
Instructions for Patchwork Rug DIY
1. Start by laying out the rug samples and determining a basic pattern you want to go with / which patterns or colors look best next to each other, etc. When working at the pattern for my rug, pieces were layered on top of each other (as shown in the photo) to determine smaller pieces that would be cut, while making sure everything would line up in the end. Hope that makes sense.
Note: To make the rug look as cohesive as possible, I’d recommend spreading around colors and patterns throughout. So, if you have blue toward the top of the rug, it’d be good to have some blue at the bottom as well, and maybe even the middle. Just some basic balancing of composition.
2. Next, you can either keep the rug samples in the exact size that they started as or cut them down, like we did. I like the way the finished patchwork looks with various sizes to switch things up. But it’s up to you.
To cut them, measure the sizes you want each piece of patchwork to be and then use a boxcutter (or a really sharp pair of scissors) to cut it down to size. It’s easiest if you mark it off and can cut from the back of each piece individually so you don’t have to go through the woven fronts of the rug. But you can also cut from the front if needed. We did a little of both.
3. Once all the pieces are cut, remove any loose pieces of thread from the cut ends and apply a fray block to any edges that were cut to seal the ends.
Once the fray block is dry, make sure to put all the pieces back together to see if it still fits like a puzzle to form your rug.
4. Then all you have to do is attach all of the pieces together using some yarn and a yarn needle or upholstery needle. You’ll need to attach everything from the back though, so flip all of the pieces over so the back side is facing up and start stitching. If it’s easier, you can just stitch two pieces at a time, so that you don’t have to flip every single piece over at once.
You basically just whip stitch all of the pieces together. Double knot your yarn at the end and create a stitch that brings the edges of the two touching pieces together. We used a neutral yarn color and kept the stitching as close to the edges as possible (while still being secure) to eliminate being able to see the stitch on the other side, when you flip it over. When you look at the final rug, you can’t even see the stitching from the front. It’s really well hidden.

Once finished, this rug can be cleaned and vacuumed like any other rug. Just handle with care when doing so, since everything is stitched together. It’s very durable and sturdy (the yarn is great for that) though.
Budget Breakdown: It took $75-100 in materials to make a 4×6 size rug. The price of each rug would really be dependent on how inexpensively you can find the rug samples, but you can make it as large as you can dream up, as long as you have the supplies.


Do you like the look of this patchwork rug? Have you seen those little rug samples that I used for this project at ay of your local home stores?
13 comments | Click here to reply
WOW
PatJust beginning to gather supplies for my small bedroom/tv room/office.
This is on my list for sure!
LOVE IT
Thank you so much for sharing!!@
[…] This rug DIY […]
Thistlekeeping - Thistlewood FarmI love idea and that shoes are super nice
The pink pineappleNew post:https://thepinkpineappleblog.blogspot.com/2018/02/the-best-looks-of-januarycoatssweaters.html
Thanks Cat. Julia was a huge help on this one. Glad I finally got it posted…I’ve had this done since last year, but just took the styled shots yesterday. Haha.
BrittniThis is next level DIY-ing. Amazing!
CatThanks Michelle! I knew eventually I’d find a use for them. 🙂
BrittniWhat a super cool idea to use all these rug samples, this ist just genius! And they fit together perfectly!
Michellehttps://www.makeandmess.com/
Haha. You’re the sweetest Cyd. Thank you. 🙂
BrittniYet another reason why you continue to be the coolest person I know. BRILLIANT!
CydThanks Ashes and Bones. This one really is pretty easy. I promise!
BrittniYou make it looks so easy! It’s lovely. I second that. I love how it turned out.
Of Ashes & BonesThanks so much Courtney. Appreciate that.
BrittniI love the way it turned out! It looks so cute.
Courtneyhttp://sugarcoatedbears.blogspot.com/