Large wall art projects like this one make it easy (and budget-friendly) to DIY your artwork instead of buying. And it looks great too!

It’s no secret that I love canvas projects around here and DIY art ideas too! So today I’m sharing a large wall art idea that I made back in 2018 and never shared. It’s held up great over the years.
And I’ve been asked about it so many times on Instagram, I thought it was probably time to create a tutorial. Especially since I finally found the original step by step photos. Haha.

Large Wall Art Materials
- unprimed / raw canvas* (one or more yards)
- acrylic paint and water
- pencil
- thread
- straight pins
- sewing machine
- grommets or dowel rod (optional)
What type of canvas should I use?
Medium weight cotton canvas is perfect for this project, but any weight will work. You’ll want to keep in mind the thickness of material you can get through your sewing machine as well.
So, if you’re using a heavy weight canvas (which is the thickest), you want to make sure your sewing machine can handle it. Unless of course, you’re opting for making this project no-sew, which I’ll explain at the end.
How much canvas do I need?
It depends on the size you want your final piece of art to be. You’ll need to take into account the dimensions for the background piece PLUS the additional material needed to create the shapes.
If you buy canvas from Amazon, you’ll typically be buying canvas by the roll or as folded yardage. Which is great, if you plan to complete additional canvas projects. There are so many things you can do with this material! I’ll share some more ideas after the tutorial.
But if you buy canvas somewhere other than Amazon, like Blick for example (or another art supply store), canvas is often sold by the yard. However, the unprimed canvas also comes at different widths.
So the dimensions for one yard of fabric might be 36 inches in length but 72 inches in width, in which case, you would only need one yard to create a piece as large as mine and would still have some fabric leftover. But you could also find canvas that is only 48 inches wide, in which case you might need two yards.
So, just double check the dimensions before ordering.

How to Make Large Wall Art with Canvas
1. Cut canvas.
Cut a large piece of unprimed canvas slightly larger than you want the end dimensions of your DIY wall art to be.
The sides will remain raw (unfinished) for this project, while the top will loose a few inches to finish the edge (and possibly the bottom as well, if you like that look).
**Iron out any wrinkles in the canvas that may be visible, once the canvas has been cut to size.
2. Paint canvas with a paint wash.
Then, decide on the color or colors you want to use for your artwork. Create a paint wash, which is one part acrylic and three parts water. And paint the piece of canvas that you plan to use for the shapes part of the project.
I kept the background canvas piece raw and painted the shapes piece in a peachy pink wash. You’ll also see a mauve pink color in some of the step photos. I originally was thinking that would be my background piece, but opted for a higher contrast with the plain, raw canvas.
**If your canvas is wrinkled at all, once the paint dries, iron it out before moving onto the next steps.

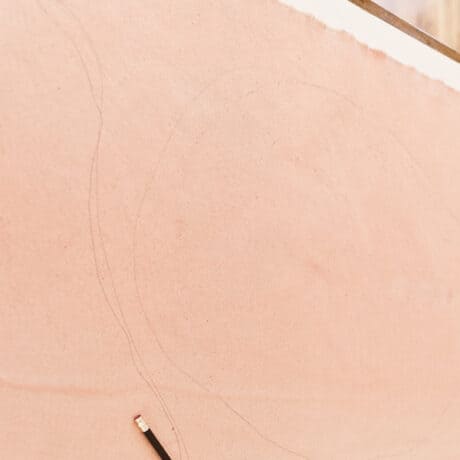
3. Draw shapes on painted canvas.
Once the paint is dry, draw the desired shapes with a pencil.

4. Cut shapes out.
Cut the shapes out with a strap pair of scissors and erase any pencil lines that are still visible on the shape once it’s cut.

5. Pin everything together.
Next, decide the placement you want for each shape on the background canvas. The pin everything together with straight pins (pin shapes down to background canvas).

6. Sew all the pieces together.
Then, carefully sew the pieces together on your sewing machine. Just make sure to keep the same distance from the perimeter of the shape while sewing, as much as possible. We went with less than 1/4 inch from the outer edge, all the way around each shape.
Note: This method of sewing means that the abstract shapes that are sewn on will have a raw edge all the way around. I really like the look personally because it adds more texture. But if that’s not your thing, you may want to approach this step a little differently.
7. Finish the top edge.
Once all the shapes have been sewn on, it’s time to finish the top edge. You can do this several ways:
1. Make a pocket for a dowel rod.
Create a 1-2 inch pocket in the back to slide a dowel rod through for hanging, similar to what I did for my woven wall hanging project.
2. Fold and sew a straight line at the top.
Just fold the top over by 1-2 inches and sew a straight line across the top and nail or thumbtack your piece directly to the wall. That’s what I did temporarily for this piece, but then never got around to doing one of the other two methods. Haha. And it’s been hanging in this spot for almost two years with no problems.
3. Fold, sew a straight line, and add grommets.
Or fold the canvas over the top by 1-2 inches and sew a straight line across the top, and add 3 grommets to top of the canvas for hanging that way. similar to how the grommets were done for the hanging wall organizer.
8. Finish bottom edge if desired.
If desired, you can also finish the bottom edge, by folding the end underneath 1-2 inches and sewing a straight line across the bottom about 1/2 inch from the edge.
Originally, the bottom part of my wall art was sewn up for a finished look. But ultimately, I took a seam ripper to the bottom after a few days because I wanted the extra length and I liked the slightly undone look better. Plus, it was going behind a huge plant, so I knew it wouldn’t bother me later, if I decided I no longer liked the bottom.

Can this art be made without a sewing machine?
Yes! If you’re not a sewer you can still recreate this project. It will look a tiny bit different, since it won’t have the thread lines, but no big deal.
I’d recommend using Stitch Witchery or another iron-on adhesive. You can use it to attach the shapes to the background and hem up the top and bottom edges as well. They come in different widths too, so you can decide which one would be best for your project.
Do you need a quilting arm for this project?
Nope! A regular sewing machine is fine. That’s what was used on the piece in the photos.
Why not just paint a design directly onto the fabric?
You can totally paint a design right onto canvas instead of sewing pieces together. But personally, I love the texture that is created with the layered pieces of this project.
It reminds me of quilting in some strange, kind of abstract way. And I really like that about it. My grandma was a quilter and was always a big inspiration for me growing up. So I might be a little bias here, but I think it adds more depth to have sewn pieces.
That said, if a painted design sounds more interesting to you, go for it! It may also mean that this cute, cheap wall art idea would be even more budget-friendly, since you wouldn’t need as much canvas. Added bonus!
Other DIY projects with canvas:
- More DIY art ideas with canvas and more
- A cool hanging wall organizer made of canvas
- DIY canvas lunch bags
- DIY wine bags (made from waxed canvas)
- An Xmas tree skirt made from canvas drop cloth

How to Make Large Scale Artwork with Canvas for Less than $15
Ingredients
- unprimed / raw canvas* one or more yards
- acrylic paint and water
- pencil
- thread
- straight pins
- sewing machine
- grommets or dowel rod optional
Instructions
- Cut a large piece of unprimed canvas slightly larger than you want the end dimensions of your DIY wall art to be. The sides will remain raw (unfinished) for this project, while the top will loose a few inches to finish the edge (and possibly the bottom as well, if you like that look).**Iron out any wrinkles in the canvas that may be visible, once the canvas has been cut to size.
- Then, decide on the color or colors you want to use for your artwork. Create a paint wash, which is one part acrylic and three parts water. And paint the piece of canvas that you plan to use for the shapes part of the project.I kept the background canvas piece raw and painted the shapes piece in a peachy pink wash. You'll also see a mauve pink color in some of the step photos. I originally was thinking that would be my background piece, but opted for a higher contrast with the plain, raw canvas.**If your canvas is wrinkled at all, once the paint dries, iron it out before moving onto the next steps.
- Once the paint is dry, draw the desired shapes with a pencil.
- Cut the shapes out with a strap pair of scissors and erase any pencil lines that are still visible on the shape once it's cut.
- Next, decide the placement you want for each shape on the background canvas. The pin everything together with straight pins (pin shapes down to background canvas).
- Then, carefully sew the pieces together on your sewing machine. Just make sure to keep the same distance from the perimeter of the shape while sewing, as much as possible. We went with less than 1/4 inch from the outer edge, all the way around each shape.Note: This method of sewing means that the abstract shapes that are sewn on will have a raw edge all the way around. I really like the look personally because it adds more texture. But if that's not your thing, you may want to approach this step a little differently.
- Once all the shapes have been sewn on, it's time to finish the top edge. You can do this several ways:1. Create a 1-2 inch pocket in the back to slide a dowel rod through for hanging, similar to what I did for my woven wall hanging project.2. Just fold the top over by 1-2 inches and sew a straight line across the top and nail or thumbtack your piece directly to the wall. That's what I did temporarily for this piece, but then never got around to doing one of the other two methods. Haha. And it's been hanging in this spot for almost two years with no problems.3. Or fold the canvas over the top by 1-2 inches and sew a straight line across the top, and add 3 grommets to top of the canvas for hanging that way. similar to how the grommets were done for the hanging wall organizer.
- If desired, you can also finish the bottom edge, by folding the end underneath 1-2 inches and sewing a straight line across the bottom about 1/2 inch from the edge.Originally, the bottom part of my wall art was sewn up for a finished look. But ultimately, I took a seam ripper to the bottom after a few days because I wanted the extra length and I liked the slightly undone look better. Plus, it was going behind a huge plant, so I knew it wouldn't bother me later, if I decided I no longer liked the bottom.
Notes
Sewing Emma Spear
Step photography Amelia Lawrence
Styled after photos Brittni Mehlhoff
What do you think? Have you ever tackled a large scale art project like this one?
8 comments | Click here to reply
That’s awesome Jeannie. I would love to see photos! If you have them on Instagram, tag me or DM me so I can take a look.
BrittniYou inspired me to make a medium-scale painted/cut/sewn art piece for my daughter’s room. Let me know if you would like me to share photos. 🙂
Jeannie LorenzThanks BRITTNI!
Alice GalleryWow!! What a piece of Art. Great!!
NipponI’m sure you’ll make something beautiful Karlijn. 🙂 Let me know how it goes.
Brittni-Brittni
This is so cool! Thank you for this. I love it. Will never make something so pretty like you, but I will definitely give this a try 🙂
KarlijnThanks Jodi!
BrittniThis is really cool. I’m not much of a sewer but I may have to break out the sewing machine now. 😉 Thanks for sharing.
Jodi