
Want to learn how to drill holes in stone to make natural stone jewelry? Well, you can, and it’s actually pretty easy.

I’m sure you’ve seen stone jewelry at craft shows, online, and small boutiques. But have you ever wondered how you can actually drill through rock and stone to make your own earrings, necklaces, charms, etc? I know have!
So I reached out to Jenny Hoople, a jewelry artist who uses rocks and natural stones in her own jewelry collection to see if see could share the process of how it’s done. And how you can make your own rock and stone jewelry at home.
The good news is that drilling process is easier than you might think. So if you’re always searching for stones on your natural walks and trail runs, this tutorial is for you. Take it away Jenny…
The below guest post tutorial is written by Jenny Hoople of Authentic Arts.
I’ve been making this natural stone jewelry with pre-drilled pebbles that I purchased from fellow Etsy artisans, but wanted to start using my own stones.
It took a little bit of internet research and guessing to figure out the best way to go about drilling my own, indigenous Wisconsin stones. Some sites said one thing, some said another.
I took the best advice from several different sources and did some experimenting and found that drilling my own, small river rock is not only possible, but pretty easy!
I’ve gotten a lot of questions from people asking how to drill their own stones and I’d be more than happy to share with all of you. Click through for the tutorial.

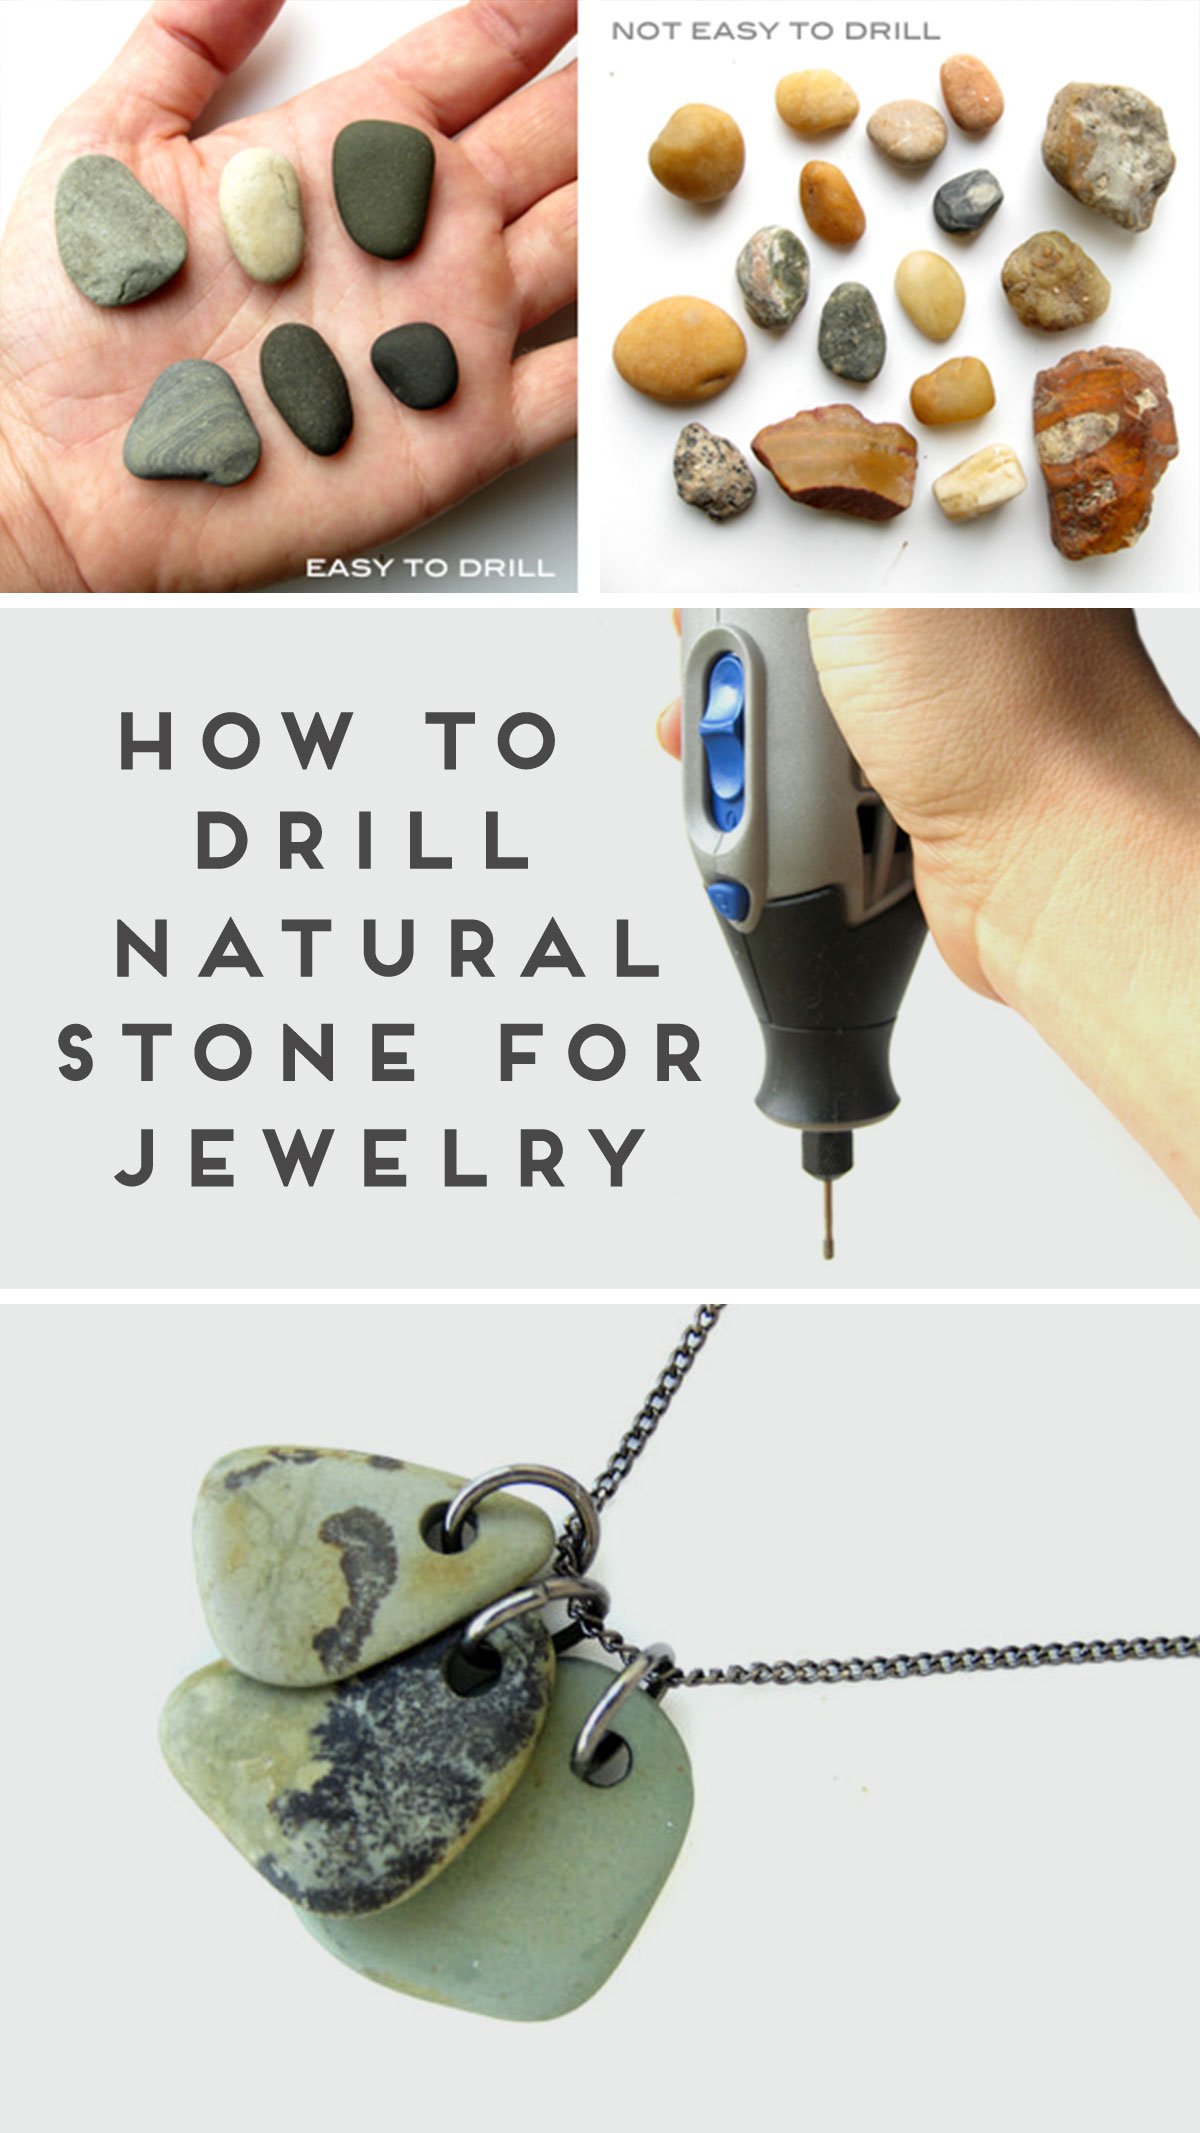
Choosing the Right Stone for Drilling
Almost any stone that you find CAN be drilled, but I really recommend starting with softer sedimentary rocks (sandstone, mudstone, limestone, etc).
If a pebble you find on the beach isn’t rounded like the other ones around it, that’s a good clue that it’s a harder igneous or metamorphic rock and would take a long long time to drill.
Other ways to tell if a rock is too hard to drill is by checking whether you can see crystals in the stone or whether the stone is shiny or glossy like quartz (ah, those magical wishing stones of my childhood).
Sedimentary rocks will be much easier to drill, so start with those.
But, don’t worry if you can’t tell what kind of rock it is. If it takes significantly longer to drill than the other pebbles, it’s probably igneous or metamorphic.

Equipment You Need to Drill Your Own Beach Stones
1. High speed rotary tool (like a Dremel)
I got the Dremel 4000, high performance.
I figure that since drilling stone is heavy duty work, it’s a good idea to have a heavy duty tool
2. Hollow, diamond-tipped coring bits
These are much faster and effective for drilling holes in pebbles than a solid drill bit.
There’s also less chance that you’ll break the stone when drilling and it’s much much faster.
Not only do solid drill bits drill more slowly, you’d need to drill a small hole and then change to an ever larger bit until you widened the hole to the diameter that you wanted. Ridiculous!
For drilling holes in small beach pebbles to use in jewelry, a 2.5mm diameter hollow coring bit works well. The bits they sell that are officially for Dremels are way too expensive, I highly recommend getting your bits from Rio Grande Jewelry Supply.
They have nice packs of 5 for $14 as opposed to one official Dremel bit for more than $20! You’ll be using all 5 of those bits eventually as they do wear out relatively quickly.
3. Dremel Collet Nut
The Dremel rotary tool comes with a Collet Nut (that’s the thing that holds the drill bit in place) but the 2.5mm coring bit is a different size. So you’ll need a Collet Nut that’s the right diameter.
I bought the set of Collet Nuts they had right there at the hardware store and used the one that the coring bit fit into! The other ones in the set will come in handy for all the other projects I dream up to use this Dremel for. It can do so many things, my next experiment will be engraving poems on stones.
4. Small Plastic Container
This is to hold a little water so you can drill your beach stone under water.
Drilling underwater cools off the bit and lubricates everything which will make the drilling go faster, keep your stone from heating up and keep those little diamond crumbs from getting ground off of the drill bit too quickly.
I like to use the little plastic container that my lunch meat came in (cleaned out and sans lunch meat, of course!)
5. Little Piece of Wood
Like a shim or whatever, to have under your pebble so that you don’t drill through the bottom of your water container!
6. Goggles
Please always wear goggles when drilling! I always wear them even though I’ve got glasses.
Real danger is minimal, it’s not like there are shards of rock shooting out all over the place, but it’d be a shame to lose your eyesight over some natural beach stone jewelry!
Better safe than sorry.
7. Rocks
Yes, don’t forget your beach stones, river rocks or what have you.
Small (~1″) pebbles are ideal. It’s easier to make necklaces like my Rock Collection Necklaces when the stones are small and thin (~1/4″ thick).
That way they lay next to each other better.

How to Drill Natural Stones for Jewelry
1. Put on your goggles.
2. Get your stone ready.
Firmly hold your beach stone on top of the piece of wood and just under the water.
3. Turn on rotary tool.
Turn on the Rotary Tool with your other hand and hold it perpendicular to the pebble.
Please be careful when working with the Rotary Tool around water!
Don’t get any part of the tool wet that’s not absolutely necessary and don’t grasp the tool with wet hands.
4. Begin Drilling.
Let the weight of the tool do the drilling for you. Be sure to keep lifting the drill up and down.
This lets cooling water get into the hole and lets the sediment from the stone to flow out.
The water will get cloudy, that’s ok, just keep drilling.
5. When it breaks through the other side, you’re done with the hole.
With these small beach stones, I’ve found that drilling one takes about 2-3 minutes. I’m sure it’ll be faster when I’m not so new at it.
6. (optional) Condition the stones.
The only way that I alter these unique stones other than drilling a hole in them is to rub them with my hands after I’ve just put on some unscented Eucerin lotion (after the stones are dry, of course!).
That helps to condition the stones so that the natural oils from your skin won’t leave uneven dark spots and enriches the natural color of the stone so they aren’t all dusty looking.
After the lotion gets a chance to be absorbed by the stone, any excess should be wiped off with a clean, dry towel so you don’t have to worry about whether it will mark your clothing with an oil spot!
Now get out there and start making some fabulous beach stone creations. All you need are a couple of basic jewelry supplies to complete the project once you have the stones drilled. Very easy.

")


Looking for more DIY jewelry ideas?
So many jewelry DIYs to try that are similar to this one. Here are a handful of favorites I think you might like…
- Make your own polymer clay earrings
- DIY chocker necklace made of rocks
- Make your own trinket dish with just a couple easy to find supplies
- DIY wire necklace (great beginner soldering project)
- DIY leather necklace with a little bit of brass as well
- Great tutorial for beading a necklace with rocks and shells and all the things
- metal stamping jewelry is a fun one to try – and easy too!
About Jenny: Jenny Hoople makes natural stone jewelry and beaded gemstone jewelry that is as natural, colorful and authentic as the people it’s given to. She lives near Madison, Wisconsin with her little Mexican husband and memories of their wonderful bunny companion (who crossed over the rainbow bridge after 7 happy, bun-filled years). She’s passionate about color combinations, the handmade movement and living closer to the “real business of life”.
Thank you so much Jenny for sharing your project!
For more ideas for quick and easy projects, click here to visit the craft tutorials and diy page filled with 100s of DIYs.
84 comments | Click here to reply
Hi there. Enjoyed your enthusiasm about the Drexel tool. I live in the gulf coast area and have lots of sea shells that I am ready to work with. Thank you. On another note. Sorry about ur bunny. We have a bunny, well my daughter and granddaughter does. My cousin is getting rid of hers if you’re interested. She’s giving it away although she drove to LA to get it and paid quite a bit. It looks like a rag doll.
ShellyReply to Cathy,
AaronYes you could but it would be extremely hard to hold the stone steady and hold the drill level while controlling the speed but what would it hurt to practice on some rocks that have no meaning or value to you? Or maybe have someone hold the rock steady. But yes it can be done.
Absolutely fantastic information – now I can stop breaking stones and drill bits !!
Christineharmony ball
This article is a godsend. I have seen way too many of these that require a jewelry drill (which are NOT cheap), so it’s nice to know that I can use my Dremel instead. I do have a question, though. I have some semi precious gemstones I’d like to drill through that are about 12mm in diameter. Could I use this technique with those materials and that size?
Eliza[…] Drilled Natural Stone Jewelry from Paper & Stitch […]
10 Ways to Make Your Own Beads • Vicki O'DellOh my gosh! I love this tutorial! Finally something different! Thank you! Kind regards,
https://queenofjades.com/
KatI love the look of your blog and I always admire anyone who can create something on Etsy, which is a great marketplace. I would have love to have seen more photos of your pieces possibly with links to them on Etsy.
Ciara@HometoolhelperCan you use a solid bit rather than a hollow tipped one?
VickiAmazing tips i will try to drill natural stone, but i use first some cheap stone.
lindaI found your instructions extremely easy to follow and very informative. Thank you for sharing.
CINDYHey love this! I’m excited to start.. I have this addiction to collect round flat rocks.. now I can do something with them 🙂
Jen[…] I found this tutorial on how to drill natural stones from Jenny Hoople to be great. This is a woman who does a lot of great river stone jewelry with her company Authentic Arts. Working artists like Jenny are the best to learn from! http://www.papernstitchblog.com/2011/07/18/make-this-drilled-natural-stone-jewelry-tutorial/ […]
Rock Jewelry Inspiration + Giveaway | Nunn DesignThis is great! I didn’t know you can use the dremel in what way!
AviantiGorgeous pieces! Can’t wait to try my hand at it. Thanks for the relative information.
AmberYou are FABULOUS! Thank you so much for this advice,however, I need to find out how to drill into large crystal quartz stones to make several crystal pendants, earrings etc. I do have a Dremel I got for my birthday in Dec. I do not want to shatter it. PLEASE ADVISE ASAP. Thanks!
JulieCan someone tell me if drilling thru beach glass would be much more complicated than stone? Or would they tend to break faster or easier than stones? I just love the idea of making homemade jewelry, great gift idea! Thanks! 🙂
JojoWow! What a technique! I just used this successfully on the stones I found recently in Carpinteria. This has really opened my eyes to the world of making my own jewelry. Thank you!!!
Jenn[…] Drilled Natural Stone Jewelry from Paper & Stitch […]
10 Ways to Make Your Own Beads | Vicki O'Dell... The Creative GoddessVicki O'Dell... The Creative GoddessI just successfully drilled a hole on my first natural stone my husband picked up on our backyard ,what I did I applied clear nail polish all over,Im just so excited because it became a bit glossy not much.just the way I like it.I made a bail for it and hung in 22″chain,which I’m ready to wear it tomorrow 😉 thanks you gave me an inspiration,it just a start believe me.,,,,
ElaineThank you . After several ruined and wrong bits. After several cracked rocks. I finally thought to seek advice online and stumbled upon your VERY helpful site. Love it and keep up the great work.
Erica NortonHi, do you know what size collets you have? I have drill bits size 1, 1.5, 2 and 2.5 mm and I’m having trouble finding collets to fit.
Ariellebits from rio grande are not working..thinking we have the wrong rock…how do we find the correct sedimentary stones to work with?
zoewhat is your source?
thanks!!
ArielleJenny,
NicoleWith your beach stones do you polish or tumble them or use them as you find them on the beach? I found a good collection while out kayaking and have been searching online about polishing without a tumbler and how to drill the stones for jewelry (that’s how i came across your how-to!) I live in Iowa so i’m sure that i have some similar stones to what you’re working with. I appreciate any advice!
I would check Amazon, Arielle. That’s where I bought mine and there are some pretty affordable options.
papernstitchHi, do you know of a less expensive alternative to the Dremel?
ArielleThis is genius! I have some gorgeous pebbles I collected from a beach in Italy that I’ve been wanting to use in some way. Can’t wait to make this!
Marlene @ Jade and FernThank you for the wonderful instructions. The link to the drill bits doesn’t work. Is this a pack of multi-size drill bits? I can’t seem to find just the 2.5 size bit by itself.
AmyTHANK you SO much for the tutorial! I’ve wanted to try this forever. How generous of you.
AuroraI would like to drill about a 2 mm hole in agate. What company and contact do you have for the drills if this is plausible? Also have you just tried grinding a small flat spot on the stone and using JB weld to hold a clasp on? Have you been able to sell many of earths most beautiful stones in various creative arrangements? If you could, would you Email me some way to talk on the phone to each other without the world knowing our phone numbers. Thanks for your kindness of putting this information together just to help others. We don’t find to much of that these days.
Frankawesome, but I would like to find about drilling mother of pearl.
Tabitha Glasmanwould you be willing to drill a few holes if I sent you three to five rocks? and if so, what would you charge?
carolThank you thank you thank you!!!
JanelleThanks for the advise on stones and tools. I want to drill into slightly thicker stones and insert an attachment for a pendent look. I assume this would follow the same technique except the diameter of the drill. Thanks again
john SmithWow this is fantastic! I’ve worked with gemstones before, but never “stones” like this! Great tutorial!!
Katie RoseVery cool! I’ll have to give this a go! 🙂
Katey, Los Angeles Car Accident Attorney
KateyThank you so much for this well-done instruction. Your link to Rio Grande leads to the diamond bit, but nowhere do I see a 2.5 mm bit. The larges they seem to carry is 2.25 mm? Am I doing something wrong? Would like to pursue!
whimsyVery nice idea!!!
Protos BisuterÃaI just really wanted to thank you for your generosity in sharing your knowledge on this subject. I really know how long it takes sometimes to research these things properly yourself, it is SO lovely of you to take the hard work out of it for the rest of us!
Much appreciated,
TejaTeja, a busy mum 😉
Awesome! I can’t wait to try this with the stones I’ve collected over the years from the Lake Michigan shoreline. Beautiful ideas.
DebraHello!
SisyenThank you for your post.
I see a stone have a problem (cracking hole on other side).
I can do it without cracks on second side of beach stone, if you want to know how to do it contact me any time!
http://www.etsy.com/shop/Sisyen
Thanks Jenny for the tutorial will this also work on say Jasper and other stones?
DorisYou should really use a Drill Extension to reduce the very high and likely risk of getting electrocuted. Not only is there a high chance of water being sprayed back into the air vents on the Dremel, your hand is bound to get a bit wet. You Could get Electricuted simply because cheaper Dremels can often arc inside the motor, with wet/damp hands it can easily arc through the air vents to your hand. They’re very cheap and may save your life. Here’s a picture for when you go to the hardware shop, you’ll have idea what you’re trying to get.
Philhttp://1.bp.blogspot.com/_pFOm7tEWWu4/SKmvwSMcnpI/AAAAAAAAA40/5MAl8jsnlf8/s400/Dremel+tool+with+flexible+power+cable+01.JPG
He great stuff. Keep it going. Looking forward to the next.
Drilling concreteGreat how-to. Want to remind everyone to get good quality masonry bits for your drill. The cuts go faster and the bits last longer.
RaymondThis is so nice. when i was young i used to pick up stones during summer, Thank God summers just a few weeks to go, I can go to the beach, im going to collect all those lovely stones and make my own necklace.
By the way are those tools available in hardware’s in a set? thanks mucha!
Love lots & hoping for updates.
January GemorieThank you! I have just discovered the incredible beauty in rock and stone. I appreciate your concise, easy directions! You have given me the confidence to go ahead and jump right in! Thank you again!
KarenJenny you are Awesome!
I am very, very excited to find out all this wonderful information in a snap!
I was at 2 different craft stores today for a total of 1 1/2 hours: Joanns and Michaels to look for any direction on how to make jewelry out of the beach stones I picked up off the Cape May beaches last year and got nowhere……I was disappointed until now!
I asked for a rock tumbler for Christmas and got one!
The stones are beautiful!
~Now to create something from my heart to give to others as gifts.
Jenny, I just have two questions:
1) How do you start the hole with the “Coring bit” since it does not have a pointed tip?
2) How do you hold the stones in place to drill a hole in the stone and not you fingers?
Thank You kindly & God Bless!
Robin*LeeHi Jenny,
I just used your technique to put together some beautiful jewelry as a Christmas present for my lady friend. Thank you so much for the help!
I would like to comment that while the diamond coring bit is essential, I was able to use a regular utility drill as opposed to a dremmel and had great results! Thanks again!
Hubert FitzwilliamGreat,
SiriusJust wondering how you held the stone in position to keep it from moving while drilling
Hi:
MegGreat tutorial! I need to know what size drill bit and which model of dremmel you are using, if you don’t mind.
Thanks!
Thanks. I’ll bookmark this and get myself a Dremel one day! I love beack stones and have a ton!
DodaGreat of you to …. SHARE, your also GOOD with explaining directions !!!
GailHi Jenny! I have been scouring the web for about two hours now, looking for information on what size Dremel to buy to drill stones and beach glass and how to do it. You have, by far, had the best and most detailed information!
MichelleMy question would be, do you think the Dremel 300 would work on the stone as well? It seems to have the same qualities as the 4000, but perhaps a bit smaller. I am worried that the 4000 will be too bulky or hard to use. Do you find that to be the case?
Thank you!
Thank you for sharing this ! I found it very helpful and appreciate your time~ 🙂
Bridgette MitchellThanks Lindsey! Yes, I think it would work really well on shells!
Jenny HoopleDo you think this would work on shells (like from the beach 🙂 ?
Lindseygreat tutorial!
Lindsey
Wow, Steve 🙂 10 pieces of jewelry? That’s awesome! You guys rock 😉
Jenny HoopleThanks for the great tutorial! We got back from a great vacation in Maine with a whole bag of rocks that I wasn’t sure what we were going to do with them. After reading your tips on Friday, my son and I made about 10 pieces of jewelry this weekend and I can’t wait to make more and try some different things. Thanks again! Steve
SteveHi Jenny, Thanks so much for share this awesome info with us. I have always wanted to learn how to do this ever since I was little, my aunt use to make necklaces like your and I have always want to know how my aunt did it. Since she not here on earth. Thanks again for sharing. BLESS IT BE ””
Yasmin Mohamed,Thanks for sharing, always wanted to make my own.
Stuart jannettsHello, does this work for drilling holes in 12mm beads?
Nesha[…] found this blog on how to make holes. They are showing a hollow “core bit”. That looks […]
Drilling in small stones « MamboheadThank you all again 🙂
Cathy – I don’t think a regular drill bit will work. A regular drill would be so slow and the bit wouldn’t be hard enough to drill the stone. Diamonds really are a girl’s best friend here.
Jenny HoopleSo nice, thank you for sharing! : )
MijbilIt’s a fantastic idea in this season :)))))
Caterina[…] Hoople of Authentic Arts shares some excellent tips and tricks for drilling natural stone for jewellery-making over on papernstitch. Her information is extensive and the post is a great […]
Drill Natural Stone For Jewelry-Making | External BrainHi,
Great idea!
Could a normal drill be used with the bit you mentioned? Don’t really want to go to the expense of a good Dremel at this time but would like to give this a try.
Many thanks,
CathyCathy
You’re very much more than welcome, Brittni 😀
Thanks for the opportunity!
Jenny Hoople~Jenny
Thanks for answering those questions we had in the comments Jenny. And thanks again for a wonderful tutorial!
papernstitch-Brittni
Hello again!
To Daryl regarding whether the bit is a dremel product: No it isn’t, though they do carry similar ones. You can get them cheaper at Rio Grande http://www.riogrande.com/MemberArea/ProductPage.aspx?assetname=349041&page=GRID&free_text=diamond+bit I use the 2.5mm bit 🙂
To Terri regarding whether I have tried this with sea glass, the answer is no, BUT a person did comment on my Facebook Fan Page that it was the same process to drill sea glass, so perhaps that is true 🙂
To Roy Jacobsen – Good question, thanks! I’ve been running it right about in the middle, but I think I can turn it up. Seemed safer to start kind of slow 🙂
Great questions and great comments! Thanks so much everyone!!
Jenny HoopleGreat info, nicely presented. Thanks!
BethGreat info! I’ve been wondering how to do exactly this.
One question: What speed do you run the Dremel?
Roy Jacobsen[…] really awesome tutorial on how to make rocks in to beautiful beads for necklaces and […]
Cool Stuff on the Interwebs « bluemollusc.comThanks so much Jenny for sharing this super tutorial on drilling stones. Made me regret my wimpy Dremel model! Okay to feature this in a future post so others can come visit? Pearl
beadinggemHave you tried this with sea glass? Thanks, Terri
TerriHi,
Saw this nifty tutorial via Pulse. Wondering, is the bit a Dremel product? If so, might you know its product number? Can’t seem to find a match on the Dremel website.
Thanks for any details.
DarylGreat information! Thank you for the tutorial. I’ve wondered what would be the best way to do this.
ShelleyHi,
Fabulous information! Thank you! I have just shared it on my facebook page here http://www.facebook.com/piggyimp
Many thanks!
Linz
linz jackson-kayPiggyimp Crafts
creative ideas. thanks alots
Love craftsThanks for sharing this!
karrie watersThanks so much for sharing my tutorial Brittni!
You’re all very welcome and I wish you much happy stone drilling!
Jenny HoopleThanks for sharing!! Something I’ve always wanted to know!!
lynnkThis is such a cool idea. Thanks for sharing this Jenny.
Mati