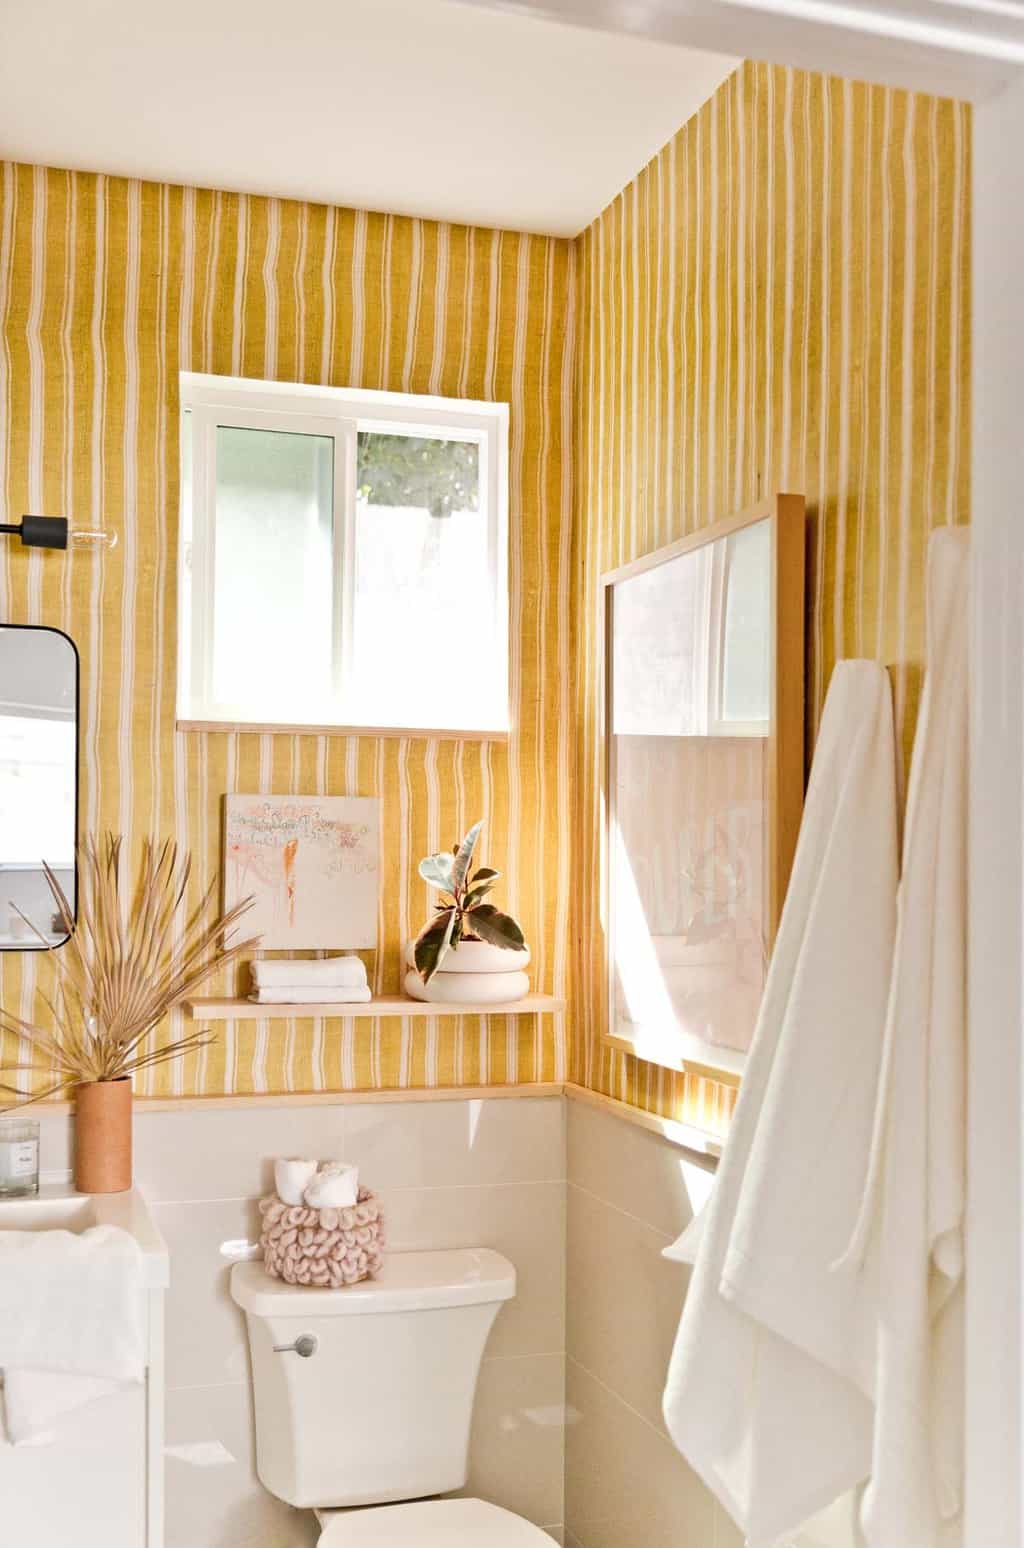
A tiny yellow bathroom! And I’m not describing the ‘before’, I’m describing the ‘after’. Check it out!
If you follow along on stories, you know I’ve been talking about the back house bathroom for a couple of months now. It’s one of those fun projects I’ve wanted to tackle from the get-go.
And today I’m sharing the yellow bathroom reveal!
It’s so bright and cheery and a little bit off the beaten path of what I would normally do, which I actually kind of love. It’s nice to change things up with your style sometimes, right?
Click through for the before photos, all the afters, and everything I added (and subtracted) to get this tiny bathroom looking cute.
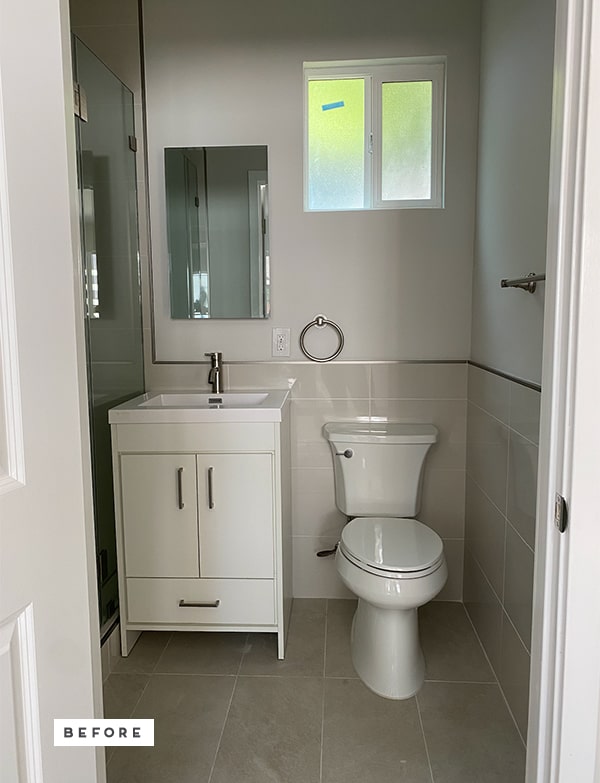
Before we get into all the changes that I made to this bathroom, here are the before photos, so you can see what we started with…
The Tiny Yellow Bathroom Makeover
It really is important to me for any space that we live in to feel like ‘home’ and to me that means decorating with things I love and doing my best to make temporary changes wherever I can.
So while there wasn’t much I could do about the tiling, toilet, vanity, and sink, there was still plenty I could do to transform the space in a renter-friendly way!
Admittedly, what the landlord put in here originally is totally fine.
But it’s not specifically my taste and I am very opinionated about how I want the place I live in to look (whether I own it or not).
So, there were a few things I wanted to remove before getting started with my temporary cosmetic changes. Things like the mirror and the towel bars.
Which was pretty easy – just unscrewing things with my drill and some elbow grease on getting the towel bars off. Those were really on there!
From there, I was ready to get started with wallpaper. BTW – I left the holes unpatched so I can literally put everything back exactly where it was before, when the time comes and I remove the wallpaper.
Here’s everything I added to this teeny tiny bathroom to make it feel like home…
Removable Wallpaper
The wallpaper, in my opinion, completely transformed this bathroom.
It’s from Wallshoppe and it’s the Monroe Street print in yellow. It also comes in four other colors! I absolutely love it.
Especially because their wallpaper is sustainably made in the USA…right in Los Angeles actually.
Small bathrooms like this one are a place where you can really have some fun with a color or pattern. And in this case, I went with both.
It’s definitely a departure in some ways from my ‘typical’ style. But that was intentional. Who knew I’d love hello THIS much?!
I wanted to play around and have some fun in here with something a little unexpected.
But also, I wanted a print that was bold enough to distract the eye from some of the things I don’t love as much (like the tile and vanity).
What do you think? Did this wallpaper do the trick?
What I love most about removable wallpaper, is that it’s high impact, renter-friendly and relatively budget-friendly as well. Win-win.
BTW – I’ve used removable wallpaper before and it’s pretty easy to hang on your own. No professionals needed. The Wallshoppe wallpaper that I used was great.
For the pattern I selected, there is about an inch overlap for each panel, so you just line up the pattern with the overlap and keep going or trim the excess ahead of time before adding panels to the wall.
DIY Chair Rail / Wood Trim
There was a decorative trim that finished out the tile on the wall all the way around the bathroom in here that I didn’t love.
To me, it stuck out like a sore thumb because of the contrast in color between the trim and the tile. So, when I was wallpapering, I decided to extend the wallpaper over the decorative trim.
When it was complete, it looked better BUT still a little weird.
I was talking to my mom about it to show her how it looked when everything was done, and she mentioned that maybe I could use a quarter round or something to finish it out.
And then I remembered that I had just bought some wood corner moulding to trim out a DIY frame I was making.
I tested it out on top of the existing lip to see if it would work and it instantly looked sooooo much better.
So, I cut the pieces down to fit each section of the wall and just used double sided tape to attach it to the lip. It’s worked great so far with just the tape.
But you could also glue it. I just wanted something temporary that wouldn’t damage anything.
DIY floating shelf
The floating maple wood shelf I made was so easy! It gives the illusion of a floating shelf without the effort. Here’s what I did…
I had some leftover L brackets from the DIY desk I made a while back. You could also use corner braces.
Then, I bought a piece of maple that was already cut to a good size (2 ft long) for the space, to save time.
I just attached the L brackets to the wall with wall anchors and covered over the metal with wallpaper scraps that matched up perfectly.
From there, I screwed in the maple plank to the brackets from underneath and that’s it! Floating shelf!
Mirror
I bought a very simple, black frame mirror from Amazon and I think it works well.
There were a zillion other mirrors that I would have loved to buy, but I didn’t want to spend a ton of money.
Not to mention, the wall where the mirror had to go is actually smaller than the width of many bathroom mirrors. So, I was pretty limited on options that would fit.
This one was under $100 and small enough to fit. Plus, it was very easy to hang bc it didn’t require wall anchors (and came with the heavy duty picture hangers needed to hang it).
It’s 16×20 in size, in case you need a smaller mirror, like I did.
Lighting
We had this Cedar and Moss light already, from our previous house. And I just love it.
It looks like they discontinued the one I have, but this Venus light is almost identical. Just select the matte black and upgrade to the midnight blue ceramic canopy.
But I have a little secret to share with this light… It’s just decorative!
There is already overhead lighting in this bathroom, which means an additional light over the mirror wasn’t necessary. For balance and aesthetic purposes though, I felt like it was.
So, instead of bringing in an electrician and making this light functional, I just hung the light housing on a couple of nails and screwed in a couple of light bulbs.
It doesn’t function as a real light, but it finishes out the space and looks great with the mirror.
And when we move out, I’ll just take it down, remove the nails, and bring the light with me to the next house. Easy peasy.
Artwork
You know I can’t function if there is a room in our house without artwork. Haha. Joking, but also serious.
I added two pieces of artwork in here.
One small piece above the floating shelf, that I hung on the wall to give more space on the shelf for other things. And one large piece to the right of the shelf on the adjacent wall.
The small piece is something I’ve had for years and years – bought it at an art show when I was still in college.
I can’t remember the artists name though and it’s not signed. Ugh. And the larger SUPER DUPER piece is a DIY from a while back, that I had framed.
Rug
I went with a 2×3 rug in here as opposed to a bathmat.
This shower will most likely never get used since it’s a part of the back house and I use that space as my office. So I won’t have to worry about the rug getting wet in here.
It’s a flatweave rug from the Sarah Sherman Samuel collection for Lulu and Georgia.
I love the Moroccan inspired pattern and the black ties into thee black frame of the mirror and the vanity hardware.
Planters and Vases
A couple of plants and cute planters can go a long way in a tiny bathroom like this one. And there is enough light in here in the mornings to make it work.
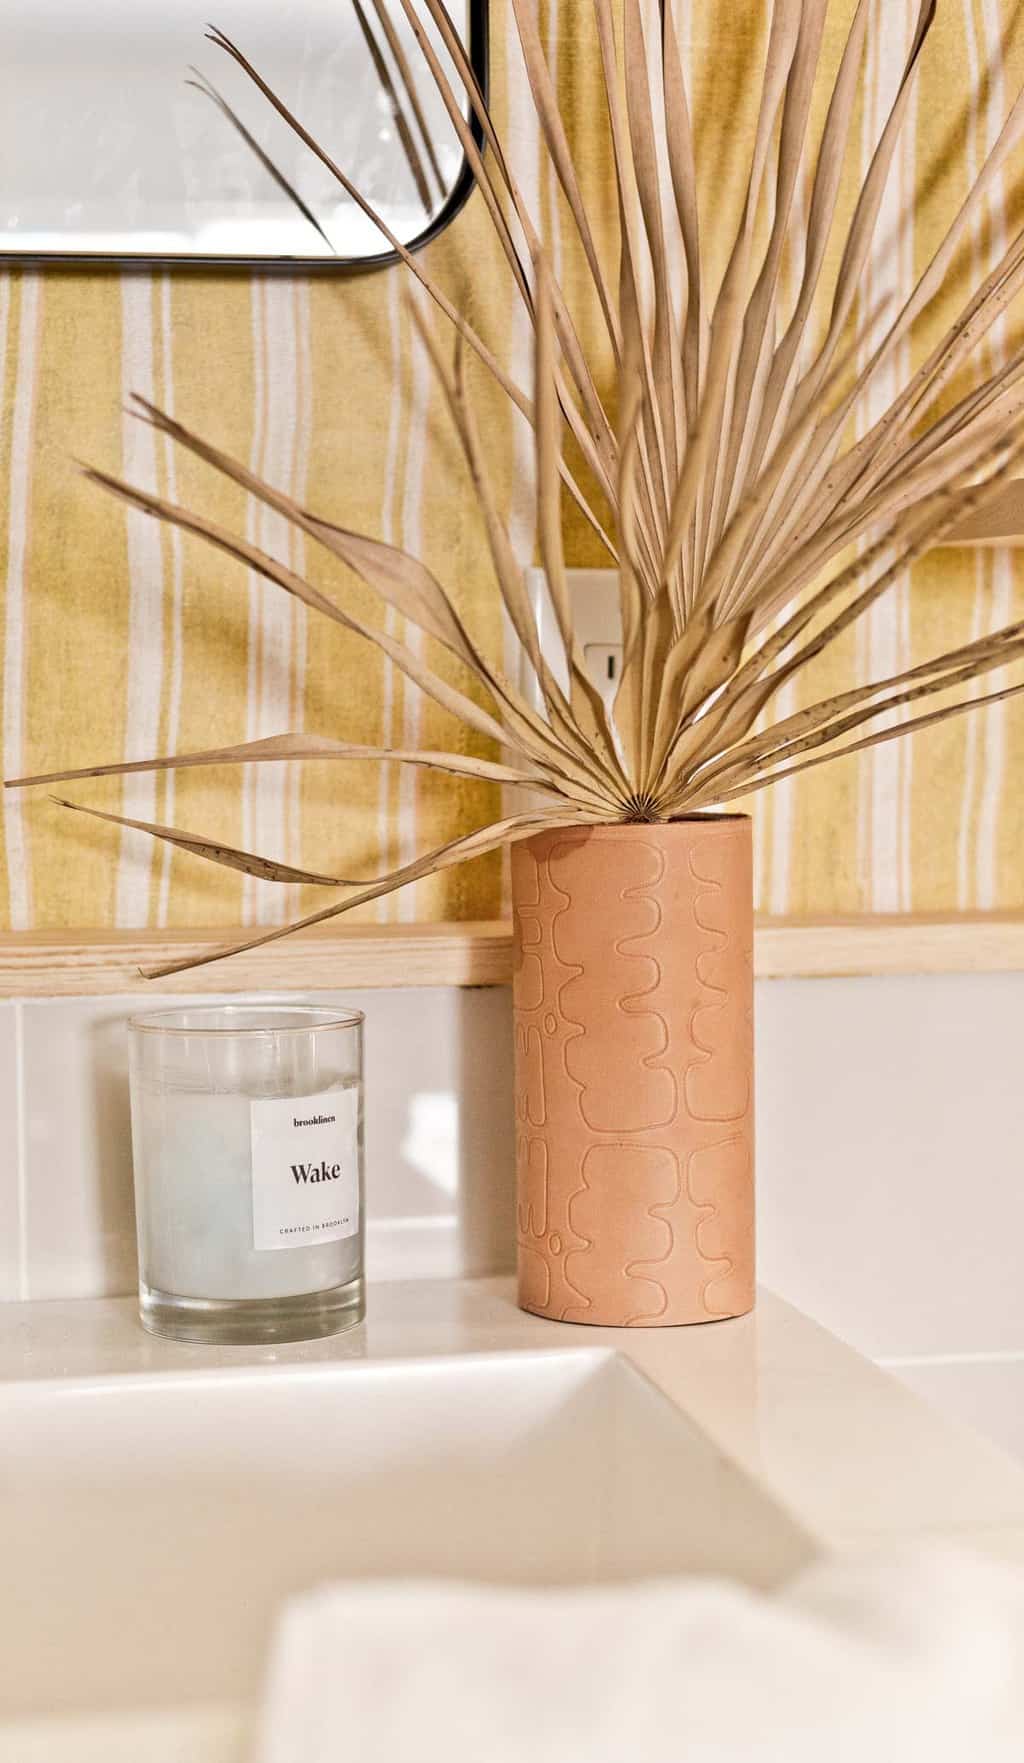
I added a vase with dried palms in it too, for some extra height and texture. The leather vase is a DIY.
And the planters are from Areaware (white stacked planter) and small one with brushstrokes is from GoodHood, but no longer available.
Bath Towels
If there isn’t much storage, bath towels can actually help elevate a space.
And everyone needs towels in their bathroom, so it’s a totally functional decor element.
Throw up a wall hook or two or fold a few smaller washcloths on a shelf and it starts to feel like a mini spa.
All of our crisp white towels are from Brooklinen and they are the best! They’re very soft and absorbent and lightweight, which I personally love.
Not a fan of super thick towels bc they’re harder to fold and don’t look as nice hang on wall hooks, imo. So, this thinner, classic towel is perfect for me.
We have the classic bath towels, hand towels, and washcloths in white. There are five color options for the classic towels though, if you prefer a different color.
For a limited time, use the code paper20 at brooklinen.com and you’ll get $20 off orders over $100!
If you made it this far, yay! That’s pretty much it for this little yellow bathroom makeover.
I’ve included the list of sources below isn case I missed anything. If you have any questions, let me know. I’m happy to answer.
Bathroom Sources
Wallpaper // Mirror // Lighting // Shelf (DIY) // White stacked planter // Ceramic brushstroke planter (no longer available) // Leather vase // Super Duper artwork (DIY) // Small abstract painting (artist unknown) // Candle // Looped basket (DIY) // Towels // Flatweave rug


6 comments | Click here to reply
Oooooh, black, white, and this shade of yellow is SOOOO cool together. Just LOVE.
FrancesI am in love with the yellow walls. It brightens up the room so much. I just got my cabinets in my bathroom redone to be white. We decided cabinet refinishing would save us money but now I want to keep updating the bathroom. Thanks for the inspo!
Rachel ClarkeSignificant piece of work, Thank You!!
NipponGreat project! we love a bright, cheery yellow paint in a small bathroom.
ArvadaWonderful project! This Yellow walls are very brightness.
DinaAmazing work!! Looking for more makeovers like this from you.
Gbw