DIY curtain rods that looks good and barely cost any money to make! They truly are the cheapest (but also one of the coolest imo) DIY curtain rod ideas out there.

I got a question about how I made my DIY wood curtain rods, after sharing this guest bedroom / home office makeover. And actually, many people commented about it who came through on the show house tour as well.
I hadn’t thought much about sharing how I made it before because I just threw it together last-minute. But when I was asked about it again, I decided to share a quick tutorial because it is probably the most affordable DIY curtain rod you could possibly have. And I’m all about saving money where you can, especially if it still looks cute / cool in the end.
Have you seen how much curtains rods cost right now? INSANE. The cheapest one I found that looked like decent quality was almost $100! And that was for the smallest size. WHAT?! That’s a lot of money for a stick that holds fabric. Lol.
My curtain rod costs less than $10 to make – even cheaper than the crappiest version you could buy at a discount store. And definitely the cheapest DIY curtain rod I’ve seen so far… When I was researching for this post, I found a site that said they had made the ‘cheapest DIY curtain rods ever’ and the cost was $18. My version is close to half that price….so I guess that makes my project the cheapest curtain rod ever? 😉
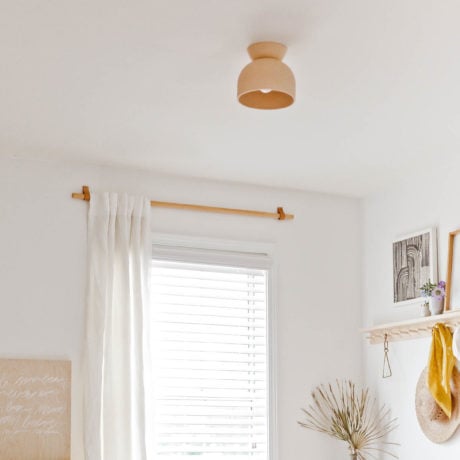
More important than the price though, is that I actually love the simple design, feels minimal and organic. Click through if you’re curious to make your own…

Materials for DIY Wood Curtain Rods
To make your own, you’ll only need a handful of items…
- wooden dowel rod
- leather scraps OR a piece of leather strap (preferably one inch wide – length will vary)
- super fine sandpaper
- level
- hammer and 2 nails
- scissors or sharp blade
- clear coat (optional)
The process is nearly identical to the hanging DIY wall organizer I made a while back. But the measurements are a little different.
So I’ll share everything below just in case.
Steps for Making DIY Curtain Rods (under $10)
Step 1: Choosing a dowel rod.
Choose a dowel rod that is slightly longer than your window. For example, the window in the photo example is 40 inches and I used a 48 inch dowel rod.
You can get round dowels like this in lengths up to 96 inches – like this one I found at Home Depot.
It’s a tiny bit more expensive – almost $10 for a 96 inch piece as opposed to $4, but still very affordable.
48 inches long is the most common length you’ll find in stores though, so keep that in mind.
Step 2: Sanding the dowel.
Sand the dowel rod using a super fine sandpaper to make sure the dowel is as smooth as possible, so the curtain can glide over the rod as easily as possible.
Add a clear coat with a paint brush or rag (if desired). Personally, I skipped the clear coat.
Step 3: Cut the leather.
Cut the leather strips into two equal pieces – you want each piece to wrap fully around the dowel PLUS at least two extra inches on each end.
So, for example, if your leather wraps around the dowel rod in 3 inches, then you’d add 2 inches additional inches on each end, for a total of 7 inches for each strap.
Step 4: Measure and mark off.
Measure where you want the leather straps to be nailed into the wall. Keep in mind that the straps will be nailed in higher than where the curtain itself will rest.
I found it most helpful to thread the curtain onto the rod and then make a mark on the wall from where the rod in on the wall when the curtain is just barely touching the ground below.
Then measure up from there for the nail hole / leather straps.
Step 5: Hammer nail through leather and hang curtain.
Next, you can opt to punch a hole in each piece of leather where your nail will go.
OR skip this step and hammer straight through the leather into the wall.
Hammer the leather into the wall, while the leather straps are attached to the dowel rod. Then thread the curtain onto the dowel rod and thread the curtain rod through the leather straps.
*For heavier curtains, you may need extra support, like using drywall anchors. So keep that in mind. My curtain is very thin and lightweight, so I didn’t have any issues with just using nails.


Customize these Curtain Rods
Another thing I love about this project (aside from the fact that it only takes 15 minutes or so to make) is that you can completely customize the length of these to fit windows that aren’t standard sizes.
For additional customization, you could spray paint the dowel rods a color…or even stain them (the leather can be stained as well, actually).
You could even wrap the dowel rod in gold leaf or metallic vinyl. Lots of options!
What else can I make with wooden dowels like these?
- I used a similar method for creating a DIY wall organizer that turned out pretty cool. And is great for hanging backpacks, hats, coats, handbags, etc.
- My DIY blanket ladder is a great way to store decor items, while looking cute.
- I made wall pegs for our small stairway landing area.
- I often use them for hanging artwork and other wall hangings.
For more DIY wall organizer inspo, here are a few things you might like…
- Made this wall organizer out of canvas drop cloth and have used it in my home office AND also in my son’s room, to store toys.
- Never thought I’d make a bathroom organizer, but honestly, it’s one of my favorite projects to date.
- How to make a giant mood board organizer.
- Recently made this wooden makeup organizer that I also use for storing art supplies.
- And finally, a wooden desk organizer DIY.
Make a DIY Curtain Rod for Less than $10
Equipment
- super fine sandpaper
- level
- hammer
- scissors or sharp blade
Ingredients
- wooden dowel rod
- leather scraps OR a piece of leather strap preferably one inch wide - length will vary
- 2 nails (or 2 screws and drywall anchors)
- clear coat optional
Instructions
Step 1: Choosing a dowel rod.
- Choose a dowel rod that is slightly longer than your window. For example, the window in the photo example is 40 inches and I used a 48 inch dowel rod.
- You can get round dowels like this in lengths up to 96 inches - like this one I found at Home Depot. It's a tiny bit more expensive - about $10 for a 96 inch piece as opposed to $4, but still very affordable.
- 48 inches long is the most common length you'll find in stores though, so keep that in mind.
Step 2: Sanding the dowel.
- Sand the dowel rod using a super fine sandpaper to make sure the dowel is as smooth as possible, so the curtain can glide over the rod as easily as possible. Add a clear coat with a paint brush or rag (if desired). Personally, I skipped the clear coat.
Step 3: Cut the leather.
- Cut the leather strips into two equal pieces - you want each piece to wrap fully around the dowel PLUS at least two extra inches on each end.
- So, for example, if your leather wraps around the dowel rod in 3 inches, then you'd add 2 inches additional inches on each end, for a total of 7 inches for each strap.
Step 4: Measure and mark off.
- Measure where you want the leather straps to be nailed into the wall. Keep in mind that the straps will be nailed in higher than where the curtain itself will rest.
- I found it most helpful to thread the curtain onto the rod and then make a mark on the wall from where the rod in on the wall when the curtain is just barely touching the ground below. Then measure up from there for the nail hole / leather straps.
Step 5: Hammer nail through leather and hang curtain.
- Next, you can opt to punch a hole in each piece of leather where your nail will go. OR skip this step and hammer straight through the leather into the wall.
- Hammer the leather into the wall, while the leather straps are attached to the dowel rod. Then thread the curtain onto the dowel rod and thread the curtain rod through the leather straps.
Notes
I hope your enjoyed my wooden DIY curtain rods as a creative way to update your home decor on a budget. Would you give this project a try in your home?
23 comments | Click here to reply
Hi Daisey! I think I got them from Target, but it was quite a while ago.
Brittni-Brittni
Doing this! Are you able to share where your curtains came from? Thank you.
DaiseyThis is great. Used this for the curtains on my narrowboat as it was going to be too expensive to buy 8 curtain rods.
SandraIt worked a treat and looks great. Wish I could share pictures.
Thanks!
Love this! Where are your curtains from?
Richellethis is very ideal and easy to make. thanks for sharing this.
Landon "Lumber Master" EdgingtonYou’re a genius. I love simple, cheap, and beautiful projects like this! I’ll be doing this one for sure.
Jessica EavesThe best I read till date!!
NipponI can’t wait to try this!
LisaHI! Love this idea! Where are those curtains from?
AshleyThese are beautiful! Do you find that the curtains easily slide open & closed being right against the wall? Are yours back tabs?
KrystleLove this look. Does the dowel ever slide out of the leather strap when you’re pulling the curtains open or closed?
LaurenI love this DIY! Do you have a recommendation for a non-leather material that would work for this??
Lauren[…] how to make a budget-friendly curtain rod (it costs less than $10 to make) 2. DIY clay hair clips from The House that Lars Built 3. how to […]
6 Weekend DIYs to Try - Paper and Stitch[…] around the pillow (one on each side) and nail the loops into the wall. A similar technique to my DIY curtain rod, but with the lumbar pillow instead of the dowel rod and a longer strap / loop of […]
How to Make an Extra Long Lumbar Pillow - Paper and StitchOMGosh, Brittni… this is genius! So easy, so stylish! Going to be putting this idea to use pronto.
BradfordHi Pat. I believe the diameter of this one is 1 inch. And yes, you could add metal eyelets in the leather before adding the nails if desired. I didn’t do that with mine, but it’s definitely an option.
Brittni-Brittni
This is so simple and Lovely! What is the diameter of the dowel? Could you put metal evelets in the leather? I am ready for something different for rods.
PatThanks for sharing this.
Haha. Thanks Angela. 🙂
BrittniGenius! Can you come DIY my whole house?😂
AngelaThanks Chesca. 🙂 Glad to hear it will make it onto your list of DIYs to try.
Brittni-Brittni
One of my other favorite part of your room. Definitely adding this to one of my DIY projects. 😊
ChescaAw thanks Norine!
Brittnithis is beautiful! So simple and clean.
norine