Felt flowers are pretty much as easy as they come, as a beginning craft project. And they’re super versatile too – you can use them for holiday wreaths, decorating packages and gifts, and so much more.
So, if you’ve ever wanted to try a felt project, be sure to check out today’s felt flowers DIY because we’re sharing FIVE different ways to make them. And they’re all as easy as can be.
")
Felt flowers are a really cute for gifting and decorating and can be super fun to make too.
So, I asked Cathy of Catshy Crafts (who makes her own felt flowers and other feet objects quite often for her shop) if she would share her process and different techniques here today.
The process of making easy DIY felt flowers like the five flowers Cathy will show you how to make today is easy enough for even a child (with adult supervision) to help with.
Making this a felt flower craft project that adults and kids can work on together.
How to Make Felt Flowers 5 Ways
Thanks for sharing your felt flower techniques today Cathy! I’ll let her take it from here…
I’ve always loved felt. It’s easy to work with, relatively inexpensive and comes in a rainbow of colors.
One of my favorite things to make out of felt are dimensional flowers.
You can add a dab of hot glue to the back of the flower and attach them to a hair clip or headband for a quick and easy hair accessory. Or use as a gift topper, make a felt flower wreath for cozy home decor, or just give them as is.
I know my daughters can get pretty excited over a few hand-made blossoms. Today, I’ll show you how to make the three kinds of felt flowers (in simple designs) – with 2 additional felt flower tutorial variations for a total of 5 that adorn my yarn-wrapped wreaths.
Once you know the basics, you’ll be creating your own felt flower bouquet in no time.
Materials for Felt Flowers
The best part of making your own felt flowers is the accessibility. All of the materials for these beautiful flowers are easy to find online and locally as well. Love that!
- 9 x 12 felt sheet – Etsy, Amazon, and Michaels have so many different colors to choose from. Local craft stores usually have a pretty decent selection as well.
- sharp pair of scissors and/or rotary blade
- embroidery thread and needle
- pinking shears (optional)
- faux pearl or vintage button (optional)
- pins (optional)
- hot glue gun (optional)
Felt Flowers DIY Ideas
Step-by-step instructions for 5 flower crafts made of felt.
Make different sizes for a more varied look, or keep the design uniform and make them all the same.
")
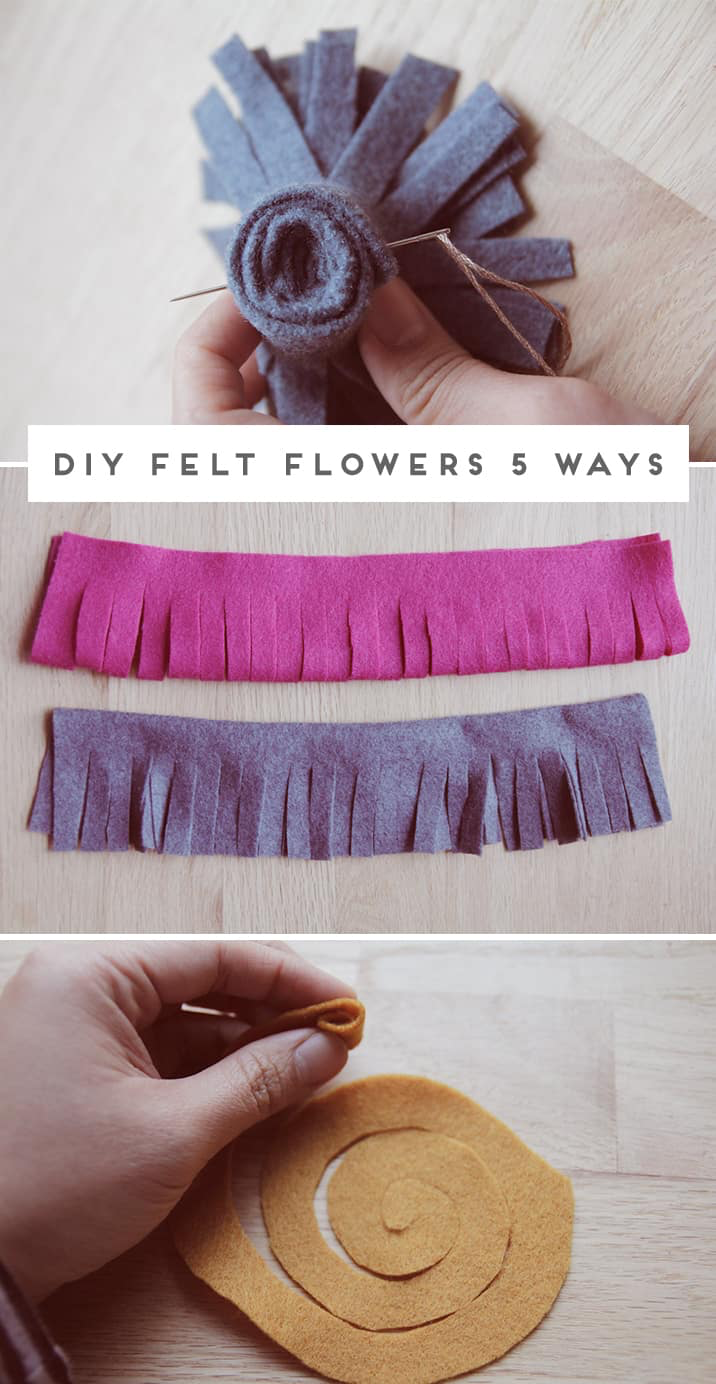
Felt Flowers Idea #1: How to Make Fringed Flowers
Step 1:
To make rolled felt flowers (or fringe flowers), start by folding over over a sheet of felt lengthwise about 2.75 inches. With scissors, trim off excess so that you have a strip about 5.5 inches wide.
This will give you a flower about 3.5 inches in diameter. For smaller flower shapes, make a narrower long strip.
Note: Usually when I am making felt flowers, I do not whip out the ruler, but I wanted to give you measurements for this tutorial. Once you get the hang of it, you probably won’t need a ruler either.
Step 2:
With the strip still folded in half lengthwise, cut your felt on the non-folded side in even intervals about 1/2 away to 3/4 down.
You may want to pin the folded strip before cutting, but I just use my hand to keep the felt folded, sliding it down as I cut.
Be careful not to cut all the way through your felt. The further you cut will determine how “open” your flower will be.
For example, if you cut 3/4 down, you’ll get a more open, floppier flower.
If you cut 1/2 way down, your flower will stay tighter in the bud, so to speak.
Bonus tip: You can also change up how wide or narrow you cut your felt strips for a different look.
")
Step 3:
Starting at one end, snugly roll your fringed strip until you get to the other end.
From there you can peel back the layers of fringe to poof up your flower.
Feel free to give your rolled flower a haircut, trimming fringe that are uneven or too long for your taste.

")
Step 4:
Now it’s time to sew. Thread your embroidery needle with a strand of thread.
Starting at the point where you finished rolling your strip in step 3, push your needle through all the layers of felt.
Turn your flower 90 degrees and repeat, again pushing your needle through all the layers.
In other words, the second stitch should be perpendicular to your first stitch.
This should be enough to secure the flower. If not, make a few more stitches. When you’re ready, tie a knot, snip the excess thread.
")
Step 5 (optional):
Add faux pearl or vintage button to the center of the flower for a little glam.

Felt Flowers Idea #2: Loopy Felt Flowers
Step 1: To get the loopy flowers, the same steps apply as above.
The only difference is that you will cut on the folded side in step 2. See photo for side-by-side comparison.
 finished")
Felt Flowers Idea #3: Rosette Felt Flower
These little guys are one of my favorites to make because they are so easy.
And they look like little felt roses, so what’s not to love?

Step 1: The first step is to cut out a free-form circle of felt about 4 inches in diameter.
No need to be a perfect circle, but if you need a little help you can always use a template (i.e. trace around a jar lid onto paper and cut out).
As before, the measurements do not matter all that much, there are just here to give you a starting point.


Step 2: Starting at any point on the circle, begin cutting a spiral.
I find that it is easier to rotate your felt as you cut, instead of moving your scissors around the felt.
Cut all the way around until you reach the middle of the circle and are left with a little center tab.


Step 3: Pick up the end of the spiral on the outside of the circle and roll snugly until you reach the end of the spiral on the inside of the circle.
The tab I mentioned in step two will rest nicely on the bottom, serving as a little base for your rosette.
Your rosette will end up being about 1 1/2 inches in diameter (compared to the 4 inch circle you started out with).

Step 4: Now, it’s time to sew. Turn your felt flower over. Find that little tab again.
That’s where you will begin sewing, pushing your needle through the tab and picking up a few layers of felt. Repeat, again using the tab as your starting point.
Keep sewing, until all your layers are secure. It usually takes 3 or 4 stitches depending on how big your flower is. If it’s a really big flower, I like to make sure it’s secure by gently pulling on the layers.
If any give way, I just tuck them back in and add another stitch or two. Now that you know the basics, here are a couple variations.
Felt Flowers Idea #4: Wavy Rosette Felt Flower
For this version, you get a fuller flower, with curved, wavy petal shapes (more like real flowers).

Step 1: To start, cut a wavy circular shape instead of the felt circles for previous flowers.
Step 2: Starting at any point, begin cutting a spiral, following the outline of the wavy circle.
Again, I find that it is easier to rotate your felt as you cut, instead of moving your scissors around the felt.
Cut all the way around until you reach the middle of the circle and are left with that little center tab.

Steps 3 and 4 are the same as the standard rosette. Don’t the flower petals look neat like this? Little cuties!
Felt Flowers Idea #5: Pinked Edge Rosette Felt Flower

For this rosette, simply use pinking shears instead of a standard pair of scissors to cut your circle and spiral.
When you’re done with that, try a wavy circle with your pinking shears. Or a loopy flower. You get the picture.
So I hope this will get you started on making your own pretty felt flowers!
")
Can you use a Cricut Maker to for flower crafts like this as well?
Yes! Using a cutting machine, like the Cricut Maker, is a great idea for these types of projects.
There might even be some flower patterns in the Cricut design space already that would get you started.
Something to keep in mind… Thinner and/or stiffer felts would likely be the easiest for the Cricut knife blade to get through.
And once you’ve finished up with any felt projects, I have some other Cricut projects you might want to try as well:
- DIY baby gifts – that utilize a Cricut Maker to cut materials.
- DIY summer accessories to make with a Cricut Maker.
- Mother’s Day Cricut Ideas
- Lastly, DIY holiday ornaments made with the Cricut Maker. #1 and 3 on this list are my absolute favorites.
What else can I make with felt flowers?
Once you know how to make the flowers, there are TONS of ways to use them. And since they’re so much fun to make, you may end with a lot more projects on your hands.
You can make your own felt flower bouquet, create a felt flower arrangement as a gift for mom on Mother’s Day, make wall hangings, gift toppers, etc.

Felt Flowers DIY Ideas
Ingredients
- 9 x 12 sheets of felt - Etsy has lots of great color options*
- scissors
- embroidery thread and needle
- pinking shears optional
- faux pearl or vintage button optional
- pins optional
Instructions
Felt Flowers Idea #1: How to Make Fringed Flowers
- Step 1: Fold over over a sheet of felt lengthwise about 2.75 inches. With scissors, trim off excess so that you have a strip about 5.5 inches wide. This will give you a flower about 3.5 inches in diameter. For smaller flowers, make narrower strips.
- Note: Usually when I am making felt flowers, I do not whip out the ruler, but I wanted to give you measurements for this tutorial. Once you get the hang of it, you probably won't need a ruler either.
- Step 2: With the strip still folded in half lengthwise, cut your felt on the non-folded side in even intervals about 1/2 away to 3/4 down. You may want to pin the folded strip before cutting, but I just use my hand to keep the felt folded, sliding it down as I cut.
- Be careful not to cut all the way through your felt. The further you cut will determine how "open" your flower will be. For example, if you cut 3/4 down, you'll get a more open, floppier flower.
- If you cut 1/2 way down, your flower will stay tighter in the bud, so to speak. Another tip: You can also change up how wide or narrow you cut your felt strips for a different look.
- Step 3: Starting at one end, snugly roll your fringed strip until you get to the other end. From there you can peel back the layers of fringe to poof up your flower. Feel free to give your rolled flower a haircut, trimming fringe that are uneven or too long for your taste.
- Step 4: Now it's time to sew. Thread your embroidery needle with embroidery thread. Starting at the point where you finished rolling your strip in step 3, push your needle through all the layers of felt.
- Turn your flower 90 degrees and repeat, again pushing your needle through all the layers. In other words, the second stitch should be perpendicular to your first stitch.
- This should be enough to secure the flower. If not, make a few more stitches. When you're ready, tie a knot, snip the excess thread.
- Step 5 (optional): Add faux pearl or vintage button to the center for a little glam.
Felt Flowers Idea #2: Loopy Felt Flowers
- Step 1: To get the loopy flowers, the same steps apply as above.
- The only difference is that you will cut on the folded side in step 2. See photo for side-by-side comparison.
Felt Flowers Idea #3: Rosette Felt Flower
- These little guys are one of my favorites to make because they are so easy. And they look like little felt roses, so what's not to love?
- Step 1: Cut out a free-form circle of felt about 4 inches in diameter. No need to be a perfect circle, but if you need a little help you can always use a template (i.e. trace around a jar lid onto paper and cut out).
- As before, the measurements do not matter all that much, there are just here to give you a starting point.
- Step 2: Starting at any point on the circle, begin cutting a spiral. I find that it is easier to rotate your felt as you cut, instead of moving your scissors around the felt.
- Cut all the way around until you reach the middle of the circle and are left with a little center tab.
- Step 3: Pick up the end of the spiral on the outside of the circle and roll snugly until you reach the end of the spiral on the inside of the circle. The tab I mentioned in step two will rest nicely on the bottom, serving as a little base for your rosette.
- Your rosette will end up being about 1 1/2 inches in diameter (compared to the 4 inch circle you started out with).
- Step 4: Now, it's time to sew. Turn your felt flower over. Find that little tab again. That's where you will begin sewing, pushing your needle through the tab and picking up a few layers of felt. Repeat, again using the tab as your starting point.
- Keep sewing, until all your layers are secure. It usually takes 3 or 4 stitches depending on how big your flower is. If it's a really big flower, I like to make sure it's secure by gently pulling on the layers.
- If any give way, I just tuck them back in and add another stitch or two.
- Now that you know the basics, here are a couple variations.
Felt Flowers Idea #4: Wavy Rosette Felt Flower
- For this version, you get a fuller flower, with curved, wavy leaves.
- Step 1: To start, cut a wavy circular shape instead of circle.
- Step 2: Starting at any point, begin cutting a spiral, following the outline of the wavy circle. Again, I find that it is easier to rotate your felt as you cut, instead of moving your scissors around the felt.
- Cut all the way around until you reach the middle of the circle and are left with that little center tab.
- Steps 3 and 4 are the same as the standard rosette.
Felt Flowers Idea #5: Pinked Edge Rosette Felt Flower
- For this rosette, simply use pinking shears instead of a standard pair of scissors to cut your circle and spiral. When you're done with that, try a wavy circle with your pinking shears. Or a loopy flower. You get the picture.
- So I hope this will get you started on making your own pretty felt flowers!
- So which felt flower idea is your favorite? Fringe, loopy, or rosette? And how do you plan to use these little guys for your next craft project? I'd love to hear your thoughts in the comments below.
- For more felt crafts like this one, be sure to check out this idea for using felt sheets as a unique holiday gift wrap.
I hope you enjoyed this tutorial for making beautiful felt flowers. I love easy crafts like this, don’t you?
So which felt flower idea is your favorite? Fringe, loopy, or rosette? And how do you plan to use these little guys for your next flower project? I’d love to hear your thoughts in the comments below.
For more felt crafts like this one, be sure to check out this idea for using felt sheets as a unique holiday gift wrap.
 Cathy, designer and owner of Catshy Crafts, is a crafter at heart, memory keeper for life, and lover of handmade and DIY. Through her hand-crafted goods, photography and paper and digital scrapbooking, she loves to celebrate the everyday and the special days of her life. She lives in a 1959 red rambler in the rainy Pacific Northwest with her indie game developer husband, two darling daughters, and calico cat.
58 comments | Click here to reply
[…] for a way to use any leftover felt from this project? Be sure to check out our DIY felt flowers project to make five different kinds of felt flowers […]
Unique DIY Gift Wrap Idea: Sewn Color Blocked Felt Pouchesmost beautiful rosettes i have ever seen
http://www.feltwasher.comI just adore these flowers! Thanks for sharing!
ConnieThanks for the awesome tutorial! Used it to make some flowers for my wreath and love how they turned out http://modern-mint.com/diy-halloween-yarn-wreath/
Amanda[…] three different colors. Roses, loopy flowers and fringed flowers using this awesome tutorial from Paper & Stitch. I won’t replicate the tutorial but note some of the measurements I used. I chose to do an […]
Ombre Felt Flower Wreath - American Cupcake Life[…] I have to be honest, it took me a while to get these felt rolled flowers to work for me. So, if you fall into the same pit I did, just stick with it! I don’t show you here how to make them, but there are tons of tutorials for them out there already. Here are a couple sites that helped me: Flamingo Toes & Paper & Stitch. […]
Yarn Wreath with Rolled Felt Flowers - This Silly Girl's LifeMy fav is the wavy rosette, but I also love your loopy one. They’re all so creative and cute. Thanks for sharing.
MimiSisI love all these flowers, can’t wait to get me some felt so I can play!
lisa arnett[…] wool and felt wreath. My blog friend Cathy Pascual is a FABULOUS wreath crafter and I followed her felt flower tutorial to create the flowers. Aren’t they pretty? The making of the wreath isn’t hard but a […]
A Tiny Christmas Decor | Savitri Wilder: Crafts Lifestyle TravelDo you make the yarn wreath too? Love it on that and finished my flowers and want to make the wreath. It’s so cute!
SaraThanks so much!!!!!
akkellyThanks for your easy tutorials. I gave you a shout out on my blog when I was successful making felt rosettes after finding your post!
http://undomesticateddabbler.blogspot.ae/2013/10/eid-al-adha-2013.html
NusraI will try to make the rose sets, my fav. Flower is a rose.
JudiLove the wavy rosette! Can’t wait to make so on put on,a fleece hat I made!
Anna[…] promoting handmade artists through her exhibition site. Plus, I was also lucky enough to write a guest blog post for her […]
My Fave Craft Blogs | Catshy CraftsI just accidental
found your site on Etsy and love your idea and can’t wait to try them…xo
Betty HorneIt’s a beautiful wreath and such an easy to follow tutorial. I put it to good use on my own wreath! Thank you so much for sharing!
Melissathanks
sarai lloved them all cant wait to try them myself
bette schlupWhat an awesome tutorial on these flowers. Just sat here and made some- they are wonderful! 🙂
Thanks for sharing
JodiAll of them are FANTASTIC!!! Thanks for sharing!!!!!
Genny@jeremiahhall http://t.co/2Hxn6l85
Nicholas Block (@nmblock)Wonderful tutorial!
Kari - the Sweetest MemoryFelt is the new yarn isnt it!! RT @lynneknowlton: RT – DIY: The Step by Step Guide to Felt Flowers Five Ways http://t.co/LKncOJdP
ThreeWildWomenOttawa (@3wildwomenott)RT – DIY: The Step by Step Guide to Felt Flowers Five Ways http://t.co/AKQNeBxN
Lynne Knowlton (@lynneknowlton)Ya es primavera! Aunque en Madrid no lo parece… http://t.co/yPXEjR9K
Cuento Cuentas (@CuentoCuentas)Really great tute with such easy to follow instructions and pictures! The wreath in the opening shot is beautiful… I want a couple for my front entry 🙂
JaneThank you for the tutorial! My fav is the wavy rosette.
Crystal JeffriesDania — Just saw your question — I use a hot glue gun to attach to the wreath. Because the flowers are so large, I want to use a pretty strong adhesive. I haven’t tried Fabritac or Felt Glue but those might work too.
Cathy Pascualthanks for sharing this wonderful tutorial. Love the beautiful flowers you have created
handicraftpassionlove your simple and yet comprehensive tutorial… I just love the felt flowers
handicraftpassionfreakin’ cool! I love felt for Kids Sewing. They will love this!
Barbara ZClever!
How do you attach the flowers to your wreath? I’m having trouble doing that! I loev the looped ones best!
daniaThanks Sierra and Sarah! I’m so glad you are all enjoying the tutorial.
CathyI love that looped one! So pretty! Have plans in mind to make a statement necklace so will give it a go!
Sarah AdieI love that looped one! So pretty! Have plans in mind to make a statement necklace so will give it a go!
Sarah AdieI like the loopy one but the rosette is a very close second
SierraThanks Corrine!
I used craft felt from Joanns or Michaels, but I am experiments with wool felt and wool blend. I ordered a bunch from Etsy. I’ll let you know how I like it!
Marlene — Thanks! I have more on the way!
Cathy Pascualyou rock. your tutiroals are the BEST!!!!
marleneTerrific post / tutorial, Cathy!!! I can’t wait to try it!! Do you recommend a brand of felt?
CorinneThanks Kristina!
BTW, I just posted a few pics showing the felt flower as a gift topper as some of you suggested! You can check it out on my blog. Thanks!
Cathy PascualGreat tutorial! Thanx so much for sharing.
KristinaThanks nsharin for the feedback! Wavy rosettes are one of my faves too!
Cathy PascualSarah — Thanks for your comment! I use craft felt from the big box craft stores like Joann or Michaels. But I would also love to experiment with 100% wool felt soon. Hope that helps!
Cathy Pascualwavy rosette is my fav!! these flowers look great and your tutorial explained everything, I am excited to give it a try!
nsharinI love all of these felt flowers and plan to try them in January!
SarahCan you tell me a good source for felt? There is none available in pretty colors where I live.
Thanks…
[…] just came across this wonderful tutorial on felted flowers on lovely blog I just discovered called Papernstick and just had to share it with you. I have three variations here and if you want to see more, you […]
Make These Felted Flowers! | Bellissima Kidsthank you! i love all of these.. they look so good together!
jonahlizaAnother great idea, Lu. I love hearing what everyone would do with their little felt flowers!
Cathy PascualLet me check if I have some fabric at hand. I will definite try some and put them on my little one’s clothes!
LuThank you for your sharing!
Jeanee – I love the loopy one too!
Cathy PascualAnn – great idea!
Oh wow, makes great “ribbons” for presents this Christmas!
Ann JeffersonLoopy!
JeaneeThanks Robin, Tute-bot and Erin!
And I hope you do make them Brittni 🙂 (And thanks again for letting me guest-post on the pns blog today! )
-cathy
Cathy Pascualthese are great! the assortment works so well together with your color choices! can’t wait to try this!
erinI totally agree tute-bot. That’s why I thought it was perfect to put this up right before Christmas. I have never wanted to make felt flowers more than I do right now. I am so pleased that Cathy shared this with papernstitch.
papernstitch-Brittni
Love these tutorials! These flowers would also be great for decorating presents.
tute-botI LOVE THIS! So clever!
Robin Hanning